


External storage not showing up is among the most common issues faced by users worldwide. If you want to know how to fix the reissue, then you have landed on the right website. In this article, we will cover what to do when a USB storage is not identified on the PC. This issue can be frustrating since you can’t read and write the files stored in the external drive. Let’s solve this problem by using various methods one by one.

Step 1: Looking for the Connected External Drive in Disk Management
Follow the provided instructions to check if the drive is showing up in the disk management of your computer:
- Plugin the storage USB drive to the computer.
- Now right-click on the Computer icon and then choose the Manage option.
- Once the program appears, simply click on the Disk Management option located on the right side menu.
- You can also open the same window with the help of the RUN dialogue box by typing “diskmgmt.msc”.
- Once the Disk Management utility appears, you can see all storage connected to your computer, whether it is an externals storage or internal.
- Now look for the external drive that you have connected to your computer. The drive would appear beneath the primary disk partitions of your computer.
- If your drive doesn’t show up there then, move to the lower part of the utility in the Removable drives.
- It should appear at least there if everything is fine with the hardware.
If your drive is not there, then it might be possible that your removable drive is facing hardware issues. A faulty connector cable can also be the reason for the same.
Step 2: Connect the Device with Another USB Port
The problem could be the USB port that you are using to connect the drive. A malfunctioning USB port will not allow your PC to detect the connected device. You can try to test the disk by connecting with different USB ports. If that works, then perfect, otherwise you can try to plug the hard drive to the backside USB ports. The back panel of your PC contains menu USB ports; you can insert the USB storage drive to any of them.
Step 3: Troubleshoot the Driver Issues
If the drive is working with other devices or computers, then the problem could be missing or outdated drivers. You need to install new drivers to the PC for USB external drive that you are using. Follow the below instructions to fix the issue:
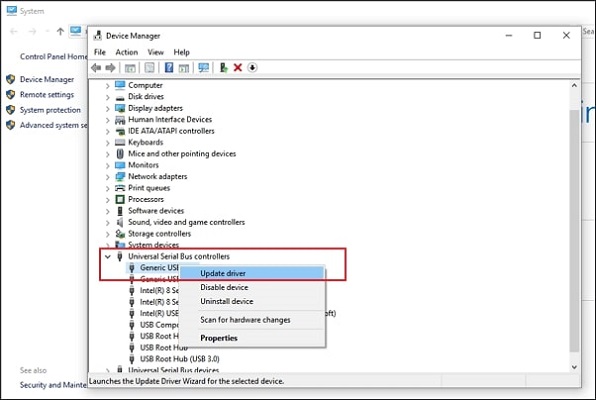
- Press Start + X keys together and then choose the Device Manager option from the triggered menu.
- You can also use an alternate method to open the Device Manager window. Open the Run Dialogue box and then enter “devmgmt.msc” followed by the Ok button.
- Once the Device Manager triggers, go to the Disk drives option from the left navigation menu.
- Once the Disk Drives option expands, If you see any disk with a yellow caution mark, then it means your computer is missing essential drivers for that specific device.
- If you see any disk with that yellow mark, then right-click on that drive.
- Now choose the Properties option to trigger the properties option.
- There should be an error message, this is crucial to solving the whole driver problem.
- To solve that error, search for it on Google, you will surely find the solution.
- If the problem started a few days ago, then you can restore your system to the previous point.
- If that doesn’t work, then simply head to the Update Driver button located in the properties of the drive. That will automatically install the updates for the external drive.
- Now, if the issue is still unresolved, then go to the Properties of the external drive in the Device Manager and then uninstall the drivers.
- Once that is done, restart the pc and connect the device again.
Step 4: Making New Partition Volumes
If the external drive is showing up in the disk management wizard, then it is now time to create the volumes using the external drive. By doing so, your drive will become usable because without creating volumes, the external drive space becomes unallocated or unusable. To do that, follow the below steps:
- Check within the removable drives for a term like “unallocated.” If the Device Manager shows all of the space unallocated, then right-click on the external drive.
- Now choose the New Simple Volume option.
- After that, use the recommended size for the new volumes.
- Follow the on-screen instructions to create the new volume.
Once the new volume is created successfully, you are ready to store your precious data into the drive.
John Smith is an avid technical blogger, a magazine contributor, a publisher of guides at mcafee.com/activate, and a professional cyber security analyst. Through her writing, she aims to educate people about the dangers and threats lurking in the digital world.


