


Amazon Fire Tablets were previously known as Kindle Fire; it’s a Tablet-based computer introduced by Amazon that comes with a microSD card with “Quanta Computer” technology.
It has built-in “Amazon Appstore,” including the feature of “e-books” and the AppStore is used to stream or play TV shows and various movies and programs.
Sometimes Tablet like “Amazon Fire” faces issues and battery not charging is one of them. It is a very aggravating issue but it can be fixed.
Here is how to troubleshoot battery issues on your Fire tablet. You have to follow these steps to know the troubleshooting steps:
Checking Reasonable Issue on Amazon Fire
There might be numerous reasons for this issue of battery, not charging. The most possible reasons are mentioned below:
- There might be a software or configuration issue.
- Your Tablet’s battery is damaged.
- There may be an issue with your charging cord or adapter itself.
- The last one only applicable in the case of “Amazon Fire Tablet” is that your device’s charging port or jack is damaged.
Continue this blog to know how to detect the right cause and their troubleshooting tips:
Checking Outlet
Before going further, it is recommended to check that your outlet cable is capable of transferring power to the Tablet. Test it to make sure that it is running well on your device and charging port.
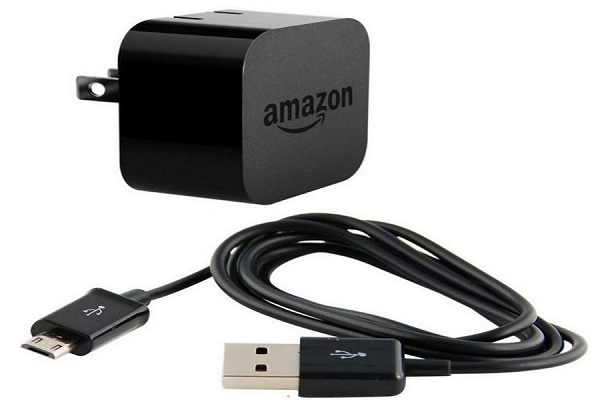
Checking Charging Adapter
If you have already tried the above steps and are still facing the same charging issues, then you should check your charging adapter. It is likely that the charging cord is not carrying appropriate power to your Tablet as it requires a minimum of five volts at 1.8 amperes. To test your adapter, you can connect your Tablet with PC using charging cable, and if your Amazon Fire is charging smoothly, then it’s the issue of your adapter.
Note: Your charging adapter may display these types of issues if the USB cable supplies below the required amount of power to charge it. It may behave badly or charge slowly and even not.
In case you found that the real cause if your adapter, then replace it with the new one by visiting Amazon store online or in person.
Checking Charging Cable
Now, we have to test the charging cord or USB cable of your charger because an adapter is incomplete without its cable. If you think that the main issue of the charging is the USB cable, then it needs to be checked. To do this, follow these instructions:
- First of all, you have to swap your charging cable either by borrowing it or from your friend. You can take or another gadget’s cable, just like the handheld device.
- Then try to charge your Tablet, if it charges smoothly, then it’s the main cause behind your charging issues.
- In this case, it is recommended to replace a new USB cable to get your Amazon Fire Tablet charged.
Resetting “Amazon Fire”
Rebooting a device enhances the performance, along with fixing various issues like minor glitches and bugs. If the battery issue is due to the existing software, then it is advised to perform full reset activity on your Kindle Fire.
To run full reset function on your device, follow these steps:
- First of all, tap and press the Power tab for about twenty seconds so that the device turned to “OFF.”
- Then, again turn your Fire to “ON.”
Note: This process shuts all the applications and programs running in the background to ensure proper power supply for fast charging.
Factory Resetting on Amazon Fire
The method of factory reset is considered the last option to fix any glitches as it takes your device to the default settings mode by wiping all data from it. Some users found it useful so that you can use this feature.
Follow these steps to perform factory reset operation:
- First of all, before continuing with this method, it is recommended to take a full backup of all your data for recovery as it will be wiped completely.
- Then, navigate to the menu icon by swiping your device’s home screen.
- After that, tap on “Settings” and then hit the “Device” option there.
- Now, tap on the “Reset to Factory Defaults” option.
- Next, hit the “Reset” tab once more in order to provide confirmation.
After performing the steps mentioned above, you have to reload your system programs and software to get surety that your device is performing in the recent edition. To do so, follow these instructions:
- First of all, tap and hold power and upper volume buttons simultaneously for nearly forty seconds.
- Then, release your fingers from the power tab but keep the volume button pressed until you view the option for installing updated software over your device.
- Now, permit to install the latest update of the particular software.
- Finally, tap the restart tab to perform rebooting.
John Smith is a technology enthusiast who loves writing about new advancements and IT threats on a regular basis. Her work focuses on the latest advancements in the realm of technology, social media, and cyber security at norton.com/setup.


Enabling or disabling the lock screen mode on computers is much different as compared to doing it on smartphones and tablets.
We usually enable the lock screen on our devices to prevent the chances of accidental unlocks.
But, sometimes, it may not be as useful as it seems, as we can see in the case of Windows 10 where it only takes a swipe or just a click to unlock your screen.
So, in that case, it’s better to disable the feature.
It includes some simple steps to follow.
Take a look below:The Steps to Remove the Screen Lock on Windows 10Follow the steps mentioned below to complete the procedure of disabling screen lock in Windows 10:Firstly, you need to search for “Regedit” on your computer.

The Iceborne is the next part of the Monster Hunter: World series.
Glavenus is the first version of those monsters in Iceborne.
This creature is like the Tyrannosaurus (shape-wise), with an extremely sharp tail.
So if you are struggling with it and wants some tips, follow the article:Behaviour of Glavenus This monster has an unmatchable power, and its hyper-aggressive nature(works like the cherry on the top of the cake) makes this character unstoppable against any opponent.
These abilities are more than enough to make a gymnastic jealous.Tips and Tricks to Use in the Combat Against Glavenus The main attacks of the Glavenus are performed with a sharp tail.
The main move of Glavenus that many face difficulty in dealing with is called “Charged Spin.” When it sharpen its tail, then you have to make sure that you are at some distance or dive toward its left leg (by in the perfect time dive).


Silent Hill is one of those horror games that have the potential to stay evergreen and are doing a pretty good job till now.
In the multiple additions of the franchise the game has not been felt repetitive and is one of the big names in the genre of survival horror.
Silent Hill is filled with monsters that represent the deepest fears, regrets, and traumas of those who are unfortunate enough to be trapped inside.
These monsters have not only terrified every player out there but have also kept the thrill alive in the games even after so many years.
Because of the constantly changing protagonists and the different themes of each Silent Hill, their appearances are different in most Silent Hill titles.
These nurses can be effective and dangerous in groups as they can gang up on the player.Unlike all the other monsters in the game, the nurses do not stem from the memories and horrors of the protagonist but are rather based on the traumas and memories of Alessa.

Over the years, Apple has provided numerous useful apps, and Siri tops them all.
In fact, it lets you call, mail, or text someone without even touching your phone.
Follow the blog and text, call, or mail someone using Siri.Source:-How to Message, Email, and Call Contacts through Siri?Set up Contact Relationship with SiriIn case you intend to set up a contact relationship with Siri, then go through the below-mentioned steps.You should long-press the Power button or Home button or say ‘Hey Siri.’You have to tell Siri about the relationship you would like to set up.Then say or select Yes if Siri asks you to verify the relationship.Thereafter, Siri will verify that the contact card’s relationship has been added.Add Relationship Data via Contacts Application ManuallyIf you would like to add relationship data via contact application manually, then abide by the given steps.You have to open the Contacts application on your system.Alternatively, you can open Phone and then choose the Contacts button.Go to the contact card.You should select Edit within the upper side of the screen.Move down then select the Add Related Name.You have to choose a relation type.Select relation you would like to use or Add Custom Label.You should select an information icon near to Related Name.Go to the contact.You should click on the Done within the top right-hand side of the screen.Get Contact Detail using SiriIn case you intend to get contact detail using Siri, then go through the below-mentioned steps.You should long press down the Power button or Home button to activate Siri or just say ‘Hey Siri.’You have to tell Siri contact detail you would like to see.When you have several people in the contacts with a similar name, Siri will verify the one you would like to get the detail for.Call Contact using Siri.If you would like to call a contact using Siri, then abide by the given steps.Long press Power button or Home button to activate Siri on iPhone X and newer or just say ‘Hey Siri.’You should tell Siri about who you would like to call.When you wouldn’t like to identify number you would like to, and contact has some phone numbers related to them, Siri will verify if you intend to call.After receiving the command, Siri will make the call right away.Send iMessage or an SMS using Siri.In case you intend to send iMessage or an SMS using Siri, go through the below-mentioned steps.To activate Siri by long-press the Power button or Home button or just say ‘Hey Siri.’You have to tell Siri who to send the message.
Ensure that you say the relationship or person’s name you would like to add.Then tell Siri what you would like to contain within the message.You should say or tap Send if Siri says to verify the message before it’s sent.When you create a mistake, just say ‘Change it’ to re-dictate the message.Now, when you don’t wish to send a message to everyone, just say Cancel if Siri wishes to verify.Send an Email with SiriIf you would like to send an email with Siri, then abide by the given steps.Long press the Power button or Home button to activating Siri or just say ‘Hey Siri.’Tell Siri about you would like to send an email.When a recipient has one or more email IDs on their contact card, Siri will request you that one you wish to use.Go to the email and tell Siri about the subject.Navigate to the email and tell Siri about the content.When you are happy with email, say or tap Send to verify and send it.Siri Look at and Play the Voicemail Message In case you intend to Siri look at and play the voicemail message, go through the below-mentioned steps.To activate Siri by long-press the Power button or Home button or just say ‘Hey Siri.’You should tell Siri to check the voicemails by saying anything along the lines of ‘Do I have any voicemails?When you have a voicemail, Siri will show them on display.Say Yes if Siri tells you when you would like to play the newest voicemail, or you should be able to tap it.Also, you should be able to tell Siri to ‘Play my voicemail message.’After hearing a message of voicemail, you should be able to tell ‘Call back,’ ‘Play the message again’ or ‘Play the next one.’Check the Phone Call History with SiriIf you would like to check the phone call history with Siri, then abide by the given steps.Long press the Power or Home button to activate Siri or just say ‘Hey Siri.’Tell Siri to ‘Check my recent calls’ or ‘Check my call history.’Siri will tell you about the most current calls, beginning with the latest, in groups of 3 at once.Now, when you would like to call anyone back, just say something as ‘call Papa back.’Harry Martin is a technology enthusiast who loves writing about new advancements and IT threats on a regular basis.
Her work focuses on the latest advancements in the realm of technology, social media, and cybersecurity at norton.com/setup.

Norton.com/setup: Get full safety to your device and data with Norton setup.
Login at www.norton.com/setup, and download, install, and activate your product.Read more - https://broad-blogs.com/norton-setup/


