


VirtualBox is a free open-source hosted hypervisor and a free application developed by Oracle and is the creation of “Innotek.” It can run on almost Operating Systems such as macOS, Windows, Open-Solaris, and Linux, etc. It helps the users to manage and the creation of various virtual machines as a guest. It also includes guest addition setups for system applications and device drivers.
VirtualBox VM is effortless to set up and install on Mac or any other OS. You can use this program for various purposes, such as code testing, file recovery, and for experimental fun. It can run on all the OS even with the Windows OS 3.1.
Here, we are going to guide you on how to install VirtualBox on your Mac device with some easy and compatible procedures:
Easy Method to Install VirtualBox on Mac
- In the beginning, get the recently updated edition of VirtualBox downloaded on your Mac device. To do so, press the option “OS X Hosts” and wait for some time. The system will initiate the downloading process.
- Next, launch the fresh DMG file and look for the option “VirtualBox.pkg” and double click on it to launch the installer.
- Note: Users may take the help of the available User Manual available here as well as the “Uninstall” tool.
- Hit the “Continue” tab to proceed.
- In case you wish to change the installing location of VirtualBox, then hit the option “Change Install Location.”
- When all the adjustment is properly carried out, then tap on Install. If the system asks for the passcode, then enter the same and then proceed with the on-display instructions.
- It is recommended to give your permission to the device for installing programs via Oracle otherwise;, the program may crash at the stage of installation. For granting access permission, pursue these guidelines:
- Navigate to the uppermost right-hand side section and hit the search icon there.
- Then, insert the keywords “Security,” followed by the Enter key.
- Or
- Hit the Applications tab and then hit the System Preferences option there.
- Now, hit the Security & Privacy option.
- Go to the lowermost portion of the tab “General” and then look for the text options related to the blockage of Oracle America and associated options.
- Then, hit the “Allow” tab there.
- After that, tap on the “Reinstall” button.
Note: These options will remain up to thirty minutes only just after installing “VirtualBox.” In case you are unable to see the same, then hit the Applications folder to expand and drag the icon resembles VirtualBox towards Trash bin for the un-installation procedure.
- Delete the entire file and data that is left behind on your screen. Then, try to install the fresh copy of VirtualBox there.
- Now, reopen the menu “Privacy and Security” to view the option.
- Then, you will see that your VirtualBox has been installed successfully.
- Press the Close tab and drag the installation file to the trash as you won’t need the file anymore.
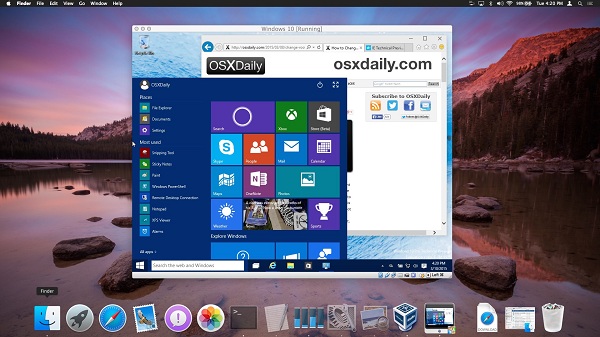
Easy Method to Install Windows 10 on Your VirtualBox
Once you have successfully installed VirtualBox on your Mac device, it’s time to install Windows 10 on VirtualBox. To do so, pursue the under-mentioned instructions:
- First and foremost, launch your Virtual Box. (You can use Applications folder or Spotlight search for the same.)
- Hit the New tab in VirtualBox.
- Now, assign a name to your OS as you wish. Don’t insert the existing name such as Windows 10; otherwise, the system automatically jumps to that Operating System. For storing your VM, you can select a different machine folder.
- Once done, tap on Continue.
- In the next window, select the amount of RAM that you wish to assign to the Virtual Machine. Don’t allocate too much memory as it decreases the storage space for your Mac.
- Then, hit the Continue tab to proceed.
- Now, hit on Create related to the option for creating Virtual Hard Disk. Here you have to decide the size of your VM’s hard disk.
- Next, select the hard disk type and hit the VHD related option as you are running on MS product.
- Then, tap on Continue.
- In case you wish for quicker performance, then hit the option “Fixed Size” and tap on “Dynamically Allocated” if you need frequent setup operation.
- Finally, tap on the Continue option there.
- Now, press on Create and the VirtualBox will search for the relevant location for the installation setup.
Now, let your VirtualBox search for ISO file on your Windows 10 automatically to run VM. If it is not doing on its own, then do it manually:
- Hit the folder with a green arrow.
- Tap on Add.
- Choose the “ISO” related file and hit the option “Open.”
- Finally, press the Start tab.
John Smith is a creative person who has been writing blogs and articles about cybersecurity. He writes about the latest updates regarding mcafee.com/activate and how it can improve the work experience of users. His articles have been published in many popular e-magazines, blogs, and websites.
Source:- https://geomcafee.com/blog/how-to-install-windows-10-virtualbox-vm-on-macos/


Google Meet is one of the best video meeting applications for all device platforms.
However, if you would like to download it on the Amazon Fire Tablet, then you will be uncertain block because this application is a part of the package of Google that is unavailable on the App store of Amazon.
So, if you would like to know how to use Google Meet on the Amazon Fire Tablet, then here are the instructions given below.Turn on Downloading Applications via Unknown SourcesIf the users are attempting to turn on the downloading applications via unknown sources, then they should correctly employ the given instructions.Firstly, you have to reach the home screen and pull the notification bar on the tablet.After that, go to the Settings option and select it.Then choose the “Security and Privacy” menu.You should switch the toggle of “Apps from Unknown Sources” to enable it.This action will permit the device to download the applications via sources external to the Google Play Store.Download Apk File of Google Play StoreIf you would like to download the apk file of Google Play Store, then you can determine to pursue the directions given below.You should launch the Settings application once again.After that, select the ‘Device Options’ additional lower the menu.Then choose the “System Updates” option to view that Fire IS launches on the device.Finally, you require to download the compulsory APK’s.Browse the Site for the Suitable Version of the Pursuing APK Files in the Sort Given Below:Google Play StoreGoogle Services FrameworkGoogle Account ManagerGoogle Play ServicesInstall the APK’sIf the users are attempting to install the APK’s, then they should correctly employ the given instructions.You should launch the ‘Docs’ application within the application menu.After that, select the ‘more’ option at the upper left-hand side of the window.Then tap on the ‘Download’ option.Now, go to the ‘Local Storage’ section.Download Google Hangouts MeetIf you would like to download Google Hangouts Meet, then you can determine to pursue the directions given below.Firstly, launch the application of Google Play Store on your device.After that, reach the search bar and input ‘Hangouts Meet’.You should access the application menu.Now, tap on the ‘Install’ button.Then wait for the application to install.Once you have done, you will view the button Hangouts Meet in the application menu.Rdx Tango is an avid technical blogger, a magazine contributor, a publisher of guides at mcafee.com/activate, and a professional cyber security analyst.
Through her writing, she aims to educate people about the dangers and threats lurking in the digital world.Source:- How to use Google Meet on the Amazon Fire Tablet?

The American comic writer Jason Aaron recommends that Dario Agger could be a great role for star Christian Bale in the forthcoming Thor Love and Thunder.
It is just his opinion that Dario Agger will be a perfect character for Bale due to a few reasons for the next Thor sequel.
There he founds a mysterious idol, and then he prayed before it for granting powers to punish his enemies and take revenge.
Then he successfully gains the superhuman powers, including superhuman strength and tolerance, along with the ability to become a giant.
He can become a giant Minotaur.
He also joins Laufey, the leader of the Frost Giants.

As it is a speaker, you can hear music wherever you want in your house, whether you are in the kitchen or bedroom or anywhere else.
Smart pairing with a speaker can help you experience multiple convenient things.
Apple added multiple features in the HomePod to make it one of the best speaker devices, they succeeded in most of the cases.
You can put any particular name of your HomePod without any restrictions.Before starting, you need to download and install the Home application.Now you need to “Long-press” and hold the HomePod in question.Then click on the “Settings” icon on the right-bottom side.Click on the name of the top bar and then mention your HomePod name.That is how you can customize any name for your HomePod easily.Transfer Playing Music On HomePod or Any Other DeviceTransferring media playing is a great feature in HomePod, and to do it, you just need to follow a simple step.
You can basically “Hold” your iPhone device above the HomePod device, which is a touch interface.
In the same way, you can do a reverse thing like you are playing on HomePod and transfer to the iPhone device by just holding the device.Use HomePod to Find Music, Podcasts and Siri ControlSiri is intelligent, and with its intelligence, you can find music easily.

The move taken by the company has made it difficult for the employees to choose between the provided options.Amazon has given its employees unpaid leave in unpaid leave due to the lockdown imposed by the government amidst the ongoing health outbreak.
The unpaid leave was given to the workers so they could save their jobs if not able to return to work amidst the current situation.
The company said that its policies are flexible regarding the leave absence, which also includes expanding the leaves amid the ongoing circumstances if the individual is at high risk.According to the spokeswoman of the largest retailer, it has been said that both full time and part-time employees will be eligible to request for leave.
The company has said that it is committed to serving its customers and community incredibly in all circumstances.The company earlier extended the policy of the increased hourly pay along with extending its plan to pay its employees in the USA and Canada double overtime.
Meanwhile, some of the employees have a complaint that the company is taking proper care of their health issues.
Many of the employees working at warehouses all across the USA choose to stay at home due to the fear of catching the disease to them.

The next semi-annual update for Windows 10 is set to be released on November 2019.
This means that the compatible devices will be slowly getting a small set of brand new functions and updates.
Like the previous Windows updates, it is going to be optional, so it is up to you whether or not you wish to update.
Here are the steps for delaying the Windows 10 November 2019 update while still getting updates.
Source:- How to Delay the Windows 10 November 2019 Update While Still Getting Updates, Mcafee.com/activateDelaying the Windows 10 November 2019 UpdateFirst of all, you have to launch Settings on your device.Then you should select Update and Security option.You have to go to the Windows Update.Thereafter you should select the Schedule the restart link.Beneath the “Schedule a time” field, switch the toggle to the “on” position.Now, choose the time along with the day your computer will reboot automatically to complete the installation.Pausing the Downloads for Windows 10 Feature UpdateGet started by going to the Settings on your device.Then you should select the Update and Security option.You have to navigate to the Windows Update option.Thereafter you should click on the Advanced options.Select the deferral time.Deferring the Windows 10 November 2019 UpdateTo get started, go to the Settings on your device.After that, you should select the Update & Security option.Then you have to choose the Windows Update.Later, navigate to the Advanced options link.Now, beneath the “Choose when updates are installed” field, select the levelBlocking the Windows 10 November 2019 UpdateFirst, you have to launch the Settings on your device.After that, you should select the Network and Internet option.Go to the Wi-Fi.
Or else, select Ethernet.Later, choose the network name.You should switch the toggle of “Metered connection” to the “on” position.Select the Home tab in the upper left-hand side of the screen.Choose Update & Security option.You have to select Windows Update.Navigate to the Advanced options link.Now, beneath the “Update options” field, switch the toggle of “Automatically updates, even over metered data connections” to the “Off” position.John Smith is an avid technical blogger, a magazine contributor, a publisher of guides at mcafee.com/activate, and a professional cyber security analyst.

The TFTP Server offers you the best service to share your files between PCs that are associated over the network.
TFTP is the internet software tool that you should apply to receive or send the file via a remote system.
The protocol does not give additional security for files that being are shared.
If you would like to know how to set up the TFTP server on Windows 10?
Here are the directions are given below.Sources :- TFTP Server on Windows 10 , Mcafee.com/activateConfigure TFTP ServerFirstly, perform the tool of ‘SolarWinds TFTP Server’ by pursuing to the Windows Menu and browsing for the TFTP Server.When its loading up, select the File option and choose the Configure option.In case you would like to the server the show in the System Tray of Windows, select the option of ‘Add TFTP Server to Windows System Tray.’Thereafter, you will select the option of ‘Server Root Directory.’ It is wherever each received file will be stored.Even whether you would like to transfer over a few files, you will copy the files to the directory first.Even whether you would like to transfer over a few files, you will copy the files to the directory first.You should choose the Browse option and select the location of choice.Then, move to the section of Security to save some restrictions.In case you would like to transfer files and choose the Send files option.If you would like to get the files, choose ‘Receive files’ option.Don’t forget to mark the box of ‘Send and Receive files.’Thereafter, input the IP addresses range and select the OK button.Now, select the OK button to shut the configuration screen.Install TFTP ClientNavigate to the Windows menu then launch Control Panel.Thereafter, reach the Programs and Features option and choose the ‘Turn Windows features on or off’ option at the left side panel.You should move down and find the TFTP Client.Then mark the box.Go to the OK button to install the client.Now, you have to wait to finish the process.Configure Firewall to Permit TFTPReach the Windows menu and launch Control Panel.Afterward, modify View by to Large Icons then choose the ‘Windows Defender Firewall’ option.To disable the Windows Defender Firewall beneath both settings.Then choose the OK button.You should select the ‘Allow another app’ then select the Browse option.After that, browse for the ‘TFTP.exe’ in the directory of the Windows system32.Choose and select the Open option.Now, mark both boxes of Public and Private and then choose the OK button.Abigail Smith is an inventive person who has been doing intensive research in particular topics and writing blogs and articles on mcafee.com/activate and many other related topics.
He is a very knowledgeable person with lots of experience.


