QuickBooks Desktop and Online both are considered as most efficient applications managing online banking and payroll for the employees. However, errors are also a part of the application especially if it is an large application like QuickBooks. One error that interrupts the online banking other related features of QuickBooks application is QuickBooks error 248. The best shot to resolve the error is to verify the internet connection settings under the Internet Explorer on your Windows computer. Users can also acquire direct assistance from technical experts at TFN (844)-932-1139.

In this post, we will discuss Windows files and folders that you can delete and why you may want to remove them.
You can also go clear up space by going to Settings (press Windows and I key together)
On the Settings page, click System and then from the left pane, navigate and click Storage.
Before deleting all the files and folders, you can check if you have any important file worth restoring, click Restore.
The Rempl folder consists of various small files and a few Task Manager processes are connected to it as well.
You can delete Rempl folder and there are no side effects to it.

(Last Updated On: December 21, 2018)
9c59 Error Code Description :
When you try to install Windows Internet Explorer 11, the installation may fail and generate an error message.
This can occur for various reasons
Checklist before you install Internet Explorer 11:
To successfully install Internet Explorer 11, make sure that your system meets one of the following minimum operating system requirements:

There are many reasons behind this, but it can be easily fixed.
Let’s see how.Here’s How to Fix Internet Explorer Won’t OpenSource : http://retailcard-activation.com/how-to-fix-internet-explorer-wont-open-issue/• Common Fixes When Internet Explorer Not Opening1.
Choose the Task Manager option.3.
Find the Internet Explorer browser by going to the Processes option.4.
Go down to the Web browser column.8.
Choose the Internet Explorer as your default browser in case it is not set as default browser yet.9.

Did you know that if you turn off the Add-ons on Internet Explorer and configure your Windows Firewall Settings appropriately, you could get rid of the QuickBooks Script Error?
Let us explain this better in our blog here.
Alternatively, we are also available on call.
Contact the experts at 1-800-579-9430.

If you would like to cast your laptop to the TV through the network connection, it is a very simple task on Windows 10.
But not everyone achieves favorable results.
So, if you are facing some issues, then here are the instructions to help you with the same.Sources :- Fix Internet Explorer Has Stopped Working , Bloggers-newsUpgrade Network DriversThe first step to fix the cast to device not working issue is by updating all your network drivers.
Here’s how you can do it:Firstly, you have to invoke the Device Manager on your device.After that, go to the Start Menu and right-click on it.Choose the Device Manager on the menu.Then right-click on the Network adapters that the network is linked to.You should select the Update Driver option.Go to the dialogue section that launches asking whether you would like to browse automatically or check locally for the newest drivers, pick the ‘Search Automatically’ option.Once the pop-up appears, enter the needed details.After you complete the installation, restart the system and check whether you are capable of repairing the issue of ‘Cast to Device not working.’Enable Network DiscoveryIf you wish to try the enable network discovery, here are the steps for it:Hold the Windows and I buttons together on your keyboard to invoke the Windows Settings.After that, select the ‘Network and Internet’ option present beneath the Settings.You should choose the ‘Network and Sharing Centre’ option.Then select the option of ‘Change advanced sharing settings’ on the left side panel.Don’t forget to select the ‘Turn on network discovery’ option and close any open screens that have these settings.Now, try ‘Cast to Device’ then check whether you are capable of repairing ‘Cast to Device not working in Windows 10’ error.Check for Windows UpdateUsers can try updating their Windows to resolve this issue.
Here are the steps to do that:Hold the Windows and I buttons together on the keyboard to invoke the Windows Settings.Thereafter, select the Update and Security option.You should click on the Windows Update option on the left side.Select the button of ‘Check for updates’ to look for any available and latest updates.In case any upgrades are pending, then you can select the ‘Download & Install updates’ option.Now, after downloading the updates, install them.Check Streaming ChoicesIf there is an issue with your streaming channel, you can fix it in the following ways:Hold the Windows and S keys both together on your keyboard to invoke the Search section.After that, select the option of Windows Media Player through the search results.You should select the ‘Stream menu’ button at the upper left side of the screen.Select ‘more streaming options.’Don’t forget to choose the right network.Remember to grant permissions to access each library for streaming.Now, store the settings and check whether you are capable of repairing the error.ConclusionThis article will help you find the cast’s issue to the device not working on Windows 10.
We hope that the above tips can help you overcome the issue!Abigail Smith is an inventive person who has been doing intensive research in particular topics and writing blogs and articles on Bloggers-news and many other related topics.
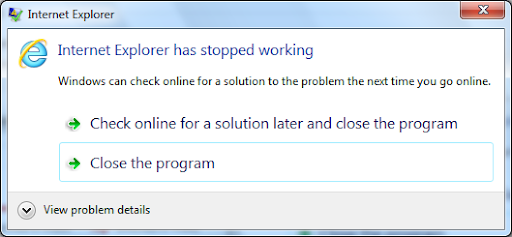
Isn’t it irritating when you are using your web browser and it suddenly stops working?
Internet Explorer users often encounter this problem.
However, the issue can be easily resolved without installing a new browser.
Follow the solutions mentioned below.Reset the Internet Explorer through Control PanelGo to the Control Panel and reset your browser.
Here are the steps that you need to follow:Firstly, invoke the Control Panel by selecting the Start key.Type ‘control’ into it and select the OK button.You should choose the ‘Network and Internet’ through the screen of the control panel.Beneath the ‘Network and Internet’ option and select the Internet Options.Reach the screen of Internet Properties; move to the Advanced section.You should select the button of the Reset shown at the lower side.Now, mark the ‘Delete personal settings’ box then choose the Reset button.Turn off Hardware AccelerationFollow the guidelines mentioned below and disable hardware acceleration.Thereafter, input ‘inetcpl.cpl’ into it and select the OK button to invoke the Internet Properties.Move to the Advanced section and mark the “Use software rendering instead of GPU rendering” box.You should select the Apply then OK button, and it would turn off the hardware acceleration.Now, once again, reopen the Internet Explorer and check whether you have fixed the ‘Internet Explorer has stopped working error.’Uninstall the Internet Explorer ToolbarsTry uninstalling the IE toolbar.
Follow the below given steps.Hold the Windows and R buttons altogether over the keyboard to invoke the Run section.Then input ‘appwiz.cpl’ into it and select the OK button.You will see the Programs and Features screen.Then remove all the toolbars in the program and features list.Now, select the toolbar and right-click on it you would like to remove then choose the Uninstall button.Finally, reboot the system and attempt to launch the Internet Explorer.Run Internet Explorer TroubleshooterHere is how you can troubleshoot the Internet Explorer.Go to the Windows Search section.Then input ‘troubleshooting’ into it and select the OK button.After that, choose the Troubleshooting option.Reach the left side panel and choose the ‘View all’ option.Click on the ‘Internet Explorer Performance.’Now, pursue the steps and allow the ‘Internet Explorer Performance Troubleshooter run.’Finally, reboot the system and once again attempt to perform the IE and check whether you are capable of solving this error.Run System RestoreFollow the steps mentioned here and learn how to conduct a system restore.Hold the Windows and R buttons altogether over the keyboard to invoke the Run section.Then, click on the System Protection section and select the System Restore.You should choose the Next button and click on the preferred ‘System Restore point.’Later, pursue the steps to finish the system restore.Finally, restart the system and check the issue.John Smith is a creative person who has been writing blogs and articles about cybersecurity.