today, everybody is not kidding about information assurance, particularly close to home and secret information from malware dangers and online assaults. There are a few antivirus suites accessible in the worldwide market. webroot is one of the solid names in the field of antivirus programs that are fit for giving total insurance, including assurance to perusing locales with the assistance of firewalls for network security. It gives a clear technique to utilize the product on the framework that pulls in clients from each edge of the world. In the event that you wish to find out about this antivirus program, visit the website webroot.com/safe.


Webroot com safe antivirus program, you can protect your devices such as Windows, Mac and mobile devices from malware, virus, spyware, etc.
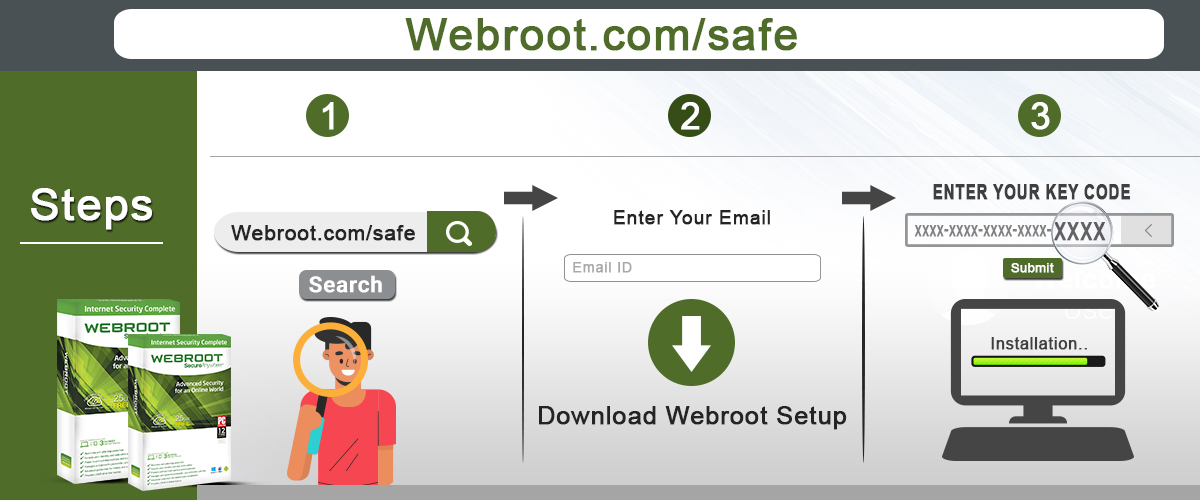
Through the webroot com safe link, you can Install Webroot with key code on multiple devices and activate the software.
webroot.com/safe | www.webroot.com/safe | download webroot with key code

Webroot safe - Webroot key code is the license key of the product.
User received it at the time of purchase Webroot product.
Webroot Key Code is 20 digit long alpha numeric code used in the activation process.

the working proficiency of individuals is upgrading step by step as the progression in the advanced world actually relates to get more achievements.
Web and devices are the primary segments of the Digital World, yet like this present reality, it is likewise loaded with negative components to block us.
One of the significant negative parts of the Digital world is antiviruses close by digital cheats who continue wanting to obtain control of our information or gadgets.the security ascribes of the organizations to impede every one of them through their antiviruses are getting obsolete because of less headway in it.
To run alongside the mentality of digital cheats and infection makers, we need further developed and prepared antivirus.
subsequently, webroot is one that satisfies all the requests of its clients as it is progressed, helpful, and probably, it is snappy.
The clients who are confronting infection related issues should visit webroot.com/safe to determine their inquiries with respect to infections.


Webroot programming is one of the demonstrated best Antivirus programming.
On the off chance that you own a gadget or framework and you are associating it to web or another gadget then you should have antivirus programming.
Infection or any unsafe danger like Malware, Trojan, Spyware, Rootkit or web based hacking or assault can take your information and harm your framework.
What's more, to spare your framework from such treats, introduce antivirus programming known as webroot from webroot.com/safe and secure your framework.

About USWebrootcomsafe.services is a leading and globally managed company providing technical support to small and medium-sized companies along with home-based users.
We are committed to providing our clients best solutions in the field of technical support,We Provide Service!Webroot.com/safe provides a wide range of services with their different products.
With Webroot discover cloud-based security to stop threats in real-time and protect business and consumers in the connected world.