


Today, we are going to tell you about the best AirPlay supported speakers of 2019.
So let’s check out the best speakers that support AirPlay.Source : http://hbnorton.com/top-5-best-airplay-enabled-speakers-of-2019/1.
Naim mu-so QbIf you need a concert-type feel, then you should go for something that has a compelling sound and a punchy bass.
Sonos One If you want a clear surround sound with soft bass, then you can go for this one.
This speaker can work with Amazon Alexa, and soon in a future update, it will also be compatible with Google Assistant.
It is a well-constructed speaker and looks great.3.
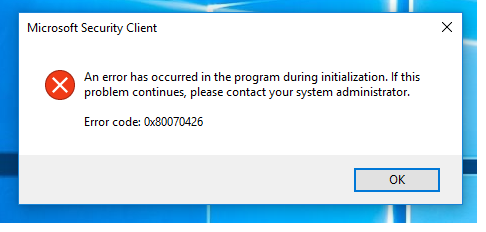
The 0x80070426 error code mostly shows up when the system processes mismatches and initialization issues.
In case Microsoft Essentials used to stay on your device, and you need to update to Windows 10, which provides the security of enhanced Windows Defender, the error could show up.This often happens if the application is not supported by the third-party software you got in your device.
This error can trigger a plethora of other issues in case you ignore it.Fix 1.
Removing Microsoft EssentialsHere is a guide to removing the Microsoft Essentials from your system to fix the 0x80070426 error code:On your system, press the Windows logo + D keys altogether to bring yourself to the desktop screen quickly.
Now press the ALT + CTRL + DELETE Keys at the same time on your computer keyboard.Then head to the Task Manager option to trigger the Windows Task Manager.Look for the option called Windows Defender (Windefend) and then make a right-click on that.Head to End Task.Now head to the start menu by pressing the Windows logo key on your keyboard.Put in the Control Panel and then hit enter.
Uninstall the Windows defender.Fix 2.

Norton setup downloaded from the norton.com/setup page helps to work and explore the ever-changing digital landscape.
Norton makes it as easy to protect and manage your devices while installing an application on your smartphone.

The technique of deleting blank rows in Microsoft Excel sheet in the quickest way is easy though you must watch out for unintended consequences.Blank rows are useless in most of the Microsoft Excel Sheets.
Though blank rows are not that bad for most of the sheets, they are unnecessary and undesirable, so it is better to get rid of them all.
The good news is that the quick and easy way to delete blank rows from a data range in Microsoft Excel sheet is available.
With the following easy technique, you can remove empty rows, but you must be careful too because it has the potential to destroy data.
Once you select the data range, follow the below steps: Use keyboard and Press “F5.”Now go to Dialog Box, and then tap on “Special.”Tap on Blanks option and then click on “OK.”Now you must select the blank cells like A7: E7 and A10: E10.Now go to the “Home” tab and then click on the “Delete dropdown” available in Cells groups.Now choose “delete cells”.
Now tap OK or to use the shortcut key, press (Ctrl)+ (-).

Norton is one of the trendiest antiviruses everywhere throughout the world.
Furthermore, it is notable for ensuring the gadget and furthermore giving a one-stop security answer for every one of the clients worldwide with only a single tick.
Sign in to norton.com/nu16 to introduce setup item key and furthermore figure out how to download, introduce, and actuate Norton antivirus on your Windows and Mac gadgets.
For more data visit norton.com/setup.

Roku is one of the leading streaming device makers, and thus there are numerous new features that it keep on introducing.
One of its latest ventures is FuboTV, and in the blog, we will discuss how to watch it on Roku.Download the FuboTV ApplicationIn case you intend to download the FuboTV application, then you can opt to follow the below-mentioned guidelines.Source- https://canorton.uk.net/how-to-watch-fubotv-on-rokuFirst of all, turn on the Roku device.After that, reach the Home page and choose the Search button and hit the OK button on the RC.You should input ‘FuboTV’ into it and hit on the right-hand side of the RC.Then go to the ‘FuboTV channel’ and select it.You should also select the URL and hit the ‘Add Channel’ option to add FuboTV to the Roku online.When you have chosen FuboTV channel on the screen, hit the right-hand side arrow on your remote many times unless you locate the option Add Channel.You have to choose the Add Channel and verify it with the OK button.FuboTV channel will install automatically.
In case the setup finishes, hit the OK button to verify the addition of this channel.Either select return to the Home screen or Go to Channel.Now, spotlight the FuboTV and hit the OK button on the Roku remote to begin the channel.Register for FuboTVIf the users are trying to register for FuboTV, then they should carefully apply the given steps.Navigate to the Roku and open the FuboTV channel.After that, select the ‘Start Free Trial’ option, whether you are a fresh user or login in case you are a subscriber.Hit on the Allow option in the prompt screen.
In case you would like to use a different email account, select the Cancel button.You should input different email (alternate), password, and zip code.
Our recommendation is to set a difficult password and note it somewhere.
Then hit on the Next option.You will check the subscription options on another screen.Hit the ‘View All Channels’ to search the appropriate channels list.


