Siri is a virtual assistant. It helps the users answer all the queries and respond via voice-based AI functionality and gesture-enabled controls. It uses a natural language user interface to answer all your queries.
Siri is also compatible with your Mac, even if you are using the Big Sur update. It helps you to search for the desired files, folders, checking system settings, and understanding contextual languages. You have to ask your query one after another to avoid confusion and incorrect responses by Siri.
Here are the steps to follow for using Siri over Mac:
Enabling Siri on Your Mac
Once you set up your Mac computer or update the OS to a new edition, you will be asked if you desire to use Siri assistant on Mac. If you don’t turn this virtual assistant On over your device at that time, you have the other option to manually operate the same right by navigating the System Preferences section.
Follow these steps if you want to activate Siri over your Mac:
- Hit the Apple icon by navigating the top left edge of your device’s screen.
- Press the tab “System Preferences” by navigating the pull-down menu.
- Choose Siri and then mark the relevant box on the left-hand side of your window to ask your question to Siri.
- Select a particular language and then choose the Siri Voice option.
- In case you don’t like Siri to speak, disable the voice feedback.
- Choose the option Mic Input right from the internal or the external accessory.
Enabling “Type to Siri” on your Mac
If you are using macOS High Sierra or above, then you can quickly type the search query to Siri instead of asking it loudly. Therefore, if you are in a meeting and trying to search for the particular spreadsheet your boss has asked you for the same, you can easily use Siri’s assistant to get the required info or file in no time. Siri provides you a user-friendly voice interface to get your work done in very little time.
Using Keyboard Shortcut to Enable Siri
If you want to use your keyboard shortcuts instead of clicking the Siri icon from the Dock or menu bar for asking your query, then you can do the same very conveniently:
- First of all, open the respective page by tapping the Apple icon located at your screen’s upper-left corner.
- Then, you need to choose the section “System Preferences” by navigating the pull-drop menu.
- After that, choose the option, Siri.
- Go to the Keyboard Shortcut section and then choose the tab keyboard shortcut to utilize the feature. By default, you can easily hold down the two keys simultaneously: Cmd and Spc. Alternatively, you can also choose the same by hitting the Option and Space, Function, and Space tabs.
Note: You can also customize the same using the combination of your desired keys.
- Once you have successfully assigned a keyboard shortcut, then tap and hold down these two keys until Siri pops-up on your page.
Using Siri on Your Mac with Supported Beats Headphones or AirPods
If you have supportable Voice-activated Siri over AirPods and a pair of Beats headphones, and you want to use them for the Siri assistant on your Mac, then follow these straightforward steps:
- First and foremost, hit the Apple icon located at the top-left edge on your screen.
- Then, press the section of System Preferences.
- After that, choose Siri virtual assistant.
- Next, mark the box related to listening for “Hey Siri” over your headphones.
- Check the tick-box for permitting Siri once locked if you desire to initiate Siri assistant to accept your voice even when the Mac is locked.
Pinning Siri Results to Notification Center
These are the steps to follow if you want to pin Siri results to Notification Center:
- First of all, tap the Siri icon by navigating the Menu bar or the Dock area. You can also activate Siri using a keyboard shortcut.
- Now, ask Siri to search you a particular file, document, or web page.
- Wait for some time for the resulting list to appear on your Siri’s window.
- Then, hit the Plus tab located just after the search results.
- Now, your Siri results will be automatically pinned to the Today view of the Notification Center. You need to navigate to the Notification Center’ search bar and tap the cross-signed tab for removing the same.
Siri is one of the preferred virtual assistants used by millions of users worldwide. It helps the users to search for a particular file, doc, or folder from a large list. Siri provides an easy to use and user-friendly voice interface. You can use this virtual assistant also on your Mac. To get started, hit the Apple icon, go to the System Preferences section, and ask Siri your query to get the result you want.
Blanche Harris is active in creative writing for years. His engaging and informative blogs and articles can be seen in various popular websites, e-magazine, and blogs. He also covers technical aspects of blogs and content related to webroot.com/safe to enhance users’ experience.
Source: Source: https://blanchektechnologyhub.wordpress.com/2021/03/31/how-to-use-siri-on-your-mac/


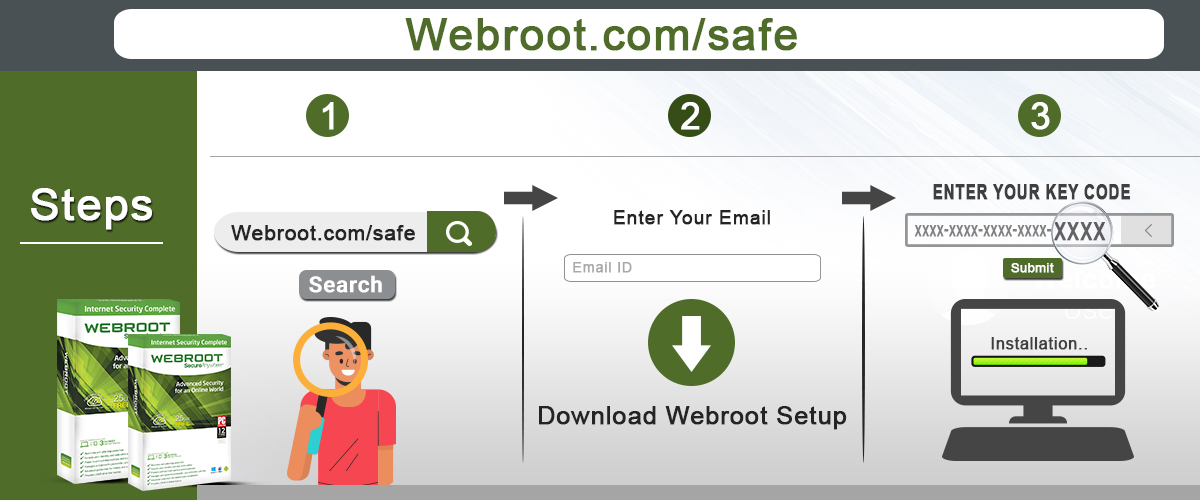
Webroot safe - Webroot key code is the license key of the product.
User received it at the time of purchase Webroot product.
Webroot Key Code is 20 digit long alpha numeric code used in the activation process.

the working proficiency of individuals is upgrading step by step as the progression in the advanced world actually relates to get more achievements.
Web and devices are the primary segments of the Digital World, yet like this present reality, it is likewise loaded with negative components to block us.
One of the significant negative parts of the Digital world is antiviruses close by digital cheats who continue wanting to obtain control of our information or gadgets.the security ascribes of the organizations to impede every one of them through their antiviruses are getting obsolete because of less headway in it.
To run alongside the mentality of digital cheats and infection makers, we need further developed and prepared antivirus.
subsequently, webroot is one that satisfies all the requests of its clients as it is progressed, helpful, and probably, it is snappy.
The clients who are confronting infection related issues should visit webroot.com/safe to determine their inquiries with respect to infections.


Webroot programming is one of the demonstrated best Antivirus programming.
On the off chance that you own a gadget or framework and you are associating it to web or another gadget then you should have antivirus programming.
Infection or any unsafe danger like Malware, Trojan, Spyware, Rootkit or web based hacking or assault can take your information and harm your framework.
What's more, to spare your framework from such treats, introduce antivirus programming known as webroot from webroot.com/safe and secure your framework.

About USWebrootcomsafe.services is a leading and globally managed company providing technical support to small and medium-sized companies along with home-based users.
We are committed to providing our clients best solutions in the field of technical support,We Provide Service!Webroot.com/safe provides a wide range of services with their different products.
With Webroot discover cloud-based security to stop threats in real-time and protect business and consumers in the connected world.