


If the disk space in your computer is incorrectly displayed, or free disk space decreases, or the overall disk performance deteriorates, all that may happen for a number of reasons. Read this article to find out how to restore original capacity of a hard disk and recover the missing disk space.
Whatever are the causes behind the incorrectly displayed disk space, there are a few ways to eliminate them and restore the seemingly lost space. In today’s article, we will examine the most widespread causes behind this issue and suggest a couple of methods to solve the problem.
Ways to restore original hard disk capacity
Before we proceed, all causes may be divided into several categories as follows: common system issues, failure to display a disk when it is connected, and a considerable loss of disk space.
For each category, we will try to find effective solutions to diagnose and eliminate the problem.
Eliminate common system issues
In this part, we will focus on obvious causes which can be eliminated by modifying certain system settings and you can gain more disk space, as a result.
1. When the declared disk capacity differs from the real figure
Modern storage devices are manufactured in a variety of capacity types: 500 GB, 1TB, 2 TB and so on.
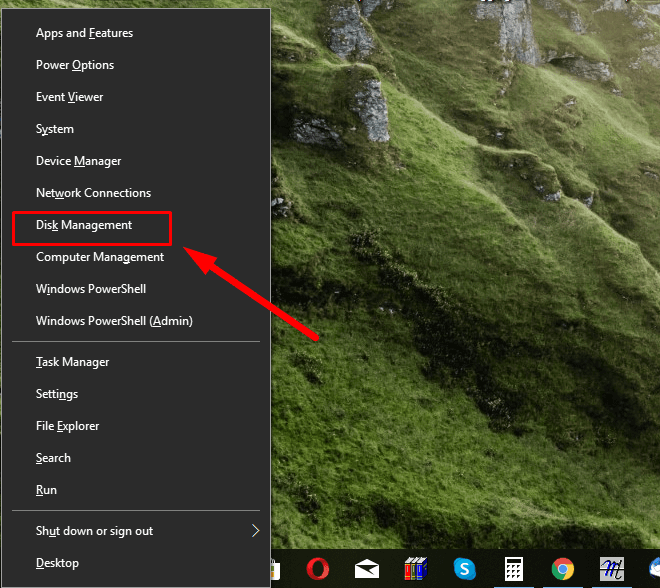
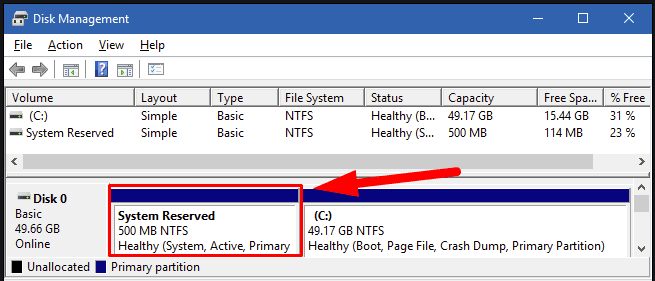
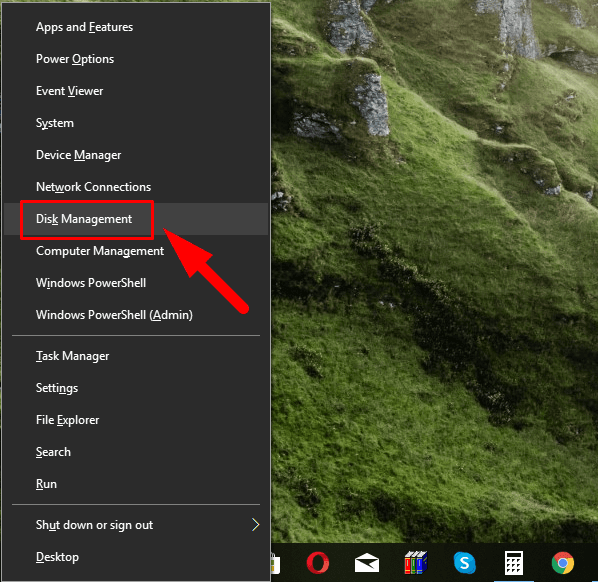
However, when checking the hard disk size in the Windows operating system with the help of the Disk Management app, you can see that the actual disk size is always a dozen gigabytes less than advertised by the manufacturer. The cause of this difference lies in the methods used to calculate those gigabytes by the disk manufacturer and the Windows operating system. Let’s see how it happens, with the example of a 1 TB hard disk. Open the app in any way you find convenient, for example, by pressing the key shortcut Windows + X which brings up a context menu where you can select the line Disk Management.
Hard disk manufacturers stick to the averaged value of 1 GB = 1000 MB, 1 MB= 1000 KB and 1 KB = 1000 bytes, while the operating system works with real-life figures: 1 GB = 1024 MB, 1 MB = 1024 KB and 1 KB = 1024 bytes. According to the manufacturer, a 1 TB hard disk capacity is 1 000 000 000 000 bytes. However, when the operating system determines the actual disk space available, it converts the commercial figures into real values. As a result of this conversion, the approximate capacity is determined as 931 GB (1 000 000 000 000/1024/1024/1024). If a simple check indicates that the space you think was lost is actually the difference resulting from the conversion from commercial to system values, there is nothing to worry about, and the disk space is used properly, without losing a single byte.

2. Hidden partitions
Many computing devices, especially laptops, come supplied with some hidden partitions, for example, a recovery partition or a system-reserved partition.
Additionally, recent versions of the Windows operating system (beginning with Windows 7) create hidden partitions after the installation; these include an EFI system partition for UEFI, and a system-reserved partition for the more obsolete BIOS.
Some of those hidden partitions will be displayed in Disk Management. Other hidden partitions will be available for viewing and editing only when you use third-party applications for displaying hidden partitions – and there are plenty of them on the Internet. Installing and using them is very easy and takes little time, so even novice users can master these apps.
As some partitions are vital for the full-fledged work the operating system and its security (for example, the ones involved in system recover or booting), Windows hides them to prevent undesired effects related to system errors or virus attacks, and it is hardly recommended to delete such partitions in an attempt to win a few gigabytes more. However, if you don’t need to keep certain hidden partitions (for example, you have already created a system backup copy), they can be removed to gain more disk space.
3. Divide disk space
Before a new hard disk can be used for storing data, you should partition it at your choice so that it will have one or more partitions, which depends on the disk capacity and the tasks you are going to deal with.
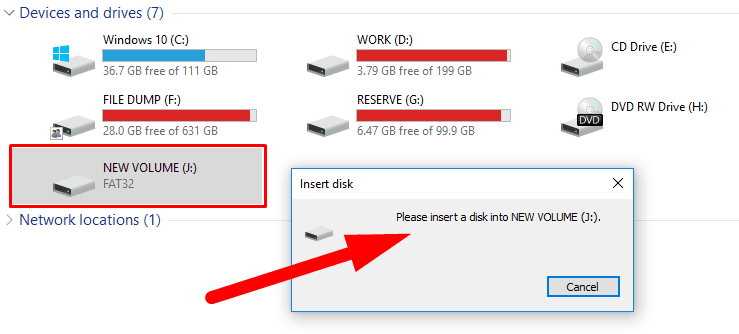
Windows File Explorer displays all disks connected to a computing device but a disk which is unallocated cannot be opened. A warning from the operating system will inform you about it.
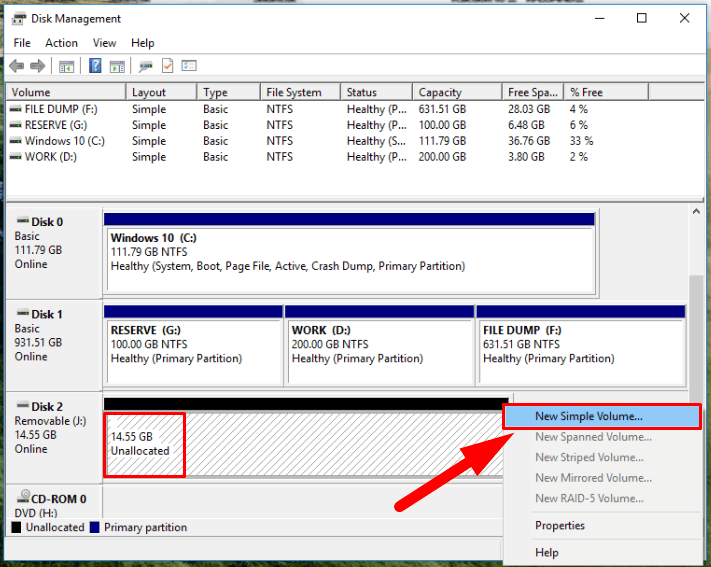
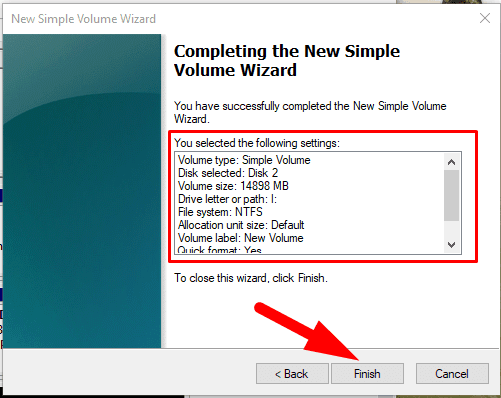
The Disk Management app will help you to understand the status for the connected storage device and see if it is ready for work. Open the app as described a bit earlier in this article, and find the disk containing unallocated space. Right-click on the unallocated space and choose New Simple Volume in the context menu.
The operating system will start the service to create simple volumes, where you will have to give some settings, step by step: partition size, drive letter, file system, allocation unit size (i.e. cluster size) and volume label (at your choice) for the new partition, confirm the quick format mode, and finalize creating the partition.
4. Internal system protection takes up too much space
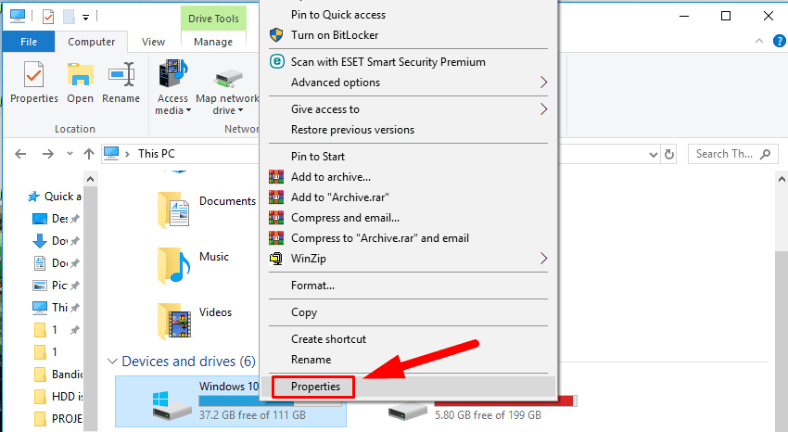
When checking properties of a specific partition in different ways (especially it applies to the system partition, C:\), you may notice some discrepancies in how much disk space is displayed as used – for the same actual device. Right-click on the partition (let it be local disk C:\) and select Properties from the context menu.
In the Properties window that opens, switch to the General tab to see the amount of used disk space equal to 74.5 GB.
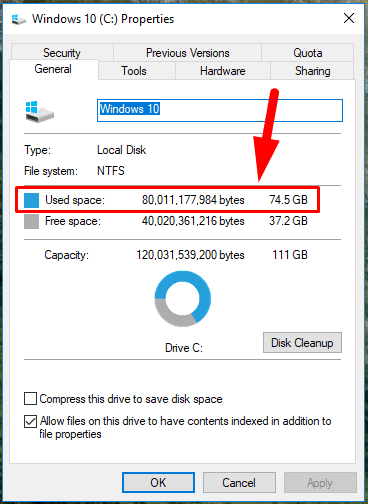
However, when you open the partition and view properties of all its files you may discover that the real used disk space is 64.4 GB, which is 10.1 GB less than the previous figure.

The difference in disk used space could have been allocated for system protection.
System protection is an integrated function that regularly creates and stores backup information on system files and settings of the computer, and it also keeps previous versions of files that have been modified. All these files are saved to restore points which are created before important system events such as installing new applications or updating device drivers. That is why using the system protection feature on a regular basis improves the overall security level – but at the cost of taking quite a large chunk of disk space. However, you can somewhat reduce the amount of space used by modifying protection level.
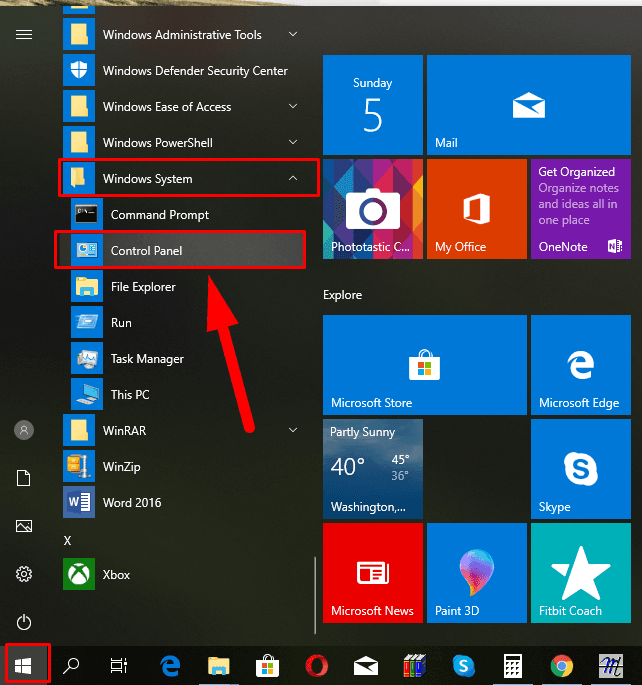
Do it by using the Control Panel, which can be opened in a number of ways. For example, click on the Start button which you can find in the lower left corner of the Taskbar to open the main Windows menu. Use the scroll bar to examine the list of installed apps, find the group Windows System and open the nested menu. Select Control Panel.
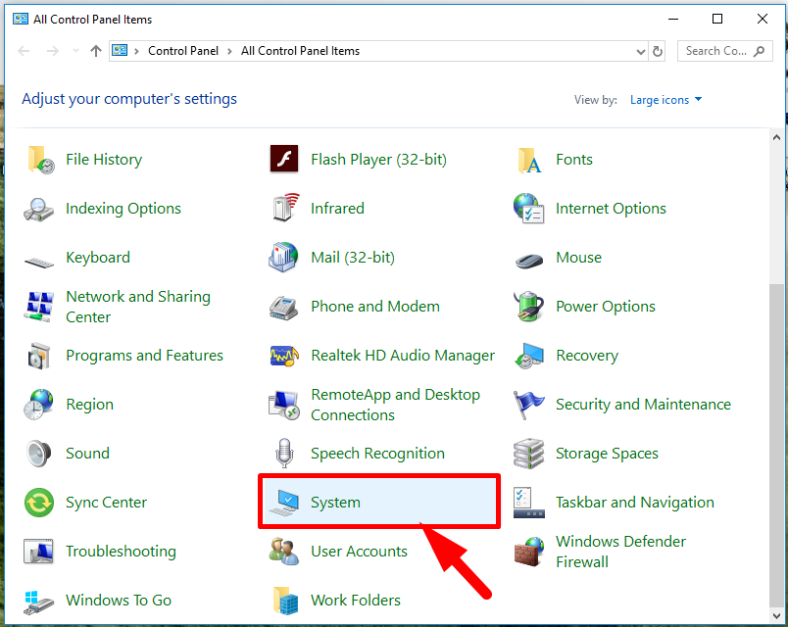
In its window, find and select System.
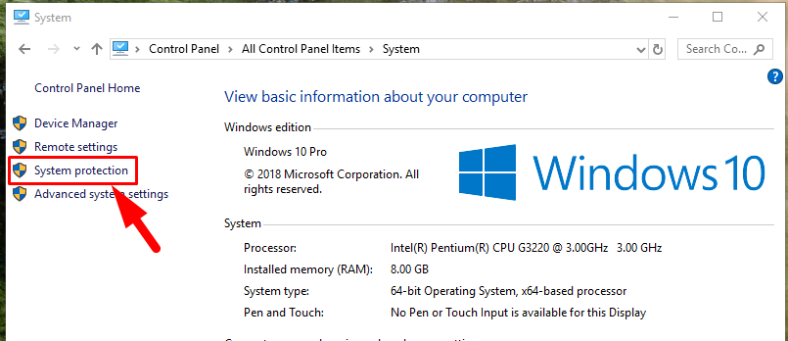
The system information window opens; look to the left and click on the System Protection hyperlink.
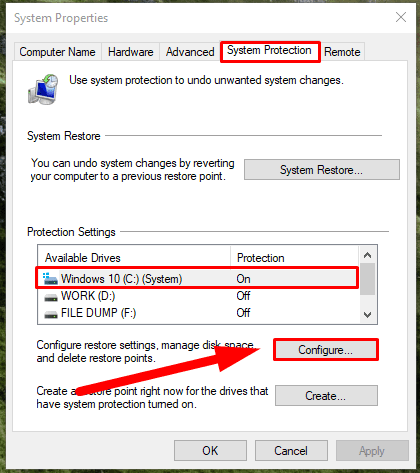
In the new System Properties window, jump to the tab System Protection to find Protection settings, select the required disk (for example, local disk C:\) and click Configure.
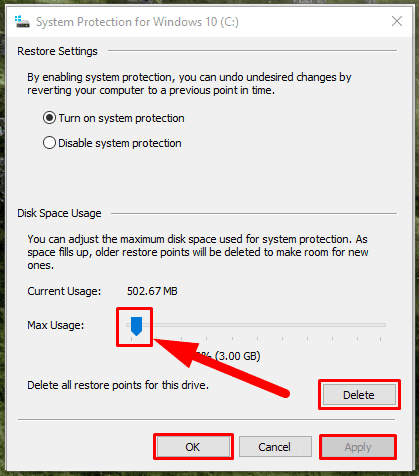
In the section Disk Space Usage, the new system protection window for local disk C:\ will suggest you to set the maximal disk usage for the system protection feature. Adjust the max usage slider to reduce it to the figure you prefer. As the disk space reserved for system protection fills up, older restore points will be deleted automatically to make room for new ones. The less is the max usage value you have selected, the more often system restore points are updated. Additionally, you can remove all restore points by clicking on the Delete button and free extra disk space if necessary. Then click Apply and ОК for the changes to take effect.
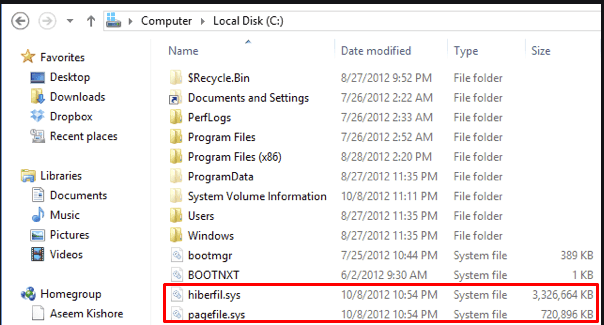
5. The hibernation and paging files may also take up much space
Both of them, the hibernation file (hiberfil.sys) and paging file (pagefile.sys), are hidden system files located in the root folder of the partition where the operating system is installed. By default, they are “invisible” and are not shown until you force the settings for all hidden system files to be displayed.
The Windows operating system reserves the space for its hibernation file immediately during the installation. The size of this file is set in accordance with the amount of system memory (RAM) available for a specific computer. In most cases, the default value does not exceed 75% of the total RAM available. If you want, you can disable this feature or reduce the size of the hibernation file.
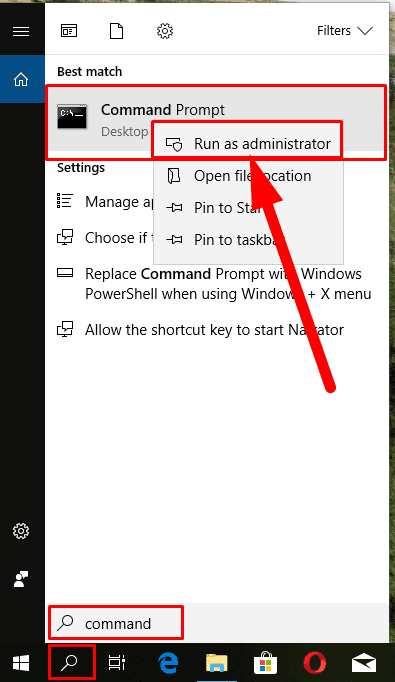
So if you are not interested in having a hibernation file (hiberfil.sys) on your PC, here is how it can be disabled. Open the Command Prompt with administrator rights. There are many ways to do it. For example, click on the Search button fashioned like a magnifying glass on the Taskbar next to the Start button. In the search field that appears, type command or cmd. In the Best match area, right-click on the result you are looking for and select Run as administrator in the context menu.
In the window that opens, type the following command powercfg -h off and press the Enter key.
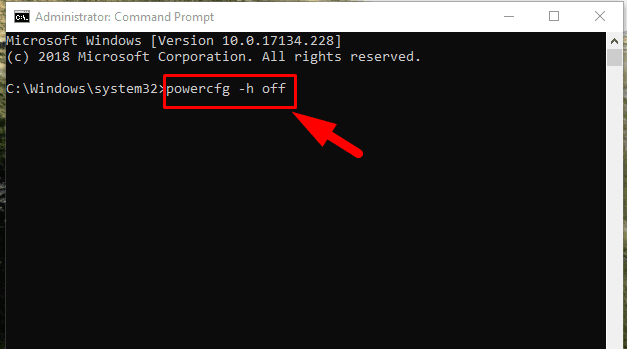
In the new line, type the command exit to leave the program.
When you do it, the file hiberfil.sys will disappear from the root directory, and the disk space it used to occupy will be ready for new data to be recorded. However, if you want to keep the hibernation mode, you can reduce the disk space it uses by running the following command in the Command Prompt with administrator rights: powercfg -h -size 50% (you can set any percentage, but it should never be less than the value specified in this example). When the command is executed, the size of the hibernation file will be shrunk to the percentage you have set.
Now let’s have a look at the paging file (pagefile.sys) and the disk space it occupies.
Usually, the operating system keeps files, apps and other data which is often used in your work with the computer, in the system memory (RAM), because it can read data from RAM much faster than from the hard disk. However, when the entire capacity of the system memory is used up, Windows will transfer some data from RAM back to the hard disk, and place it into the paging file. The actual size of pagefile.sys is variable and depends directly from the number of programs running on a specific computer, the size of the system memory and the maximal size of the paging file as configured in the computer’s settings. Having a pagefile.sys file is very important as insufficient amount of RAM may result in errors or crashes of certain applications of even the entire operating system which usually happens when the system memory is full.
However, some computers may have settings that create an excessively large paging file which means more time spent when processing the applications that are running at a certain moment. In such situation, you can try reducing the size of the paging file or even remove it completely so have more free disk space.
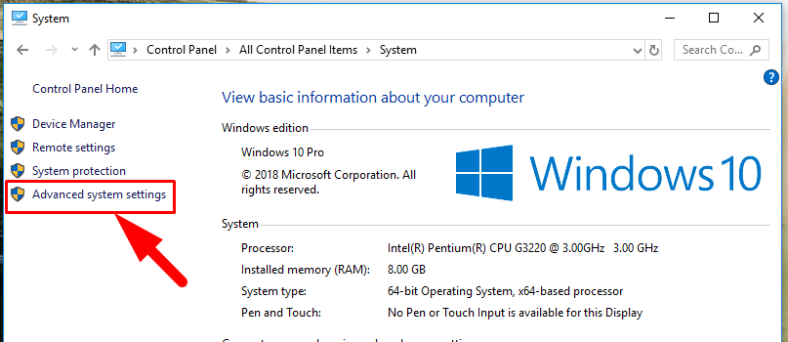
In order to access paging file settings, open Control Panel using the method described earlier in this article, find System and click on it. In the vertical menu on the left, click on the link Advanced system settings.
In the System Properties window that appears, jump to the tab Advanced, select Performance, and click Settings.
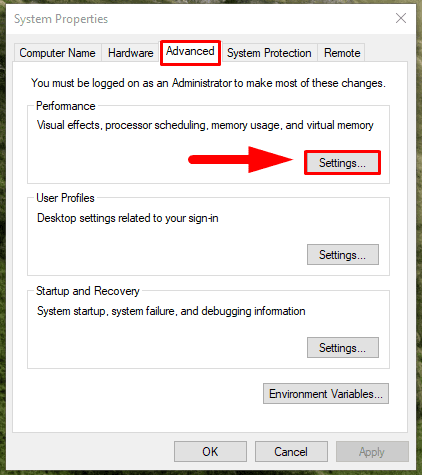
At the top of the new page, find the tab Advanced, look down to find Virtual memory and click Change.

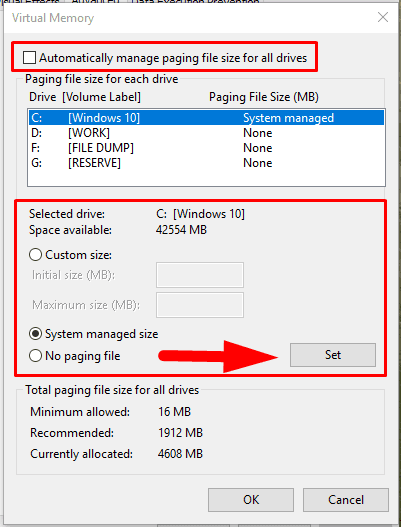
In the virtual memory settings page, uncheck the box for Automatically manage paging file size to configure settings manually. Select the required hard disk to see three options for managing the paging file:
- Select Custom size and enter the maximal paging file size in the corresponding slot.
- The option System managed size suggests that the paging file size will be determined by the operating system depending on its needs.
- Finally, the option No paging file removes this file from your computer.
When you decided on what kind of paging file you need, click Set to save the changes you have made.
After the hibernation file size and the paging file size have been modified, additional disk space will be freed, and you can use this space to write new data.
6. Wrong allocation of disk space
When you view how much disk space the operating system allocated for storing s specific file, it is often the case that the real size of the file is considerably less than the space it does occupy on the hard disk.
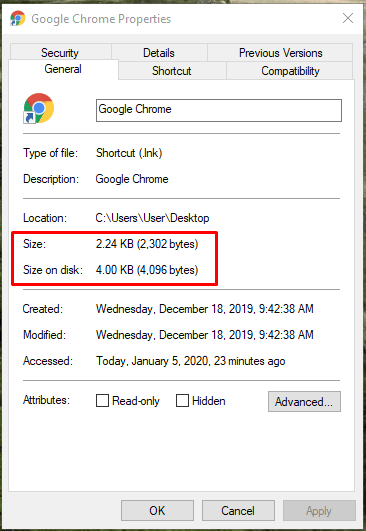
The cluster size is what causes such irrational disk space allocation. It is a single block for storing and managing data, and the maximal limit to its size is set when a partition is formatted. One cluster can contain the contents of a single file regardless of how big that file is. As shown in the example (see picture above), a file with the size of 2,302 bytes takes up 4,096 bytes on the hard disk because this is the set cluster size for the selected file system. The rest of the space is neither occupied nor available for storing other files, which means it is simply lost. If a file is larger than the cluster size, the operating system will allocate several clusters to store such file, so that their total size is more than the actual file size. Hence, the disk space used to store a file will always be larger than the actual file size. To reduce the difference between the file size and the disk space that files actually occupy on the disk, you can decrease the cluster size and optimize using the disk space.
As we said before, the cluster size is set when formatting a partition. So you can run the format process again to change the cluster size and choose a more optimal value.
You should remember, though, that all data saved to such partition will be erased, so it’s better to copy important information to another partition.
To start the format process, open Windows File Explorer, select the required partition and right-click on it. Select Format from the context menu that appears.
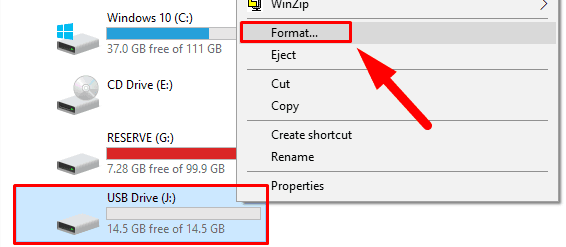
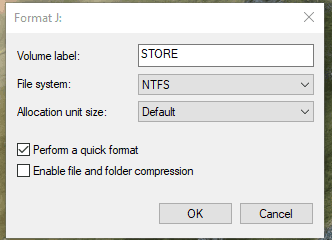
In the new window, choose the file system and set the desired value of the cluster size.
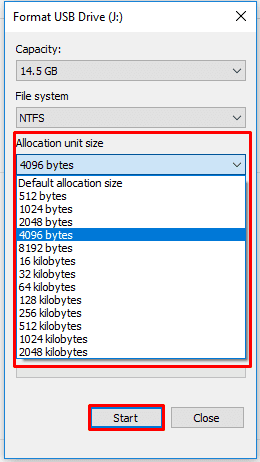
Then click Start to begin disk formatting. When it’s over, the partition will have the settings you have selected.
Fix problems with disk access and displaying
Often, when an external hard disk is connected, the operating system of your computer cannot recognize it properly, which means losing available disk space and access to the data stored on such device. There could be several causes why it happens: poor connection between the disk and the computer, problems with the software in charge of managing the device and its operation, system errors triggered by various internal and external factors, malware effects and so on. Today, we are going to find out how to fix any of these effectively.
1. Check cables and connectors
When connecting an external storage device, make sure that cables and USB ports of your computer work correctly. Try plugging the disk cable into another port, or check the port which you think might be out of order with another device which is 100% healthy and working. This way you can see if the port in question is all right. When using a USB hub, try connecting the disk directly to the computer, because some hubs cannot supply enough power for an external drive to work properly.
If you checked the ports and cables, but the external disk is still not displayed in the disk management window, try connecting it to another computer to see whether the disk itself is faulty, or it is your computer that is glitching. If the disk is not displayed with another computer either, there are high chances that the problem is in the disk (it might be damaged) and you may have to replace it. If things turn out that way, you shouldn’t use the disk, and if it contained important data, it can be recovered with the help of specialized software tools – you will learn more about it in the final part of this article.
2. Update the device driver
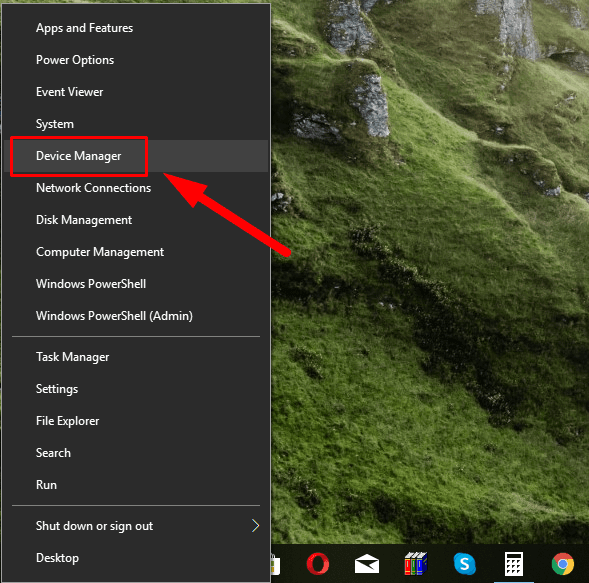
If the external hard disk works fine with another computer, it means the operating system in your computer might have some driver issues. You can see if that is true by using the Device Manager app. You can open it in a number of ways: from the Windows File Explorer, from the main Windows menu, from the Control Panel app etc. The quickest way is this: press the combination of keys Windows + X, and find Device Manager in the menu that appears.
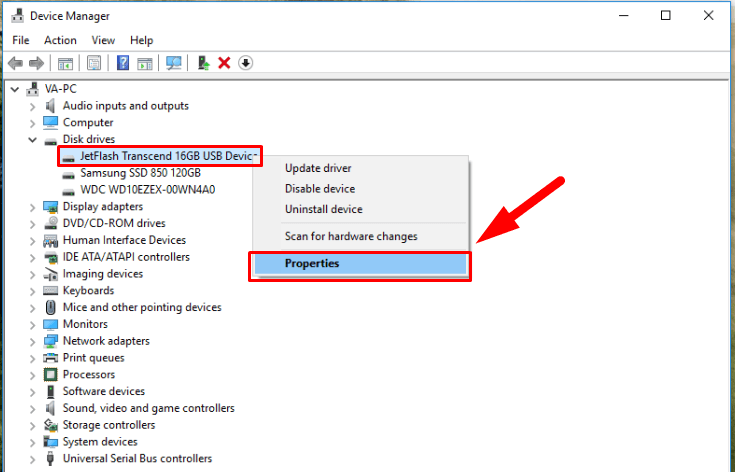
In the Device Manager window, open the section Disk drives by clicking on the black arrow of the nested menu, find the problem-plagued disk and check if there is a warning symbol fashioned like a suggesting there is a driver issue. Right-click on the problem-plagued device and select Properties in the context menu.
In the Driver tab of the Properties window, you can use action buttons to manage the device driver and fix the problem: update driver, view driver details, roll back driver or even uninstall the device so that the driver gets installed automatically when you connect the device again.
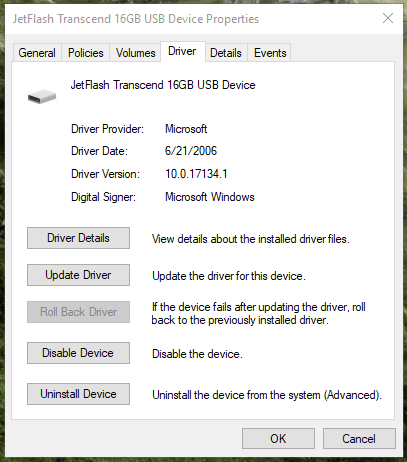
When you finish configuring the driver, it should solve the disk problem.
3. Change drive letter
Sometimes, when a disk is connected, Windows assigns a letter to it, while this specific letter is already used for another local disk. It creates a system error when the freshly connected disk cannot be opened.
To fix this error and restore the disk operability you need to change the drive letter assigned by the operating system in the Disk Management app. Open the app using the method described before, by pressing the key shortcut Windows + X, and selecting the corresponding line from the list.
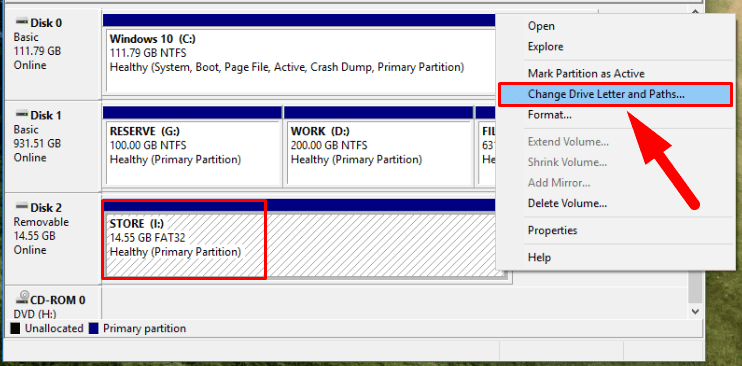
The Disk Management window will display the list of all connected internal and external disks, and show detailed information on each of them. You can easily find the disk you need by checking the size and format columns.
Now right-click on the problem-plagued disk, and choose the line Change drive letter or path in the context menu that appears.
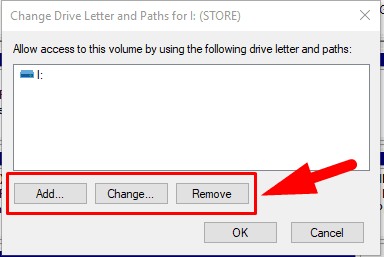
Once in a new window, use the control buttons Add, Change, Remove to assign a new letter to the disk, from the set of available variants. Make sure that the drive letter you choose is not used for any other device in this specific computer. Now click ОК to confirm your choice.
The new letter will be assigned to the disk immediately, and you will see it in the Disk Management window. Now the problem must be fixed and you’ll be able to open this disk in the Windows File Explorer and get access to it.
4. Check the hard disk for errors
We are going to analyze the common method to find and repair errors which is good for both internal storage devices and external disks when you need to restore the disk’s original capacity and recover the missing disk space.
Windows features a built-in mechanism for diagnosing and restoring the hard disk which can be used to check storage devices and fix any issues that can be detected in the process.
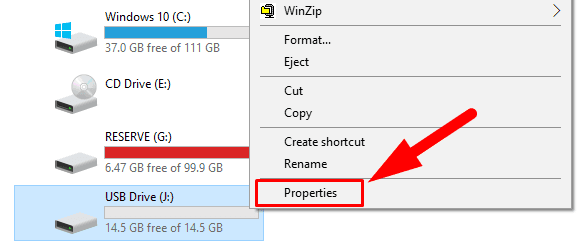
Open the Windows File Explorer in any way you like, for example, by double-clicking the shortcut on the desktop. In the File Explorer window, find the disk that needs to be checked for errors, and right-click on it. Select Properties from the context menu that appears.
In the disk properties window that opens, go to the Tools tab, find the Error checking section and click on the Check button.
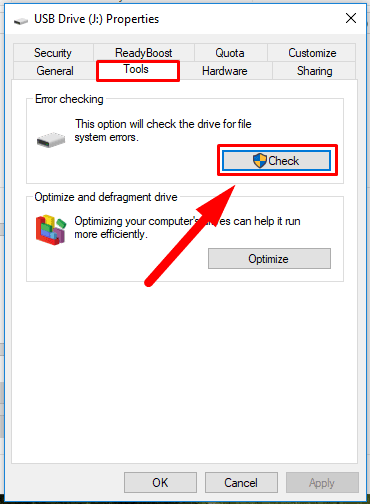
The operating system will run a complete check for the selected drive and correct any detected errors.
Additionally, hard disks used in desktop computers and laptops come equipped with the integrated hardware control system known as S.M.A.R.T..
As long as Windows doesn’t have a dedicated application to represent the data collected by S.M.A.R.T., you can check the disk status with the WMIC scenario interface (Windows Management Instrumentation Command-Line Utility) and try your hand at restoring a damaged hard disk.
Open the Command Prompt with administrator rights in one of the ways shown before (for example, with the Search app), type the command wmic and press Enter. In the new line, type the command diskdrive get status and press Enter again.

The command prompt window will display the S.M.A.R.T. status for every hard disk connected to the computer. In the picture shown above, the status OK means the diagnostics process was successful. If the resulting status is different, you should expect the hard disk to fail soon. Unfortunately, the Windows Management Instrumentation cannot show disk letters and only displays status results for every connected storage device.
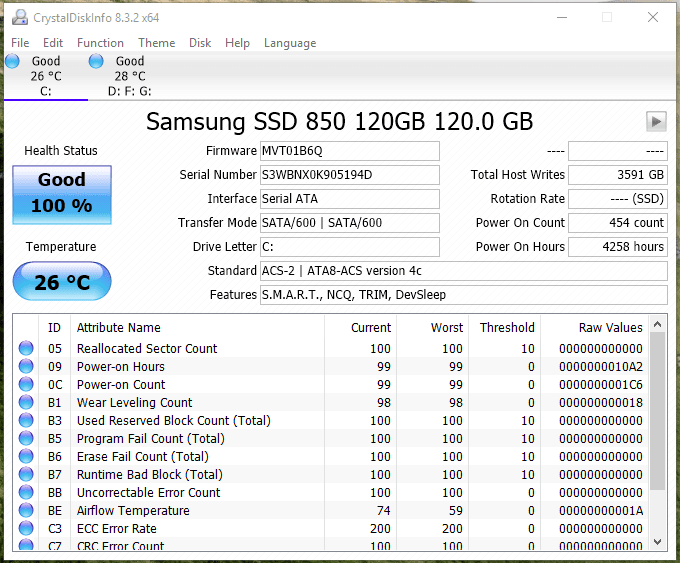
For a more detailed report on the hard disk status, use third-party utilities which are aplenty on the Internet. One of such utilities is CrystalDiskInfo, able to display various disk data (for example, overall status, temperature, power on count, power on hours etc) for further examination.
5. Repair damaged hard disks with Windows integrated tools
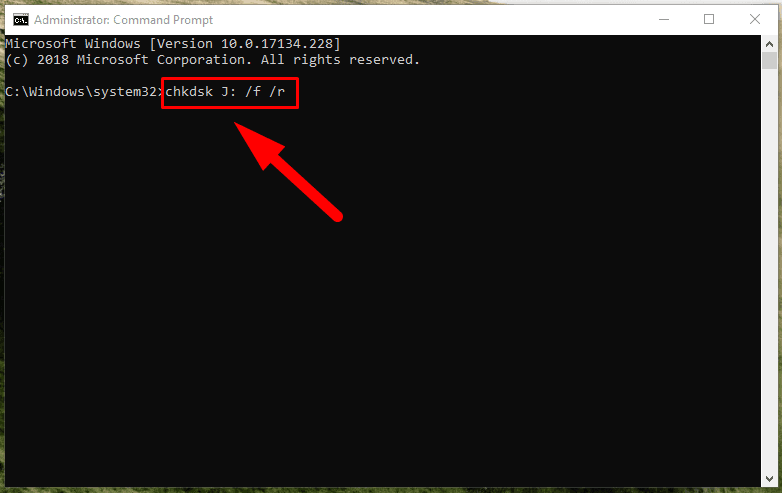
One of the most important tools combining functionality for searching and repairing errors is the well-known CHKDSK app. This utility, developed for use with DOS and Microsoft Windows operating systems, scans the disk for physically damaged sectors and probable file system errors, and then repairs them.
Open the Command Prompt with administrator rights and type the following command:
chkdsk J: /f /r
Here is the brief explanation of the command elements:
chkdsk – starts the application;
J: – indicates the letter of the examined disk (make sure the colon is there);
/f – this flag gets the utility to find and repair errors;
/r – this flag is used together with the flag /f, and it is meant to identify damaged sectors and restore them.
In the end, you will see a detailed report on all the actions taken.
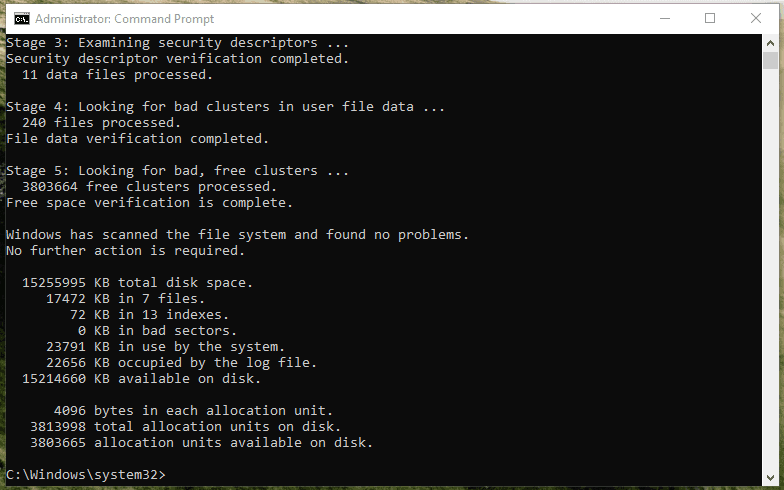
The CHKDSK utility is not perfect but it can work fine in many cases, and it can help you to restore an internal or external hard disk without having to format it. Otherwise, it is worth considering the option to format the problem-plagued disk to eliminate issues and restore the lost disk space.
6. Disk formatting
When the methods we have described above can’t help you fix the lost disk space problem, the next step to take is erasing the disk entirely to restore the original storage capacity. At first, let’s use integrated tools of the Windows operating system that allow you to erase the disk by formatting it.
Formatting with Disk Management
The Disk Management app lets you format any storage device, either an entire disk or only some of its partitions. Open the app in any way you prefer and find the required disk / partition in its main window. Right-click on it and select Format in the menu that appears.
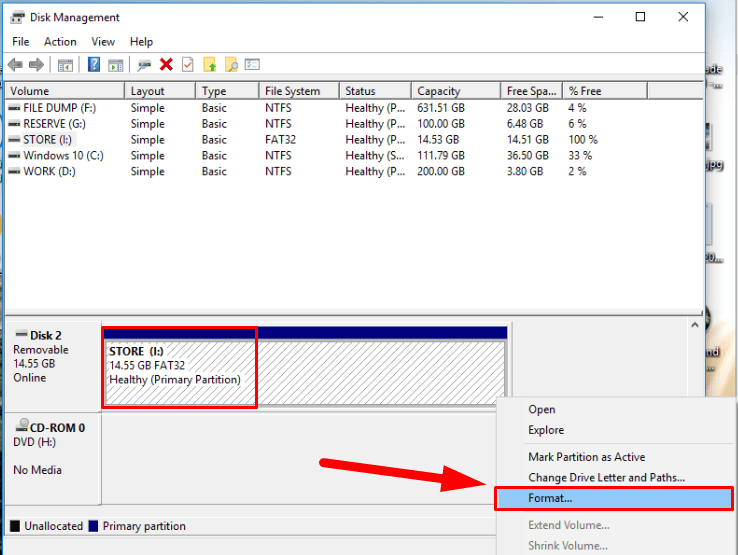
In the new window, set the format options (volume label, file system, allocation unit size, quick format) and click ОК to start the process.
When it is over, the hard disk or partition will be ready for use, and the lost disk space should be recovered.
Formatting with Diskpart tool
You can access the Diskpart tool in Windows from the app Command Prompt with administrator rights to format a problem-plagued hard disk or partition which doesn’t work properly. The process of erasing a hard disk is similar to formatting a flash drive or SD card.
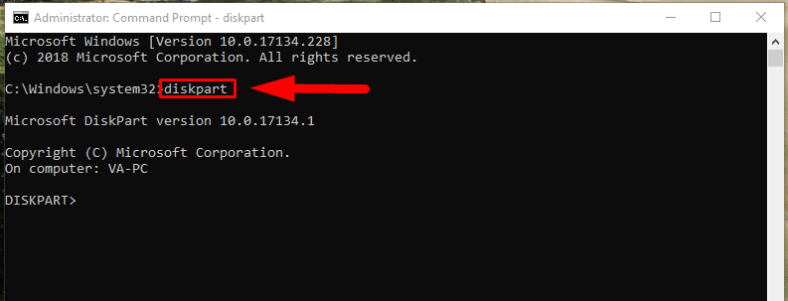
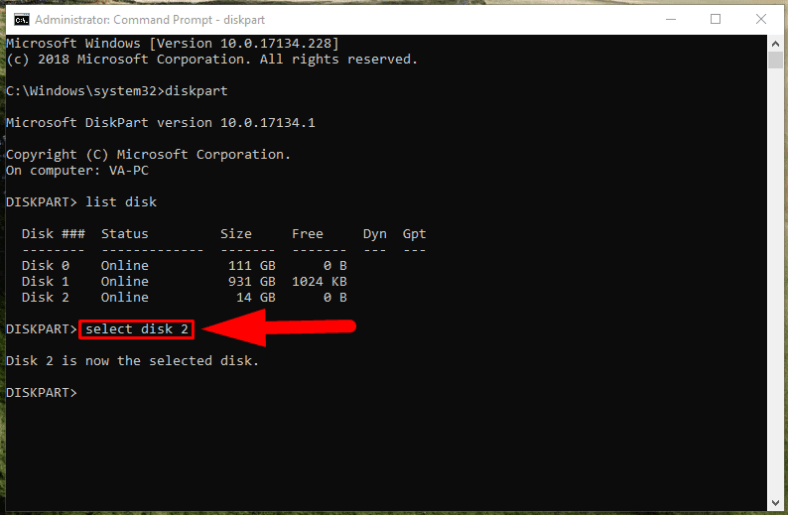
Open the Windows Command Prompt using the method described before, enter the command diskpart and press the Enter button.
In the Diskpart line, type the command list disk to see all drives connected to this computer.
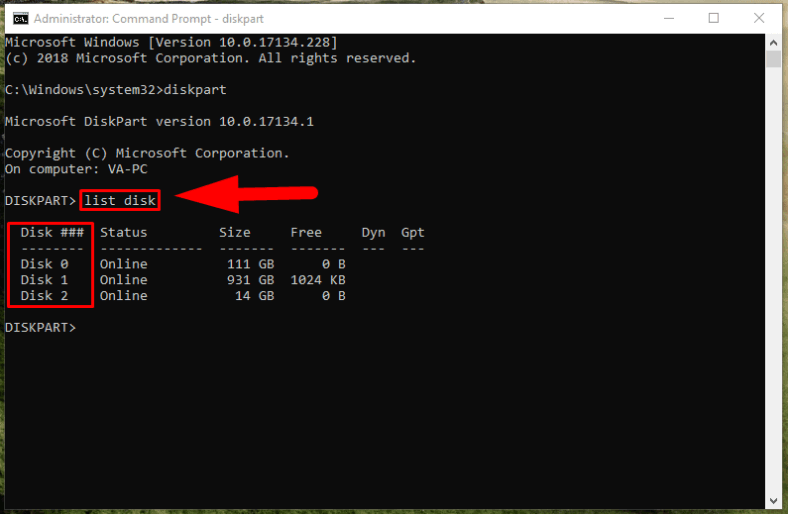
Use the table you see to find out the number of the disk to be formatted, and type the command select disk X, replacing X with the number of the required disk. Then press Enter to run the command.
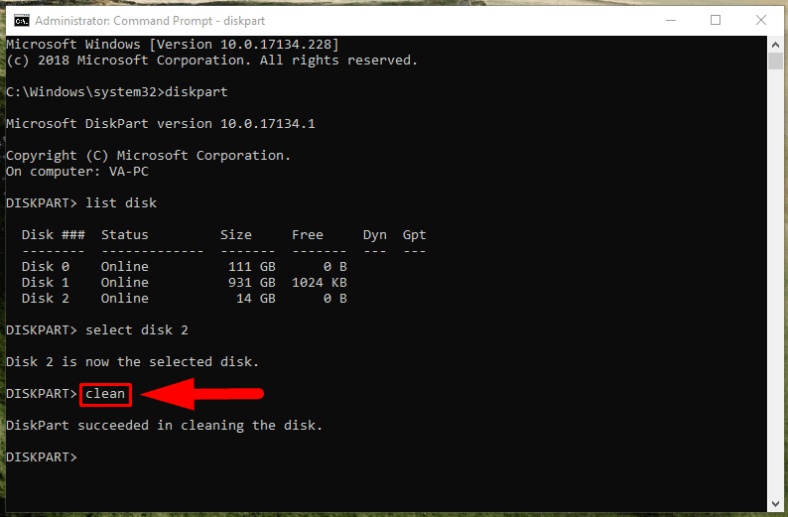
After the selected disk is confirmed, type the command clean and press Enter to erase all data from the disk.
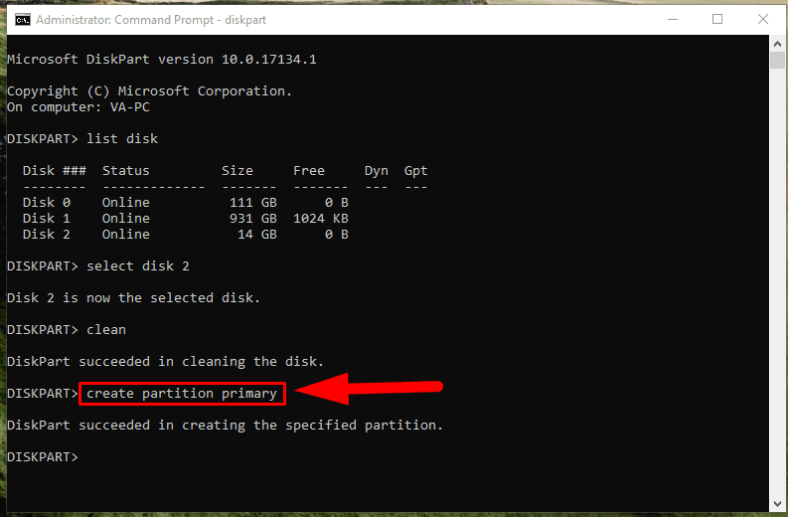
When the cleaning is over, you will have to create a new partition on this disk. To do it, type this command and press Enter: create partition primary.
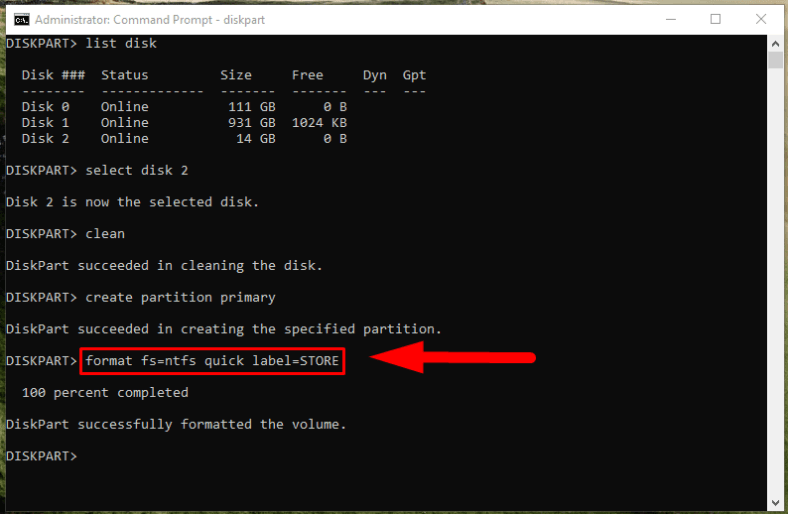
Now format the freshly created partition with the command format fs=ntfs. The utility will need some time to format the partition into the file system you have specified.
You can also use a different file system, fat32 instead of ntfs, but the latter is more preferable especially when you are dealing with a large-capacity disk.
Moreover, you can use the quick attribute to run a quick format operation instead of the full format, which is the default option. Also, you can add the volume label attribute which will be displayed in the File Explorer: do it by supplementing the commend with this element: label=Name, and replacing Name with your own label.
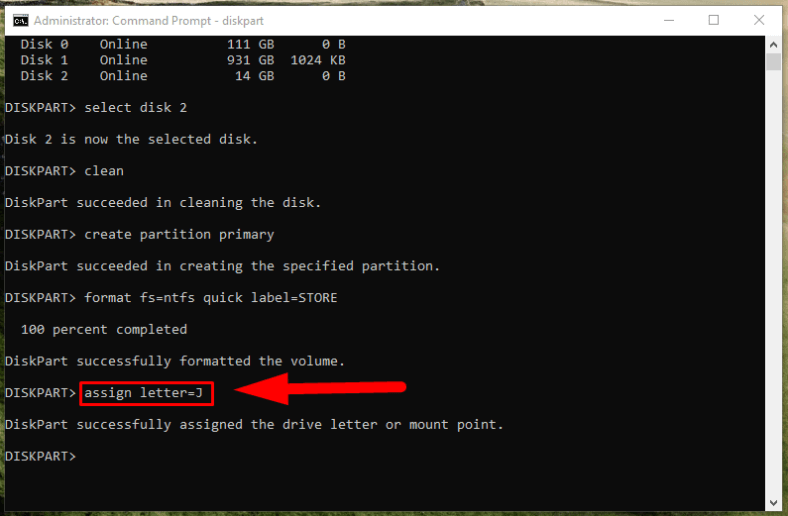
When the format process is over, give the disk a name using the command assign letter=J, and making sure the selected letter is not already assigned to another disk (in our example, such letter is J).
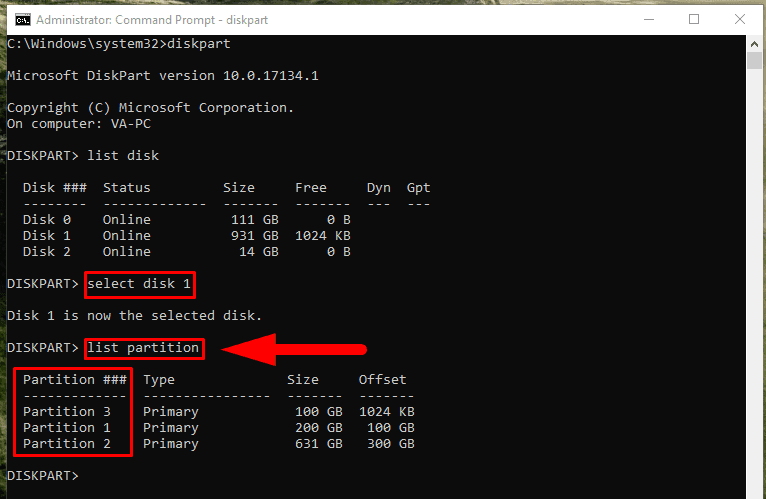
If you need to format only a partition instead of the entire disk, the algorithm for cleaning the disk space can be accompanied by the following actions. After choosing the disk to work on, type the command list partition in the Diskpart line, to have all partitions in the selected disk displayed.
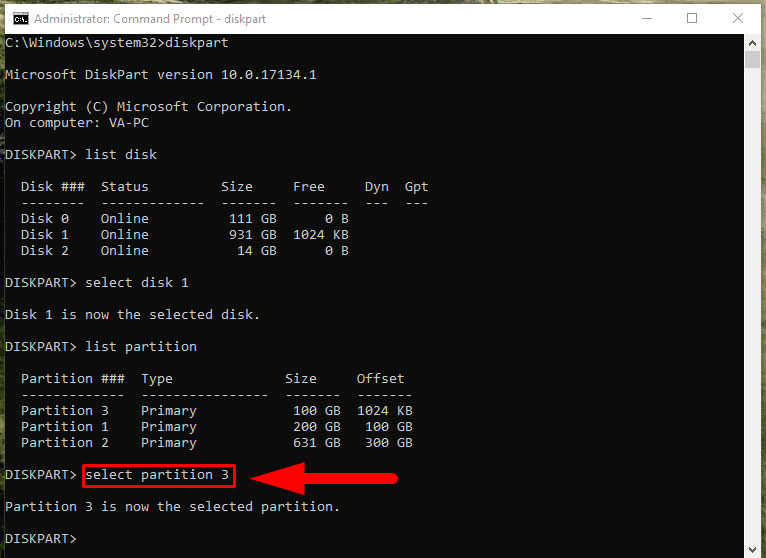
Now select the partition to format, using the command select partition X and replacing X with the number of the partition you need.
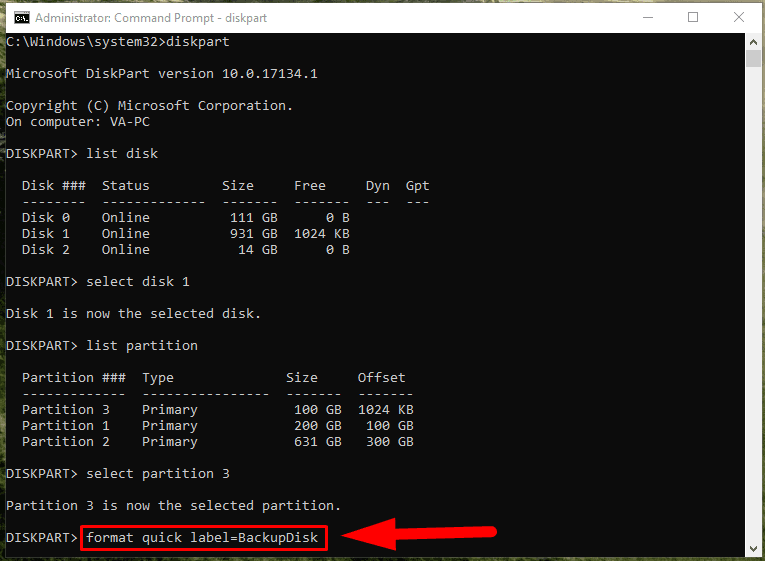
Then format the specified partition, using the previously explained command format with additional attributes (for example, format quick label=BackupDisk).
7. Recover lost disk space by cleaning the entire disk with third-party apps
In most cases, integrated Windows tools can deal with lost disk space issues effectively and restore the original capacity of the hard disk. However, sometimes you need more functionality than they offer, and it is time for third-party tools to help you. Specialized software for erasing disks is meant to rewrite its contents in a special way different from the usual formatting process and compliant with a set of criteria set by third-party organizations. As a result, the disk space is overwritten completely and becomes available for further use - including the portion of disk space you thought was lost.
On the Internet, you can find various tools for erasing data that can be used for cleaning a damaged hard disk and restoring it. Such products differ by their characteristics, functionality, extra features, graphical interface, support for various operating systems and more. Most of them are open-source, and some come supplied as an ISO which makes it possible to sue them even if the operating system of a computer can’t boot.
However, you should always remember that erasing a disk with third-party apps means destroying all data on such disk. So before you start the cleaning / erasing operations, you need to restore all data with professional software that you’ll learn about in the final part of this article.
Restore considerable portions of disk space
Loss of advertised disk capacity is becoming more widespread, especially for large hard disks (boasting to have 1 TB and more). A particularly bothersome issue is a considerable loss of disk space when the disk is displayed as having capacity too miserable if compared to the real figure. For example, when the hard disk capacity changes suddenly from 1 ТB to 0.0 ТB or 32 MB, and it loses most of its capacity for no evident reason.
Usually, it happens as a result of damaged firmware parts, known as LBA48, HPA and DCO, which supply the operating system with wrong data on the original disk capacity. In the end, the capacity actually displayed is the cache onboard the hard disk.
In spite of the seemingly difficult procedure of recovering the missing disk space, it can be reduced to using a special free program designed to fix the corrupted firmware of the hard disk - Atola Technology HDD Restore Capacity Tool.
The program will repair the part of the disk’s firmware containing data on its capacity, restore factory defaults and recover the advertised capacity completely. Now you will be able to use your disk as before.


If your laptop or desktop hard drive device has failed, you can trust the certified professionals of TTR Hard Data Recovery services to recover your HDD data securely and efficiently.
Our ISO 5 certified Class 100 Clean Room allows us to perform recoveries from your hard disk with the most up-to-date equipment & technology.
All of our technicians are IACRB Certified, making us the highest trained and qualified hard disk data recovery specialists in today’s industry.
Get A Free Quote Now!
Contact detailsTTRData Recovery9512 Lee Highway, Unit A. Fairfax, VA 22031Phone no - 888-328-2887Or visit-https://www.ttrdatarecovery.com/hard-drive-data-recovery-services/

If your hard drive is damaged or corrupted, we will help you save essential data on the drives.
Contact us if you want to avail of our efficient and affordable hard drive data recovery services in Singapore.

JTG Systems has been providing excellent customer service in the Field of Computer repair ever since.
We pride ourselves on helping people and the good work we do in the area.
Niagara region is our home base, We have Grown as a business here over the last 10 Years and will continue our Rapid growth based on Timely service, Quick Fixes, and Legendary turnaround times.
We are the best, We will stay the best.
The Strong Brand backed by hundreds of people in Niagara Region that Say, "JTG Systems is the best!"
See our Testimonials Section, and The Google Reviews you see on the internet.


External (USB) hard drive or portable hard drives comprise an enclosure made up of a typical hard disk having a USB interface adapter.
Hence, these kinds of products are susceptible to all the common problems associated with hard drives and others that the external enclosure and interface may contribute.
Portable external hard drives are usually dropped or toppled over; this almost always triggers a physical fault of some sort and leads to the hard drive making a ticking sound if it is next powered-on.
Retrieving the information from portable hard drives with defects similar to this is possible when the specific fault has been identified and the storage device has been accurately repaired.Visit our website:


