


Read this article to find out what to do if an antivirus removed important files and how to recover them. What is a quarantine and how to configure exclusions for an antivirus? Learn more about causes of data loss and available effective methods to restore missing user files.
Introduction
The harmful effects of viruses may result in all kinds of damage to your data: erasing, encrypting, overwriting, destroying system files and file allocation tables, and other unpleasant consequences that affect the work of certain hardware elements, or the computer in general.
The antivirus activities meant to combat all kinds of malware may sometimes lead to situations when certain important user files are removed by the antivirus trying to cure the operating system or repair consequences of a virus attack. In this article, we will tell you what to do if an antivirus removed the files you need, and how they can be recovered.
Why it is necessary to use an antivirus?
Security always comes first. In the times when computing technologies and data processing are developing rapidly, safe use and storage of information requires special attention and specialized software.
Viruses pose a most widespread threat for personal computers, and they can have a devastating effect on the data they store and the hardware they are made of.
Such malware can self-replicate and infect all devices connected to a computer and therefore provoke more serious issues. Malware effects include errors in the work of your computer or devices connected to it, which may provoke interruptions in your work and even result in loss of important data. That is why it vitally important to protect computing devices from malware and ensure safety of data, including its protection against unauthorized access.
Quarantine and exclusions settings in products by Kaspersky
Most virus developers are knowledgeable about the methodology of antivirus companies who strive to ensure computer safety and protect user data from various threats, and that is why they try to disguise virus activities to make them look as typical behavior of safe applications, or embed the malicious code into ordinary files.
Being the main element in the protection of personal computers and other digital devices, Kaspersky antivirus keeps user and system files secure from hacker attacks and malware intrusions. Following its internal settings, Kaspersky removes infected or dangerous files when they are detected, and this way, it prevents undesired effects for the operating system and secures all user data against devastating consequences. That is why may users can be surprised to find out that Kaspersky antivirus removes files automatically without asking for permission.
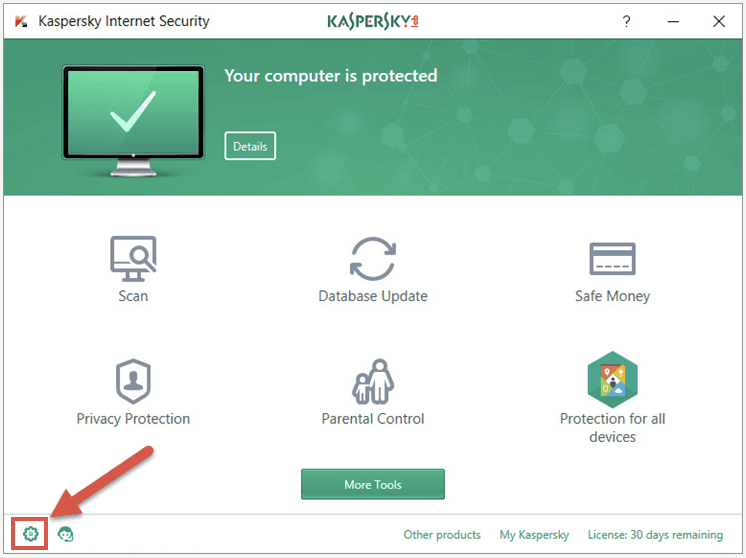
So if users prefer, on their own responsibility, to make independent decisions what to do when malicious objects and suspicious activities are spotted, they can disable automatic deletion of files in a few simple steps. Open the window of your Kaspersky antivirus or any other product by this company, and click the gear-shaped Settings button in the lower left corner of the screen. As an example, we’ll be using Kaspersky Internet Security, but the described algorithm is good for all company products.
In the settings window that opens, find the section Interactive protection and uncheck the box next to Perform recommended actions automatically.
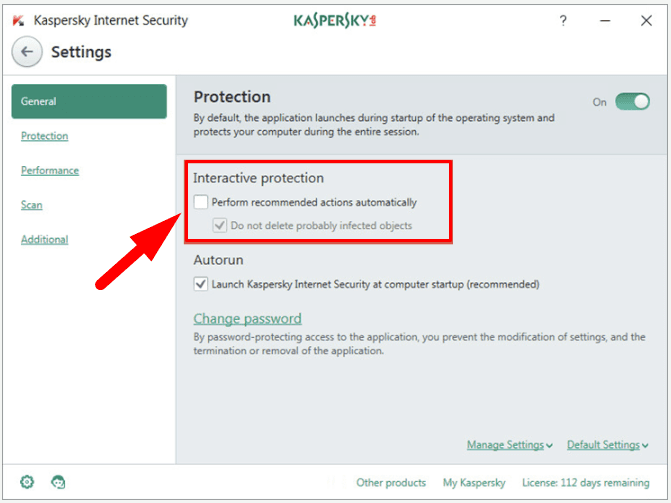
Now the automatic removal of harmful files which cannot be cured is disabled.
In this case, all detected harmful or suspicious files will be isolated and placed into the quarantine – a special storage for items whose activities raise doubts or which are considered to be dangerous for the computer and the data. The functionality of Kaspersky Lab products lets users recover important files from the quarantine in case they are removed by the antivirus.
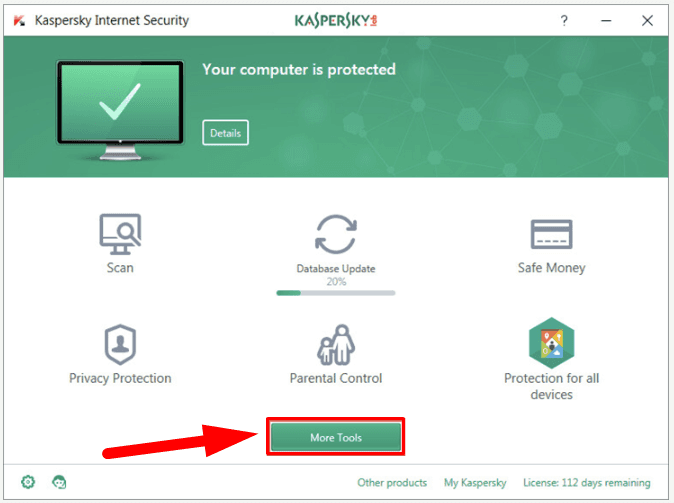
To access the quarantine, open the main window and click the button More tools in the central panel.
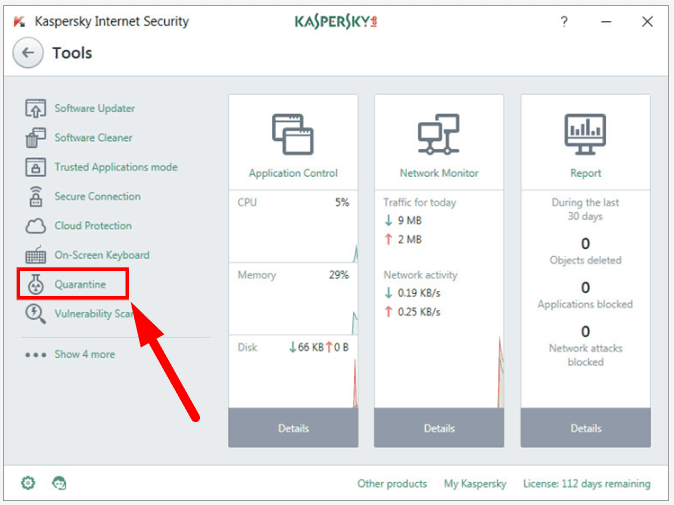
In the new window that opens, select Quarantine from the list of available tools.
The new page will show you all backup copies of the files that have been removed or modified in the course of curing. Check the files you are looking for and click the button Restore, or right-click on the selected files and choose a corresponding option from the menu that appears.
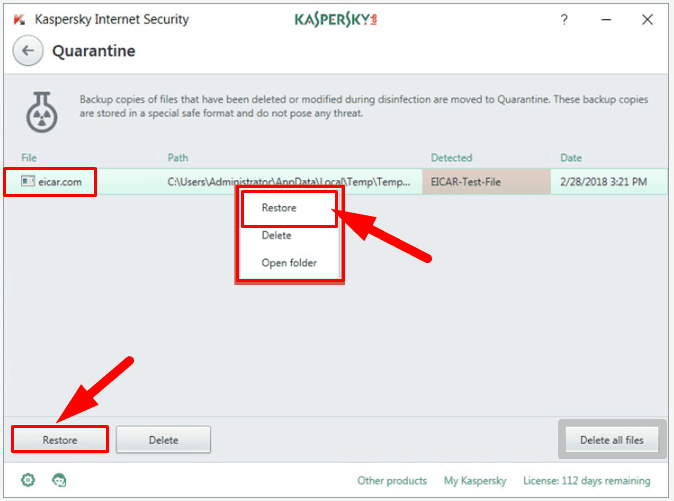
Now the files removed by Kaspersky antivirus will be restored.
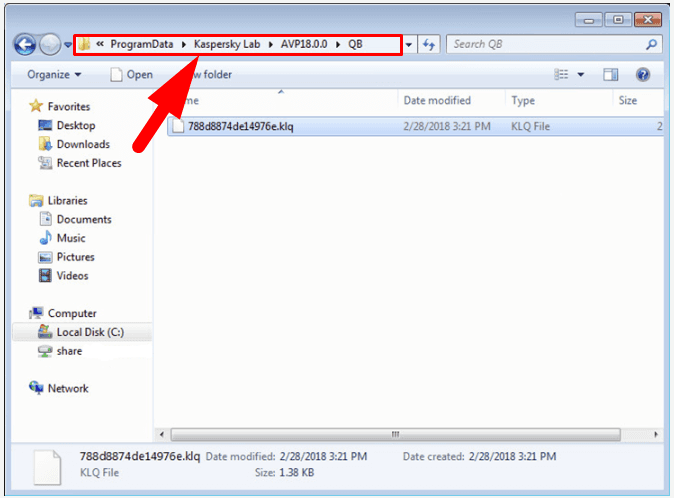
Physically, the quarantine and the files inside it can be found by following this path:
C:\ProgramData\Kaspersky Lab\AVP17.0.0\QB
Open the Windows File Explorer and follow this path, or paste it into the address bar for immediate direct access.
If you possess advanced skills in data security and are confident that certain files or apps are safe, you can add them to the Kaspersky exclusions list so the antivirus will not monitor them.
On the left panel of the settings window, go to Additional, and then click on the text link Threats and Exclusions in the right panel.
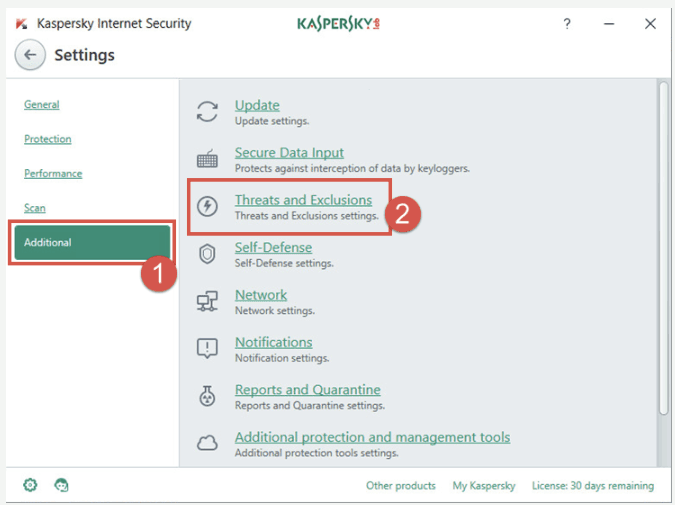
In the settings page that opens, find Exclusions and click on the text link Manage exclusions. In a similar way, you can configure the list of trusted applications by choosing the corresponding link Specify trusted applications, and the antivirus will ignore such applications when they start.
In the new pop-up window, click on the Add button.
In the next page, specify the file or folder you want to exclude from the antivirus monitoring by clicking the button Browse, set the object name or name mask according to the Virus Encyclopedia, select corresponding protection components and then click Add for the changes to take effect.
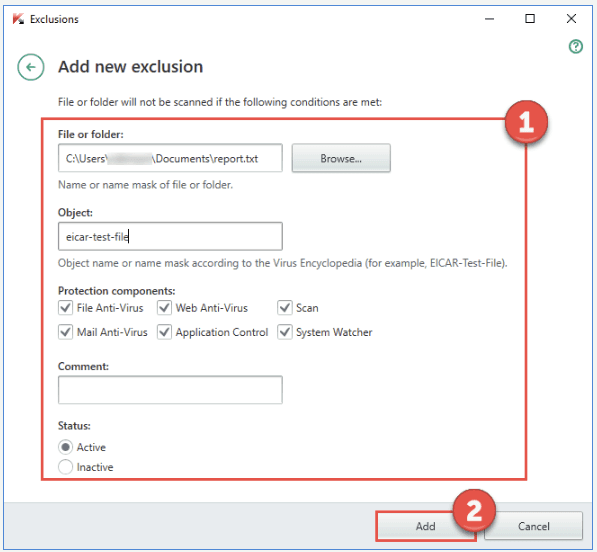
The status Active sets the exclusions list, and the antivirus won’t be checking the selected files and folders, while the status Inactive means this rule is ignored and the antivirus will check everything without missing a single file.
Find deleted files with integrated Windows tools
If you can’t find your files and think they have been removed, but they are missing from the quarantine either, don’t panic: there are other ways to help you get your data back.
First of all, you need to make sure that the missing files were really erased and not just sent to the Windows Recycle Bin which is the typical directory for temporary storage of deleted items. This idea seems so obvious, but we mean exactly what we say: always check the Windows Recycle Bin for the files you think are gone. Sometimes, they end up right there, and all your trouble can be over the very second you open the Recycle Bin.
The next step in restoring the files you need is to use integrated features of your Windows to recover the lost data from backups you may have created previously.
The essential condition for using a backup copy to recover lost or deleted data is to have the backup feature configured and enabled in advance. If files are already missing, you can’t recover anything from a backup copy - because you can’t archive what is gone. That is why turning the backup feature in advance is crucial. You can learn more about various backup options in the “Windows” operating system, their advantages and preferred settings from our video review.
Some applications in Windows may synchronize their data with the cloud storage service OneDrive, which is also a good choice for keeping backup copies of certain documents. Do not exclude this opportunity and check the cloud storage too. You may find copies of the missing files there, and there will be no need to search for them elsewhere.
If the backup feature has been enabled in advance, recovering files won’t take too long, and there are several ways to do it.
Recovering files from a backup to the current directory
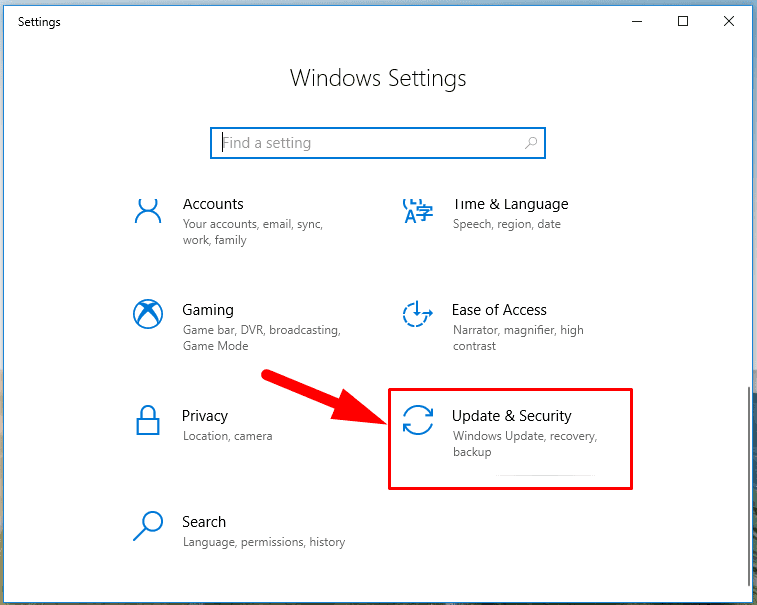
You can start recovering files with the tool named Backup and Restore (Windows 7) in one of the following ways: from the Settings app (in Windows, it combines all of the most essential settings and controls) or from the Control Panel. For example, open the Settings app by pressing the key shortcut Windows + I. Scroll down to the section Update and Security below.
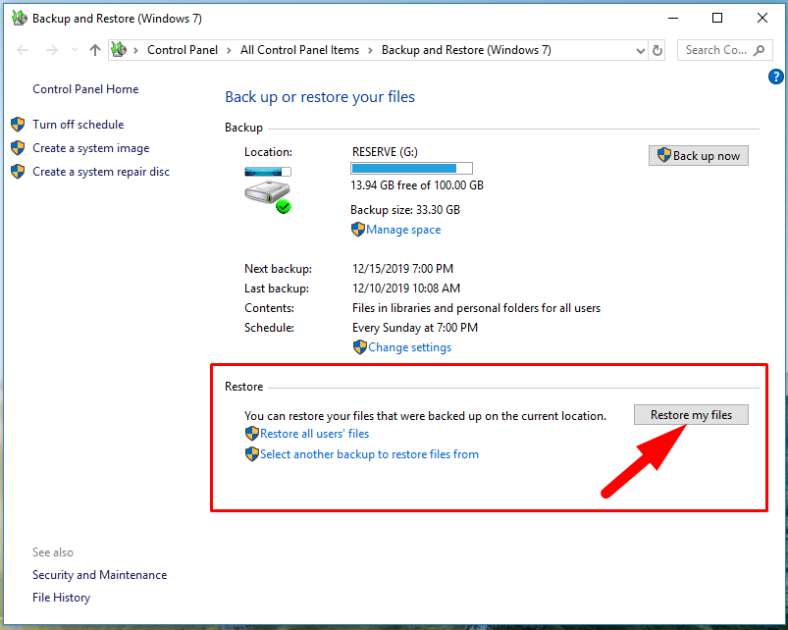
In the left panel of the new window, find the line Backup, look to the right to find Looking for an older backup? and click on the hyperlink Go to Backup and Restore (Windows 7).

The backup and restore window will open, and you'll be able to start the recovery process by clicking on the button Restore my files in the Restore section.
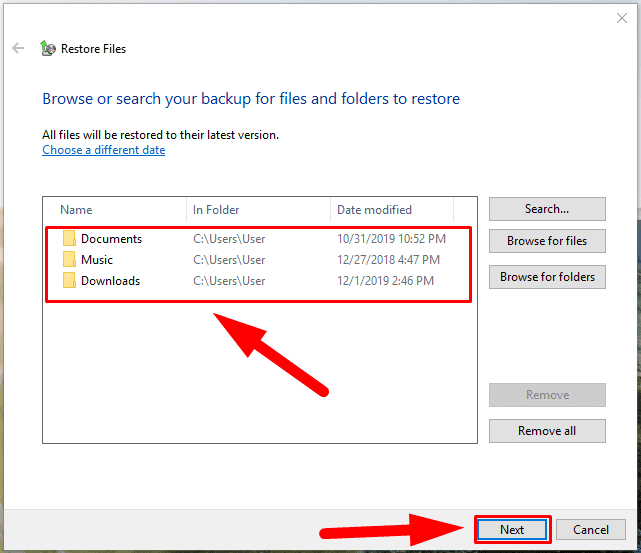
The operating system will launch the data recovery process; in the new window Restore Files it will suggest you to select files and folders from available backups for further restoration using the following control buttons: Search, Browse for files or Browse for folders.
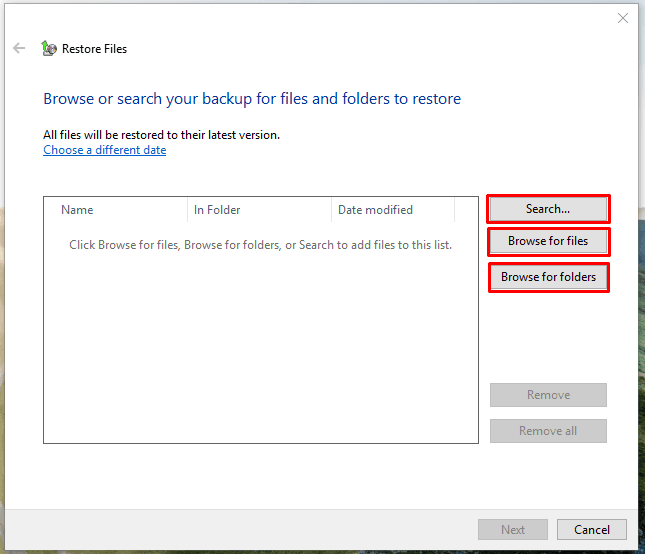
Use any of the buttons to find the files or folders that you need and add them to the recovery list which you will see in the central panel. After that, click Next to continue.
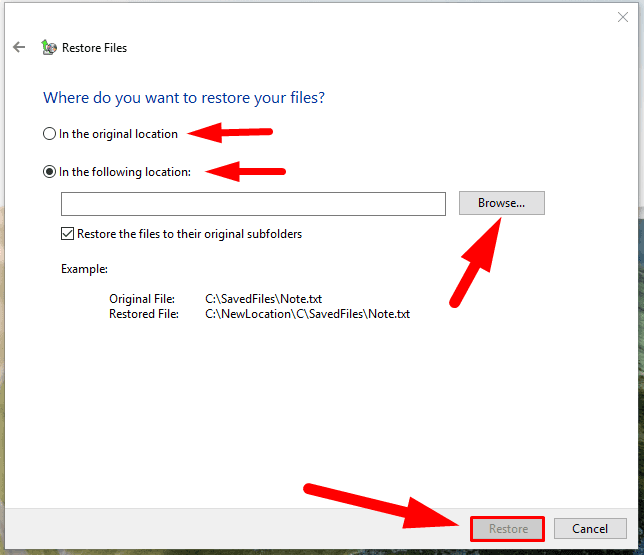
In the following window, select location for saving the recovered files. You can either choose the original directory where the files used to be stored before deletion, or specify another directory where they should be saved using the Browse button. Finally, click on the Restore button to complete the operation.
Recovery from previous versions
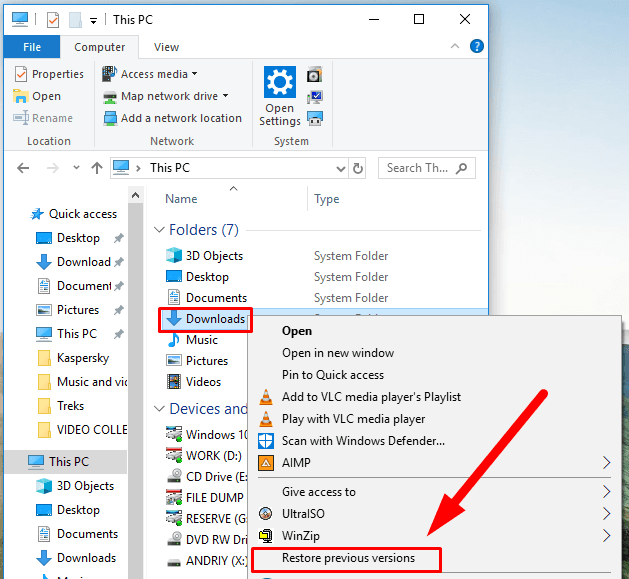
This method is quite easy and lets you restore latest versions of files and folders from their previously saved copies. Open the Windows File Explorer in any way you prefer: from the main Windows menu, by double-clicking the desktop shortcut or by clicking on the File Explorer icon on the Taskbar in the lower left corner of the screen. In the window that opens, browse to the directory where you used to store the files, select the logical disk, partition or a specific folder, and then right-click on the selected item. A context menu appears; from the list of available actions, select Restore previous versions.
In the Properties window for the selected item, find the tab Previous Versions to see all previous versions of this item saved automatically in accordance with the backup settings you have configured. Select the version you need from the list and restore the data you are looking for.
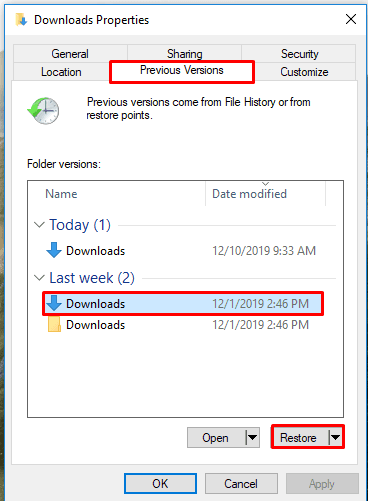
It should be noted, though, that using this method to restore files means overwriting the currently existing item with its earlier version which you selected. It means that you won’t be able to bring back the currently existing item as long as you overwrite it this way, so always keep this aspect in mind when choosing to use this particular method to restore your data.
Recovering deleted files with File History
An outstanding advantage of this method is the opportunity to set and then increase the total number of specific folders which you want to back up and which could be restored in case the original items are lost, damaged or removed. You can change the amount of data for backup and be confident of the guaranteed recovery.
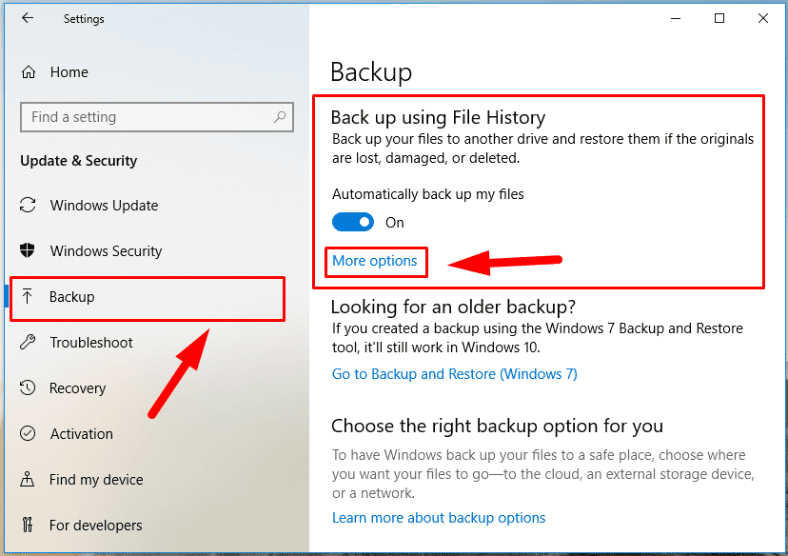
Open the Settings app and select Update and Security just as shown before in this article. In the left panel, select Backup and click on the hyperlink More options in the right panel (you can find it in the section Back up using File History.
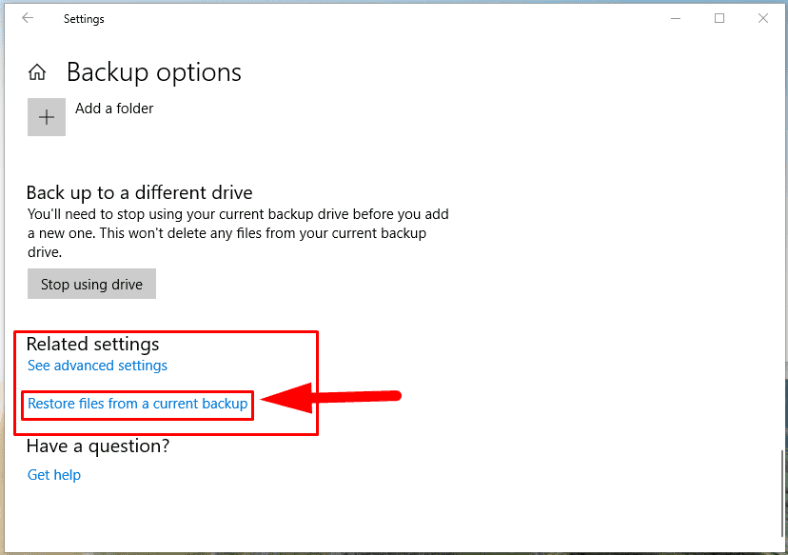
In the Backup Options window that opens, scroll down to Related Settings and click on the hyperlink Restore files from a current backup.
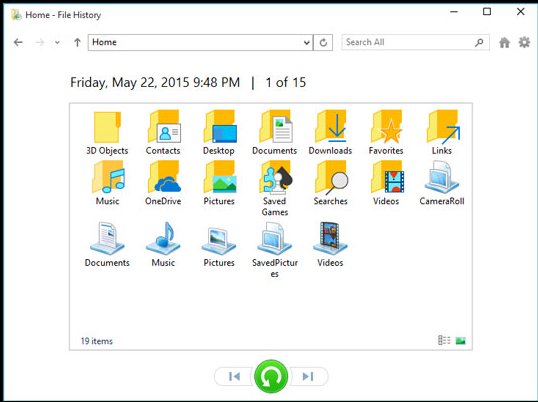
The File History home screen will show you all archived versions of the selected folders that Windows has backed up automatically according to your preferences. The archives arranged by date will be kept for an unlimited period of time. Using the navigation buttons in the lower part of the window you can switch between versions of backups saved for a certain date, and select the one you need. As soon as you select the necessary files and folders in the central panel, click on the green round button with the circling arrow inside - Restore to original location - and the selected items will be restored immediately and ready for use.
Conclusion
The increasingly growing volumes of data and its total digitalization makes users think about its safekeeping and using it in a secure environment.
The wide range of products offered by Kaspersky Lab are most important tools to protect computers from various network threats and harmful effects of malware. An antivirus can protect the user’s device and all their data from possible virus attacks and repeal any infiltration attempts by removing viruses and infected files. However, sometimes the antivirus can go nuclear and remove important user files which calls for data recovery solutions.
Al antivirus products by Kaspersky Lab feature an integrated tool protecting your data from being deleted by mistake: it’s the quarantine, and it stores safe copies of deleted files and virus threats. Just check the quarantine, as there are high chances you can find the missing files there.
If the important files are gone, and you can’t see them in the quarantine, you can always use special functions of Windows 10, provided that the backup feature has been configured and enabled in advance.
Saving backup copies of important files regularly and automatically will help you restore information from the previously created copies, should you encounter unexpected loss of data.
In addition to the system-integrated features, or when a backup is missing or damaged, you can still resort to professional data recovery tools like Hetman Partition Recovery, and have all your lost files back - with a guarantee.


Activation.kaspersky.com antivirus for your mac and pc.Below mentioned are the services provided by activation.kaspersky.comhttps://www-activationkaspersky.com

What are the most common causes of a fatal error while installing Kaspersky?The most common causes of this error are:C:Junction ProgramData's point may be pointing to the wrong spot.A Leftover Registry Key may be present on your device.There may be leftovers from a previous protection kit that hasn't been fully removed.This error can also be caused by a device cache file.Another security device on your machine may be the source of the problem.reasonThe Kaspersky Endpoint Security installer uses the Open Local Machine GPO (GPO OPEN LOAD REGISTRY) feature to create a local group policy that enables you to disable Windows Defender and configure the installation settings.
The error occurs if the domain policy prevents disabling Windows Defender on a target host.
responseOn the target host, apply the GPO (Group Policy Object) policy with default settings — Default Domain Policy, where all Windows Defender values are set to Not configured.On target hosts, force the community policies to be applied.Restart the machine if necessary.Reinstall the application if necessary.What do you do if the solution doesn't work?If the above solution did not work, try the following:Remove the host from the Active Directory domain for the time being.Local community rules should be reset.Reinstall the application if necessary.Return the host to the Active Directory domain after the installation is complete.If you are still facing Kaspersky fatal error during installation problem, contact Kaspersky technical support @+1-888-362-0111.
Please provide a thorough explanation of the issue.
See the knowledge base's guide to making a request before contacting help.

activation.kaspersky.com: To activate your Kaspersky product, ensure that you have an account to locate your Kaspersky activation code in order to activate the subscription.
Check the list error and if you are facing any of the Kaspersky error code or message, connect to Kaspersky customer support.

Kaspersky antivirus is the program which is used mostly for the protection of the system from the virus.
because Kaspersky antivirus has the feature of scanning the virus while you are using the internet.
Kaspersky antivirus removes and deletes viruses from your system instantly.
if you are facing the problem related to the virus in your system .
so install the kaspersky and activate it.
you will get a Kaspersky Activation Code for start the Kaspersky antivirus application enters the activation code in the software program.

An antivirus program developed by Kaspersky Antivirus protects the computer from malware and other security threats.
The antivirus program works primarily on systems running Mac OS X, Microsoft Windows, and Linux (for business users).
For more information visit our website.

Download Kaspersky with activation code• Each copy of a multiple-device license for Kaspersky Anti-Virus 2019 (for example, a 3 PCs license) is installed and activated in the same way on all computers you want to protect.https://downloadkaspersky.com/


