


If you have lost your QuickBooks data files and are looking for a way to recover them, then the QuickBooks Auto Data Recovery tool can be a great solution for you. This tool automatically creates a backup of your data and can be used to recover lost or damaged files. Losing important data files can be a major setback for any business, but with QuickBooks Auto Data Recovery, you can easily restore all of your transactions, with the exception of the ones that were done at the last minute. If you want to learn how to use this tool to recover your Deleted files in QuickBooks, keep reading this post. Alternatively, you can also contact our QuickBooks Support team professionals at +1(844)405-0907 for immediate support and assistance.
In this guide, we will walk you through the steps to recover lost data files using QuickBooks Auto Data Recovery.
Step 1: Verify that QuickBooks Auto Data Recovery is enabled
To check if QuickBooks Auto Data Recovery is enabled, follow these steps:
· Open QuickBooks and press the F2 key on your keyboard to open the Product Information window.
· In the Product Information window, locate the File Information section.
· Check if the QuickBooks Auto Data Recovery status says "ON". If it says "OFF", you will need to enable it.
· To enable QuickBooks Auto Data Recovery, go to the QuickBooks Help menu and select QuickBooks Desktop Help.
· In the QuickBooks Help window, select Search and type "Auto Data Recovery" in the search bar.
· Select the topic "Recover lost data with QuickBooks Auto Data Recovery" and follow the steps to enable it.
Step 2: Identify the file to be recovered
Before you can recover your lost data, you need to identify the file that needs to be recovered. To do this, follow these steps:
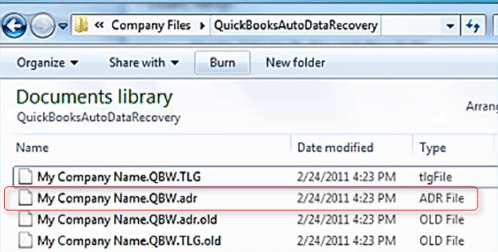
· Open the QuickBooks Auto Data Recovery folder. This is located in the same location as your company file.
· In the QuickBooks Auto Data Recovery folder, locate the two files with the extension ".QBW.adr" and ".QBW.adr.old".
· The ".QBW.adr" file contains the most recent copy of your data, while the ".QBW.adr.old" file contains an older copy of your data.
· Check the date and time stamp on each file to determine which one contains the data you need to recover.
 tep 3: Restore the lost data
To restore the lost data using QuickBooks Auto Data Recovery, follow these steps:
· Create a new folder on your desktop or in a location of your choice and name it "QB Test".
· Open the QuickBooks Auto Data Recovery folder and copy the ".QBW.adr" file to the "QB Test" folder.
· Rename the ".QBW.adr" file by removing the ".adr" extension. The file should now be named "company_file.QBW".
· Open QuickBooks and go to the File menu. Select Open or Restore Company and then select "Open a company file".
· Navigate to the "QB Test" folder and select the "company_file.QBW" file.
· If the file opens successfully, your data has been restored. If not, repeat the process using the ".QBW.adr.old" file.
Visit here: Ways to open qbw files without using QuickBooks
In conclusion, we hope that the steps provided in this post have helped you in recovering your lost data files using the QuickBooks Auto Data Recovery tool. However, if you encounter any issues or need any further assistance, please do not hesitate to contact our QuickBooks Support team professionals at +1(844)405-0907. Our team of experts is always available to assist you and clear any confusion you may have, ensuring that you can recover your lost data files and get back to your business operations quickly and efficiently.


If yes, then reading this post ahead would surely help in open QBW file successfully.
QBW file is core of QuickBooks, as all the files created in the software are saved with this format.
It is basically a type of file extension used for QuickBooks company data file.
In this post, we will be talking about the comprehensive steps involved in opening this file without even opening QuickBooks.
Thus, to know more, make sure to continue reading this post carefully.
Or you can also consult oursupport team via our toll-free numberi.e.+1-844-405-0907.

u have the QBB extension file but don’t know anything about it?
Here you get to know how to open the QBB file without QuickBooks with detailed steps.
The file extension .qbb is used for the backup files of QuickBooks that has the data related to your QuickBooks account.
When you create the backup of your QuickBooks account it saves with the QBB extension in your system.
This backup file can be restored in QuickBooks or open without QuickBooks whenever required.QuickBooks is an application that records the finances of an entity whereas the corporate file which is made in QuickBooks is in .qbw file extension stored locally on your computer.
Users trying to open the qbw file are required to require the backup of their latest company file which can be in .qbb file format.

The regular way to open the qbb file is by opening it through QuickBooks but sometimes when QuickBooks stopes working, but there is an alternative way to open it.
Go through the given link to learn on how do i open a qbb file without opening QuickBooks.
Need technical help dial: (855)-526-5749.

Open QBW files without QuickBooks is relatively easy, but sometimes users might face problems in doing so.
For this, you can use the export feature to transfer your company file in MS Excel.
For more information, go through the link given or call us on a toll-free number (855)-526-5749.


