


When you start selling on Amazon, you must register as a seller. To do so, you need to create an Amazon seller account.
On Amazon, this account is called Seller Central account. You’ll need to select a selling plan—Individual or Professional, and register on Amazon.
Keep reading to find out how to select the selling plan that works best for your Amazon sales, and get a step-by-step registration guide.
Choosing A Selling Plan
There are two selling plans on Amazon — Individual and Professional. It is essential to select the right one. An Individual plan is suitable for you if you plan to sell single products occasionally. A Professional plan is a perfect opportunity if you sell many products monthly.
Individual selling plan
Under the Individual plan, there is no monthly payment. However, you will be charged $0.99 for every unit you sell. This plan is viable for you if you’re going to sell less than 40 products per month.
An Individual plan is suitable for you if:
- you plan to sell fewer than 40 units monthly;
- you’re testing what to sell;
- you’re going to sell from time to time;
- you’re not going to advertise or use advanced seller tools.
Professional selling plan
With a professional account, you’ll pay $39.99 per month. A Professional account will save you money if you plan to sell more than 40 products monthly.
In addition, the Professional plan gives you access to many marketing and reporting tools. You can qualify for the Buy Box, enroll in different seller programs, and more.
A Professional plan is suitable for you if:
- you plan to sell more than 40 units a month;
- you want to advertise your items;
- you intend to qualify for top placement on product detail pages («win the Buy Box»);
- you’re going to use Amazon marketing, selling, and reporting tools;
- you want to enroll in seller programs;
- you plan to sell products in restricted categories.
Once you’ve selected between the Individual and Professional selling plans, start creating your Seller Central account.
Related: Amazon Seller Central: Complete Guide
How to Create an Amazon Seller Central Account
Registering Amazon Seller Account In 10 Steps
Step 1. Prepare your business and personal details
When you register an Amazon Seller Central account, Amazon will ask you to submit the information you’ll need to sell, like your email address, bank details, and more.
Information you need to register the account:
- business email address or Amazon customer account;
- valid credit card;
- government ID;
- tax information;
- phone number;
- a bank account where Amazon can transfer the money you earned from sales.
Step 2. Open the «Start selling with Amazon» sign-in page.
Enter your email and click “Create a New Account.”

«Start selling with Amazon» sign-in page
Step 3. Select between an Individual and a Professional seller account
To be able to select between an Individual and Professional seller account, start your registration in the top navigation menu—select the “Pricing” tab and click “Compare selling plans.”
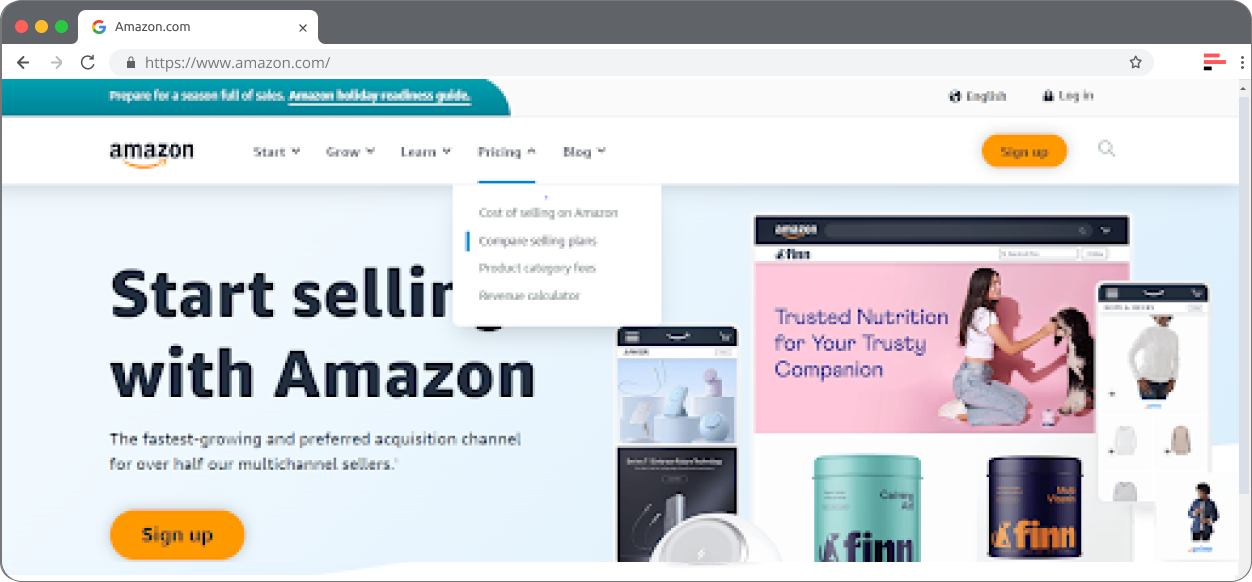
Start your registration in the top navigation menu—select the “Pricing” option
If you start with the “Sign up” button, you will be directed to the Professional seller account registration page.
Choose an Individual or Professional seller account.
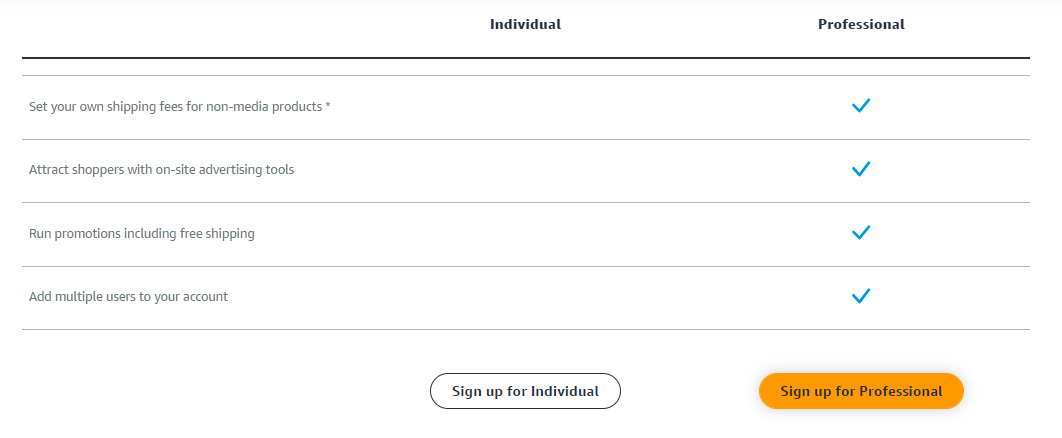
Choose an Individual or Professional seller account
Step 4. Enter your e-mail address, and password
After selecting the selling plan, you will get to the next window, where you’ll have to enter your email address and a password for your account.

Enter your email address and a password
Once done, click “Next.”
Amazon will send the verification code to your e-mail. In the next screen, enter it where necessary and click “Verify.”

Enter verification code to your e-mail
Step 5. Add your business location and business type
In the “Business location,” specify the country where your business is registered. You must input the correct data because it will be verified.

Select your business location
In the “Business type,” choose from your business entity types:
- state-owned business;
- publicly-owned business;
- privately-owned business;
- charity;
- none, I am an individual.
If you’re not a business owner and plan to sell as an individual, select the last option. With this option, you will need to specify your full name—add your first, middle, and last name.
Related: How to Sell on Amazon for Beginners - Complete Guide
How to List Products on Amazon in 2023 - Complete Guide

Specify your full name
Click “Agree and Continue.”
Step 6. Enter your personal and business details
In this step, you’ll need to specify your citizenship, date of birth, proof of identity, business address or home address, and phone number.
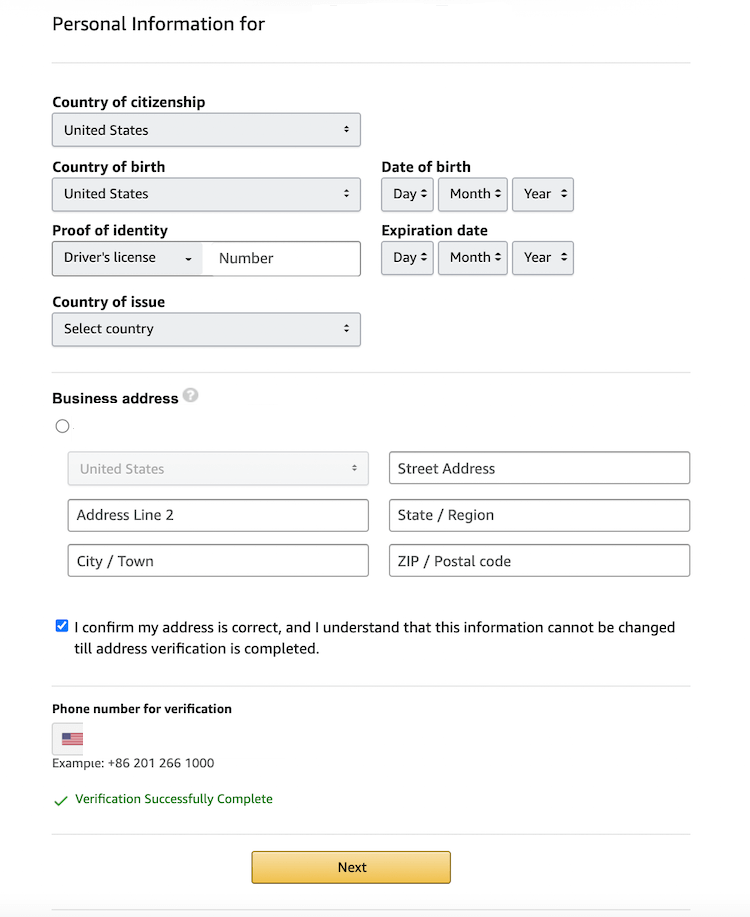
Enter your personal and business details
Add all requested information, including proof of identity (passport number or driver’s license).
Ensure the address you added is correct. That is important since Amazon will send a postcard with another verification code to this address. You’ll need to specify it before you can use your account.
Add a correct phone number.
Once done, click “Next.”
Related: Amazon Account Health: A Guide for FBA Sellers
What is Amazon Seller Account Health Rating?
Step 7. Enter your payment method
At this step, you’ll need to specify your billing information—bank account number and a valid credit card number.
On this page, click “I Understand.”

Click “I Understand" to add bank details
You’ll get to the next page and need to add your bank account details. Amazon will verify them.
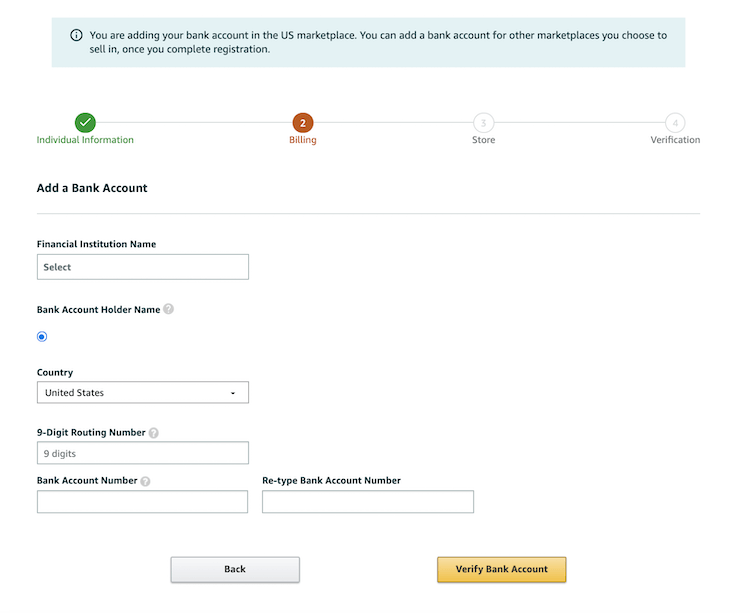
Add bank account details
After entering and verifying your banking information, add your credit card details.

Add your credit card details
Click “Next.”
Related: Amazon Business Models: How to Choose the Right One?
Step 8. Submit your Amazon store’s name
At this step, you’ll give your store name and add product details and Universal Product Codes (UPCs). If you are a manufacturer or brand owner with registered trademarks, tell that Amazon.

Give your store name and add product details
Specify the following:
- the name of your Amazon store;
- if you have UPCs for your products;
- if you have diversity certifications;
- if you are the manufacturer or brand owner;
- if you select “Yes” or “Some of them,” answer the question, “Do you own a government-registered trademark for the branded products you want to sell on Amazon?”
Click “Next.”
Related: Amazon Seller Central vs. Vendor Central: All You Need To Know
How to Create an Amazon Best Product Description that Ranks High in Search
Step 9. Verify your identity
Upload a picture or a scan of your ID. You may also be asked to upload a bank account or a credit card statement.

Verify your identity
Click “Submit.”
Confirm the business address. Click “Confirm.”
The next page will tell that you will receive a postcard with the verification code at that address.

Address verification page
When you receive the card, specify the verification code provided in the “Enter code below”‘ field.
Click “Next.”
Step 10. Wait until Amazon approves your account.
Final Thoughts
To start selling on Amazon, you must register as a seller. To do so, you need to create an Amazon seller account. You’ll need to select a selling plan—Individual or Professional, and register on Amazon.
After that, you’ll need to select profitable products you’re going to sell. Seller tools help you choose the right products. With such tools, you’ll earn money and avoid problematic products that create issues for sellers.
Seller Assistant Аpp is one such tool. It’s an all-in-one extension incorporating all features vital for product research. Advanced IP Alerts can immediately tell you if a product has any sales restrictions or has previously triggered problems with account health. It combines an FBM&FBA profit calculator, Quick View, Stock Checker, and Restrictions Checker in one tool.
Originally published at https://www.sellerassistant.app/blog/how-to-create-an-amazon-seller-central-account


shipping from china to amazon fbahttps://www.chinafreight.com/shipping-to-amazon-fba.htmlChina Freight focuses on providing comprehensive services for shipping from China to Amazon FBA from around the world, at an affordable price.

Are you looking for an Amazon tax accountant for Amazon sellers, SterlinxGlobal provides affordable handsfree online accountancy services for Amazon sellers.
We use the best industry-leading tools for our customer's businesses.


Here are some basic tips on how to sell on Amazon for beginners.
Create a Zonbase account today to start selling on Amazon like a pro!
Learn How to Sell on Amazon FBA with Our 2021 Beginner's Step-by-Step Tutorial.


