


There often occurs an error with code 0xc8000247 on Windows software that prevents users from installing any new update with the Windows update component.
There are reports by users that show that error only occurs in installing certain updates.
On the other hand, the error mostly occurs on Windows 7 t. So if you face the same error on your Windows PC or laptop, then you have come to the right place.
Go through the methods below and fix this 0x8000247 error on your Windows system.
And to run this troubleshooter, follow the steps listed below:
Press Windows Key + R to open up the Run dialog box.

Among the best part of going to a restaurant or a movie hall is getting a public Wi-Fi access.
But sometimes even after connecting to the Wi-Fi, the sign-in page does not get displayed.
To know how to get back the public Wi-Fi sign-in page, you need to go through this blog carefully.Method 1: Restart the deviceFirstly, you need to disconnect from the network.Then, disable the Wi-Fi.After that, sign-out from the user account.Next, shut down the computer.Then, switch on the computer.After that, sign in to the user account.Next, enable the Wi-Fi.Then, connect to the network one more time.Lastly, check if the sign-in page is now able to display in the browser or not.
Method 2: Go for the another browserFirstly, visit the Start menu.Then, write ‘Control Panel’ into the search bar.
Method 3: Resetting the Network ConnectionFirstly, press the Wi-Fi symbol.
It will be placed on the left-hand side corner of the taskbar.Then, press on the Wi-Fi option to turn it off.After that, switch on the network connection one more time.Switch on the Wi-Fi symbol and the Wi-Fi option one more time.Next, open your browser.Then, try to go to ‘Google.com.’ The sign-in page will now be displayed.Method 4: Updating the Network Adapter DriverFirstly, hold down the combination of Windows symbol+R on your keyboard.Then, write ‘devmgmt.msc’ into the text box.After that, press on OK.Then, move downwards to Network Adapters.Next, press the arrow for expanding the option.After that, right-click on the network adapter.Then, press on the ‘Uninstall device.’ It will be situated in the context menu.Next, reboot the PC.

Many errors are generated in the Device Manager of the system.
The error code 10 also comes into sight on various versions of Windows and is initiated chiefly in Device Manager of the system.
It is mostly correlated with the hardware and driver’s conflicting problems.Source : http://2norton.com/how-to-fix-windows-error-code-10/ Restore Drivers to Past Versions ( Windows 8.1 and 8)Steps to follow to rollback drivers to previous versions:1.
Now the Champs Bar will show on your screen.
In case you find any devices marked with a yellow exclamation sign, then it means these types of devices are out of order.8.
Now launch the Device Manager with the help of the Search Result webpage.6.

Bluetooth mouse is one of the convenient accessories for PC users.
But according to some users, once they update Windows 10, they face issues with its Bluetooth mouse.
If you would like to fix this issue, then here are some directions given below.Read more -https://2020-nortonsetup.uk.com/how-to-fix-bluetooth-mouse-not-working-after-windows-update/

In this blog, we will discuss the about the Norton Family for Android device.
As the name suggests, the Norton Family Premier offers complete protection for each of your family member.
The Norton Family Premier offers the family security with Norton Family Android, especially for the kids.
You can add restrictions according to the age of your kids.
Furthermore, you can also get a 30 days free trial version for the Norton.
Otherwise, you can face various issues with the Norton Subscription.

The error will show as:
“The Volume Shadow Copy Service used by System Restore isn’t responding/working.
Please check your “VSS” and “SPP” app event-related logs for various information regarding this.”
You have to follow these methods to troubleshoot the issue:
First of all, you have to check that the VSS is activated.
Now, hit the tab “Automatic” from the available pull-drop menu.
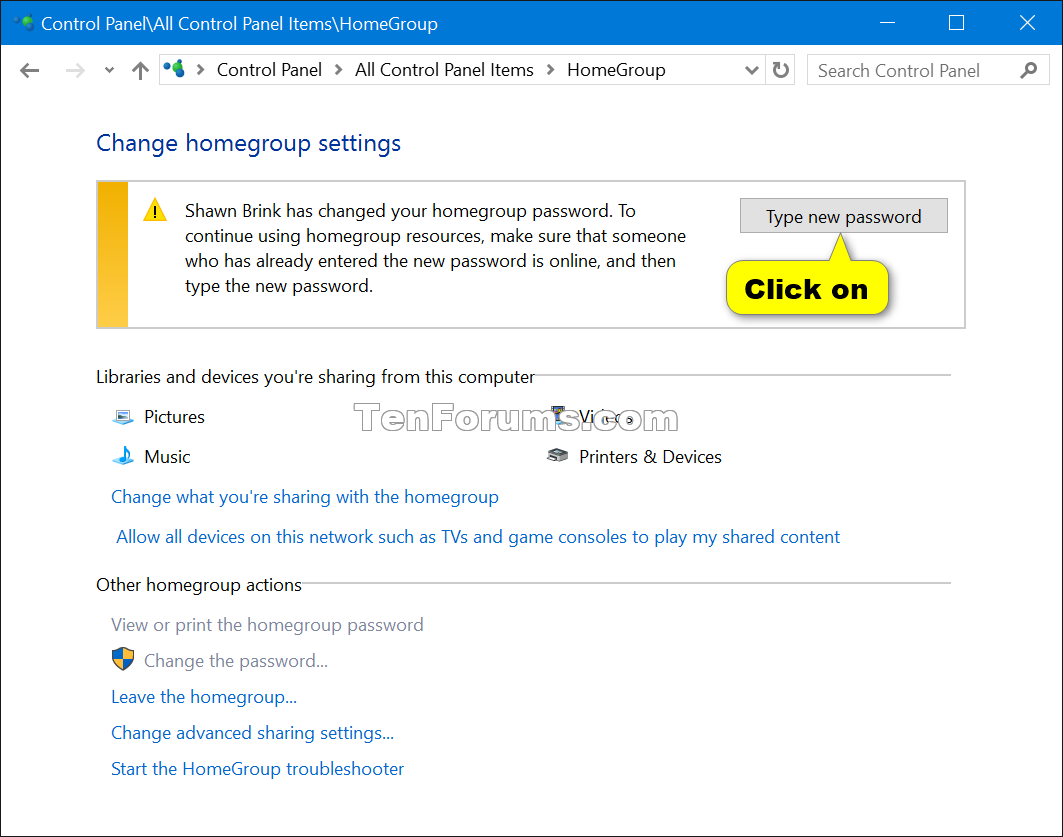
Many users are facing issues while changing or retrieving the HomeGroup password to use it on their local network.
Most of the users are trying to place the new system to the HomeGroup, or they try to remove the current system.
If you want to change HomeGroup password in Windows 10, then go through the instructions listed below.Steps to Change HomeGroup Password in Windows 10• Click on the Windows and R keys together.• Now, you will get the Run pop-up box on the screen.• Enter “control” in the search bar.• Click on the Enter option.• It will launch the classic Control Panel menu.• Press on the HomeGroup option in the Control Panel menu.• Start using the search bar to get the option in case you are not able to find it.• In the HomeGroup settings tab, press on the Change the password option.• After getting the Change your HomeGroup password menu, press on the Change the password option.• Enter the HomeGroup password.• Press on the symbol linked with the checkbox.• Press on the Enter option.• Press on the Next option,Steps to Retrieve HomeGroup password in Windows 10 through File Explorer• Go to the File Explorer.• You need to right-click on the HomeGroup.• Press on the View the HomeGroup password option.• It is located on the right side of the panel.• Now, a new window opens on the desktop where you will get the HomeGroup password.• It is located in the yellow checkbox.Steps to Retrieve HomeGroup password in Windows 10 through HomeGroup Ribbon• Go to the File Explorer menu.• Start using the left side of the menu list.• Press on the HomeGroup option to choose it.• Click on the ribbon bar.• It is located on the upper side of the screen.• Press on the HomeGroup option by going to the ribbon bar.• It is given on the upper side of the screen.• Press on the View option.• It will open the display where you can change the HomeGroup password.• Now, you will get the HomeGroup password in the yellow box.Steps to View HomeGroup Password Through Control Panel• Click on the Windows and R keys together.• It will open the Run prompt box.• Enter the “Control” in the search bar.• Click on the Enter option.• It will launch the classic Control Panel menu.• In the Control Panel, press on the HomeGroup option.• In the HomeGroup window, press on the View or print the HomeGroup password option.• It will open the menu where you will get the HomeGroup password.• It is located in the yellow checkbox.source url:- http://ww-norton.com/how-to-change-homegroup-password-in-windows-10/Ava Williams is a Norton product expert and has been working in the technology industry since 2002.
As a technical expert, Ava has written technical blogs, manuals, white papers, and reviews for many websites such as norton.com/setup.