


At the time of introduction of voice search option from Google, it was not so successful as it needed to have a louder input voice message. But, the scenario is changed completely these days. Voice search has become the most demanding feature these days. It is not exaggerating to say that voice search is revolutionizing the e-Commerce. All thanks to the rise of Alexa and HomePod has made it possible that by 2020, it is estimated that 50% of the search is done using voice search and 30% of the searches will be conducted without a screen. In 2017, in the US, more than 13% of the houses are having smart speakers and is expected to raise this number to about 50% by the year 2022. These figures infer that India needs to progress much more towards the development of voice search in e-commerce.
Role of conversational style queries
As bought into the limelight by Richard Hartley, head of Emerging Technology and Innovative Lab, the search was embraced with the conversation-style queries. Conversational searches are proving to be the most demanding, especially in the retail industry. Context and the intention of the question form basis for the conversational style searches but it is not just comprehension of words. Among many, Alexa, Google Assistance and Siri were proven to be strong competitors.
Current figures are so confusing
The above statistics may not be stable in the current scenario. As told by a Mobile app development company in Hyderabad, people are really depending on voice search to shop. It is evident with the statistics that voice search contributes to only $2 billion, out of $2 trillion e-Commerce market. 20% of the grocery shopping is done using voice search, whereas cloth shopping is accounted for only 8%. These figures are creating confusion about the importance of voice search.
Considering local
If the business is small scale industry, then it would be better to prefer local. With respect to voice searches on mobile, are three times more likely to be local? This proves that local searches are bigger. So, this makes more important to go for googling my business in place.
Conclusion:
The Future of E-commerce can be made better using some tips for voice search. Voice searches have to be kept in the first place. In the digital arena, voice searches occupy the first place. For its enhancement, e-commerce Android app development serves useful. Siri, Alexa and Google Assistant are proven to be the best. Though, it is taking time but is sure that voice searches will rule the tech sphere.


Iconic Streams - a top IPTV Provider is back here with a popular guide for step by step installation of IPTV for your iPhone, iPad, Mac, and Android.
It will also cover plenty of other devices and tablets as well.So you are not at home or traveling to reach your working place and suddenly you come to know that today is the match of your favorite sports and you don’t want to miss it.
You can’t go back home and this can be the worst thing in your life when you were waiting for it for a long time and you missed the chance.Well, fortunately, this guide will assist you in such critical situations.
With the Best IPTV Subscription plan and installation guide, you will be able to see your favorite sports anytime anywhere.The first thing that you need to do for Best IPTV access is downloading the application from Iconic Streams and install it on your Android, iPhone, and iPad.When you have the installed application you will have to press the menu button so that all the options are visible to you.Now, this is the time to delete the default server in the application.The next step of IPTV installation is to add a new remote playlist.
For that, you will have to fill out the information such as username, password, a link after Buy IPTVNow click on IPTV and start watching your favorite shows and live sports on your mobile.If still, you have any problem related to IPTV whether it is related to get IPTV Subscription or facing issues with the channel, contact Iconic Streams anytime.

Mobile app development indeed nowadays necessary for all the business.
We, as a mobile app development firm can provide high quality standard mobile app of any category.
We have worked with diverse brands, organizations, start-ups and individuals to create powerful apps from excellent idea.Our main focus, as a mobile app development company is to provide strategic planning & industry’s best product to compete in the market.Our experience and knowledge of how users interact with the app help in planning and executing the high-tech mobile app development for iPhone, Android and iPad.
Our primary mobile application development services come with perks of creative inputs, guidance of market trends and creation of apps that are worthy of your time and money, apps which work after real downloads.Mtoag as a leading web app development company, we strategies your plan and apply necessary methodology to create a perfect app for your business.
We have served many countries like USA, UK, Gulf countries, Australia, Canada, among others have benefited from the quality services that we give.

Play them in your mobile Android, iPhone, iPad and tablet.
The best exclusive unblocked games and browser games with achievements and leaderboard.

If anybody is planning to build a mobile app, they look for the best mobile apps development company.
To achieve desired ROI (Return On Investment) from the app development, you should prefer the best Android app development companies in Gurgaon, who help you to develop a killer app according to your requirement.
To choose the right mobile app development partner, we are sharing some key points, hope that helps you to find out the best mobile app developers.Look for Skilled, and Experienced App Development Partner: A reliable app development company always cares about their client’s project.
Also, they share some innovative thoughts that can help app owners to introduce an innovative app to the market.
Generally, experienced app developers who worked with many clients, obtain numerous inspired ideas that help your app become successful.
Look out the Portfolio: Looking at their portfolio also matters as the experienced app developers always have a portfolio which shows a number of apps that they developed.

Upload and install your .IPA file (iOS App) for iPhone iPad without jailbreak and share the iOS app installation easily at Installonair.
Install On Air is the fastest way for developers to create a team and distribute their in-development iOS/Android App Builds through their personal cloud in a highly secure manner.InstallOnAir.com is an easy way to distribute beta iOS and Android apps to testers.If you've been sent an .ipa file from your developer, and want an easy way to install it over the air, then you can use InstallOnAir.com this site to easily Install IPA over the air.
Are you annoyed with the crashing issues of your iPhone or iPad?
If you are also facing such issues, you need to troubleshoot the same by finding the root cause.
It might be the internal issue or the problem with your device’s battery.Here are the instructions to guide you on how to fix iPhone and iPad crashing issues:Performing a Force RestartCheck your Device properly and try to find the basic cause of the issue.
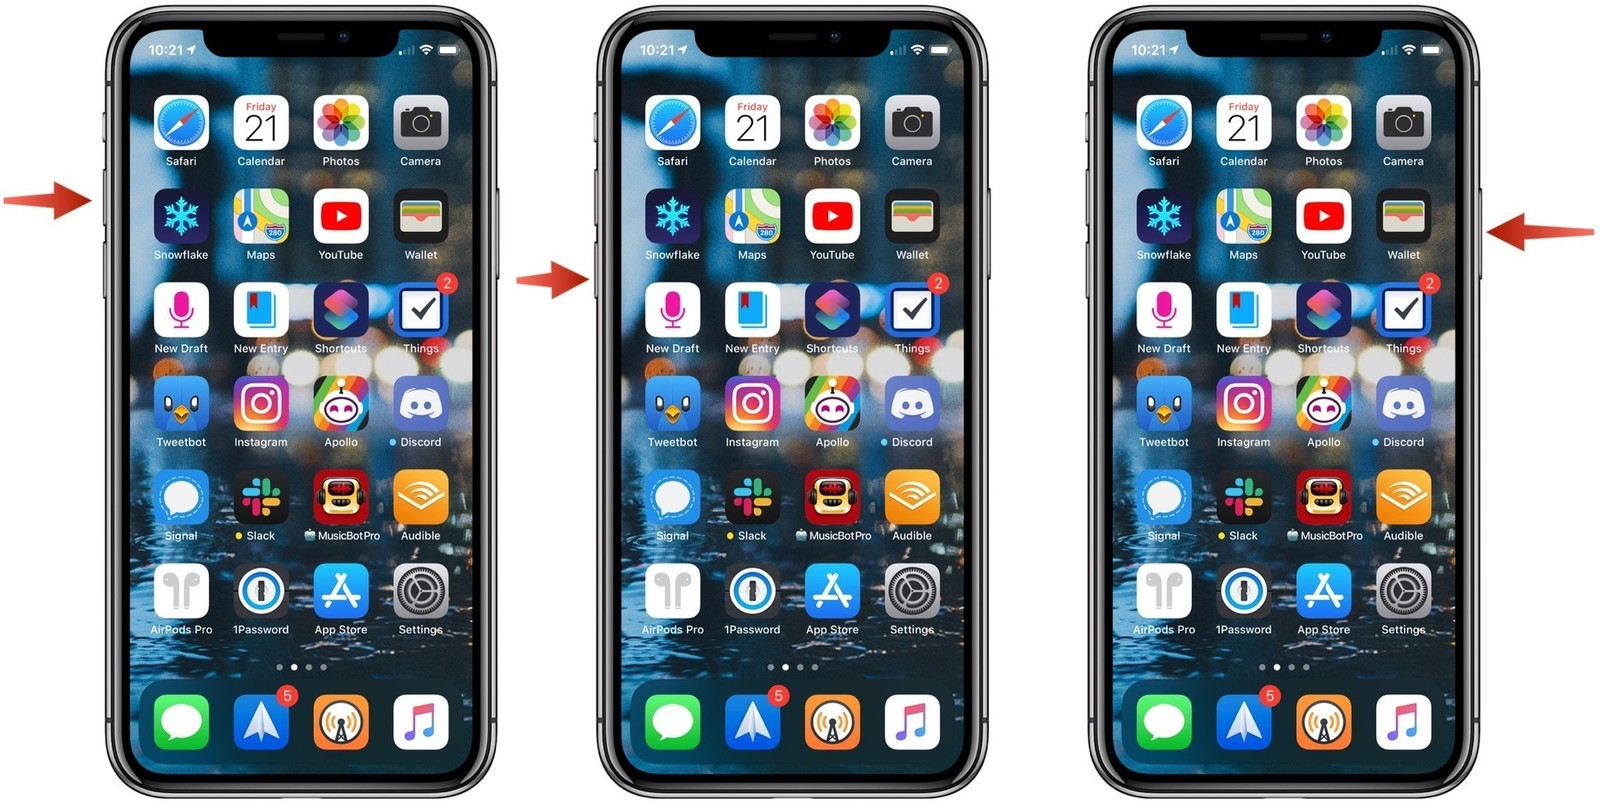
If it keeps shutting down, won’t charge, and still keeps crashing, then you can try force resetting the Device.Hard reset will help if your device is continuously shutting down or draining battery power because Wi-Fi or cellular data is turned on, rogue processes, etc.If you want to force reset your device, then follow these instructions:On iPhone 8 or AboveFirst, instantly tap and release the Volume Up tab.Then, tap and release the Volume Down button there.Now, tap and hold the side button and then release the same once you view the Apple icon.On iPhone 7 or OlderIf you are using iPhone 7 or older, then follow these steps to perform a force restart:Get started by tapping and holding down the Wake/Sleep and Volume Down buttons simultaneously.If you have an iPhone 6, or iPad with the Home tab or any other older gadget, then tap and hold down the Wake/Sleep and the Home tab at one go.Keep holding down the buttons until you view the Apple icon on your device’s screen.Wait for some time, and once the prompt screen appears on your device’s screen, release the tabs.Once the iPad or iPad has rebooted properly, then you need to check that the procedure mentioned above was effective or not.
If not, then follow the next procedure:Checking the Latest OS UpdateMake sure that your device OS is updated to the latest edition.
In order to check your device existing OS recent update, follow these instructions:At the start, go to the gear-shaped icon and then tap on it to launch the Settings page.Then, hit the General tab there.After that, click the Software Update option and then check if any update is pending for your device or not.


