


In this article, I’m going to tell you how to work with IBM controllers, M5016 or LSI 9265-8i, how to use them to create RAID60 with the help of BIOS, or with such utilities as LSA and StorCLI. Also, you’ll learn how to recover data from a crashed RAID60.
RAID60, also known as RAID 6+0, is a disk array that unites several groups of disks and combines the double parity of RAID 6 with the striping of RAID 0. You need at least 8 disks to build this array type.
As to reliability, RAID 60 has much to offer as this array type provides you with double redundancy, and can survive losing two disks in each group. However, it is still possible to lose data even from this kind of disk array.
How to create RAID60 with 8 disks in LSA (LSI Storage Authority Software)
The abbreviation LSA stands for LSI Storage Authority Software – a web application that allows you to monitor and fix problems with disk storage systems as well as create and manage various RAID configurations based on LSI/Avago controllers.
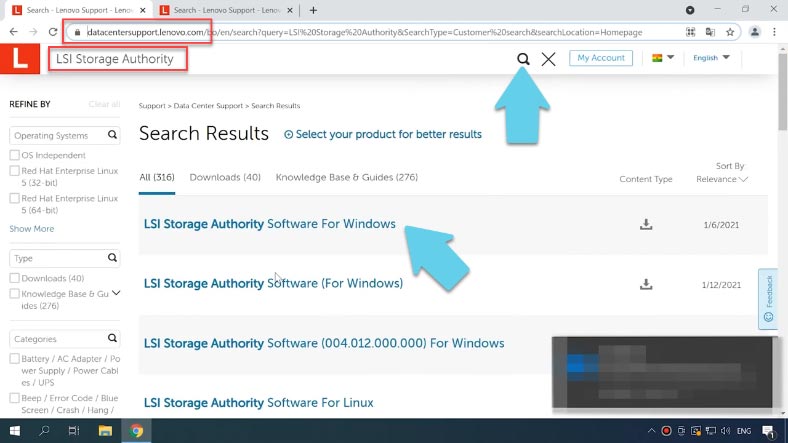
To download the latest version of the program, visit the official website. Open the Downloads tab and get the version for the operating system you are using, i choose a version for Windows.
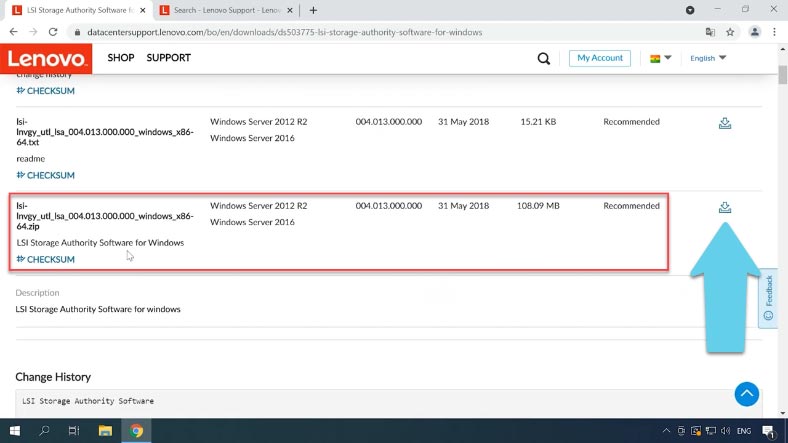
Click the download icon next to the .zip archive. Extract the files to any convenient directory and start the installation. You don’t have to fill in the customer information.
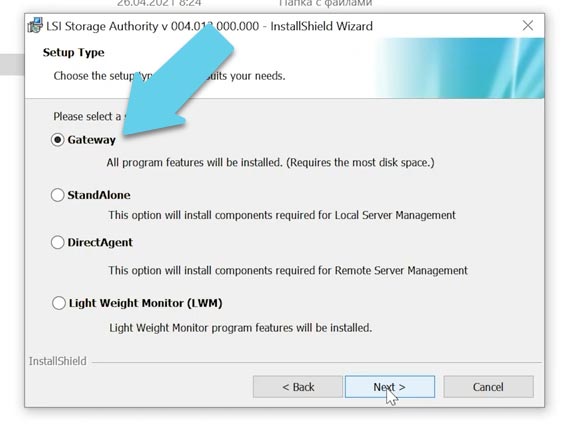
Now you are suggested to select a setup type, and you have several options to choose from: select Gateway to have all program features installed.
You can change the ports if necessary, but I leave them at default settings. Now it’s time to configure some properties.
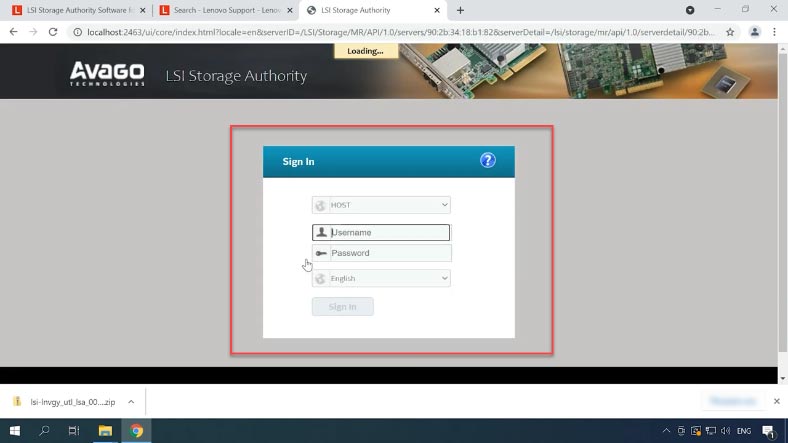
When the installation is complete, the program’s shortcut will appear on your desktop. When you start the program, it will open in the browser. Click “Sign in” here, and give the login and password to your Windows account.
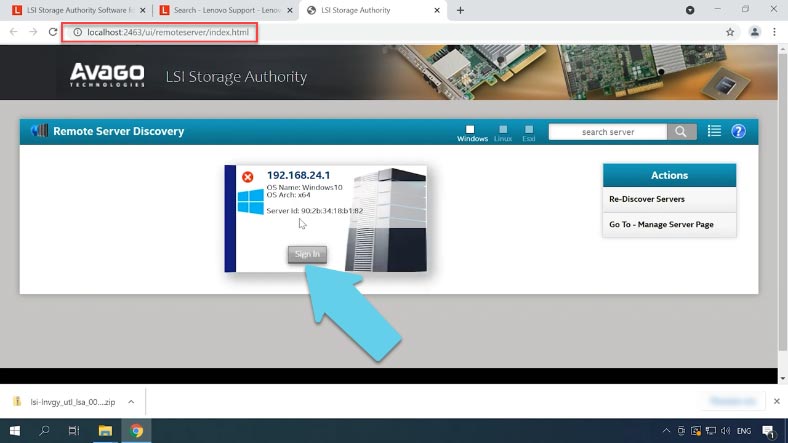
Type the login in Latin letters to avoid any issues.
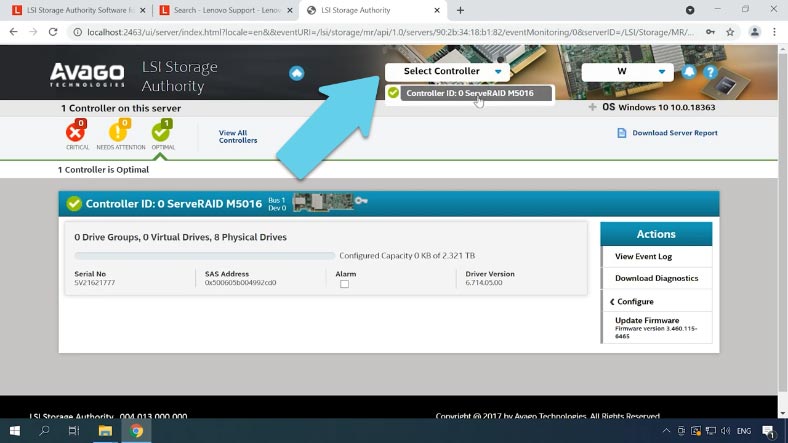
After sign-in, you’ll see the controller management screen. In the field Select controller choose the controller to use.
To create a new array, open the Configure option. If you already have a previously built RAID, delete it by clearing the configuration – just click on the Clear Configure button, check the confirmation box and click “Yes”.
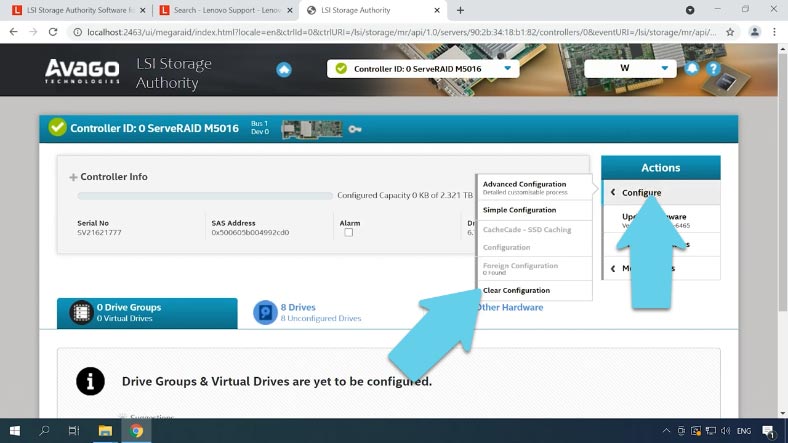
Then click “Configure” again and select the configuration method: Advanced – where you can specify all additional settings, or Simple– where some things will be set to default. I choose the first option.

In the next tab, specify the RAID level, then add the drives it is going to consist of, and add a virtual drive.
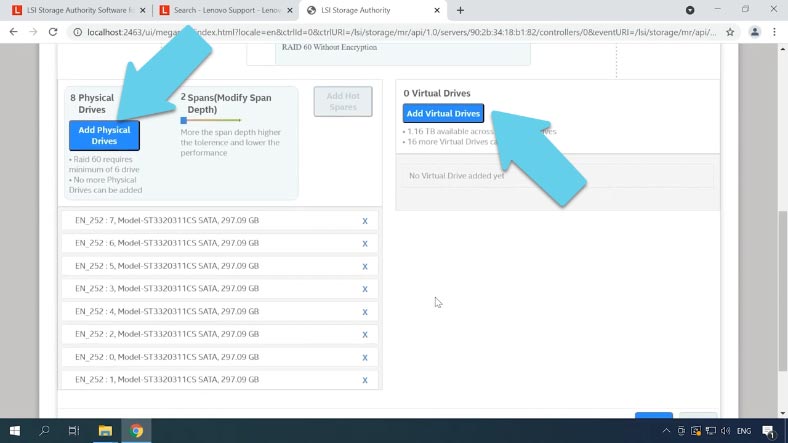
Specify the capacity, name and strip size, then select the initialization method, read and write policy, cache policy and other settings. Then click the button “Add Virtual Drive” and “Finish” to complete the process. After some time, the RAID will be created.
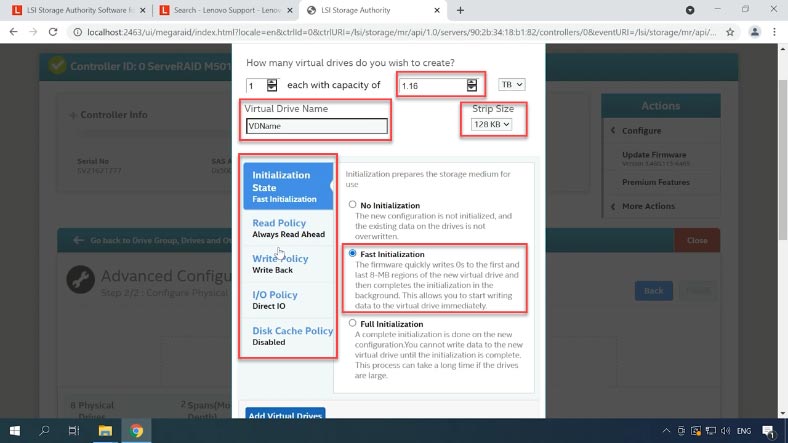
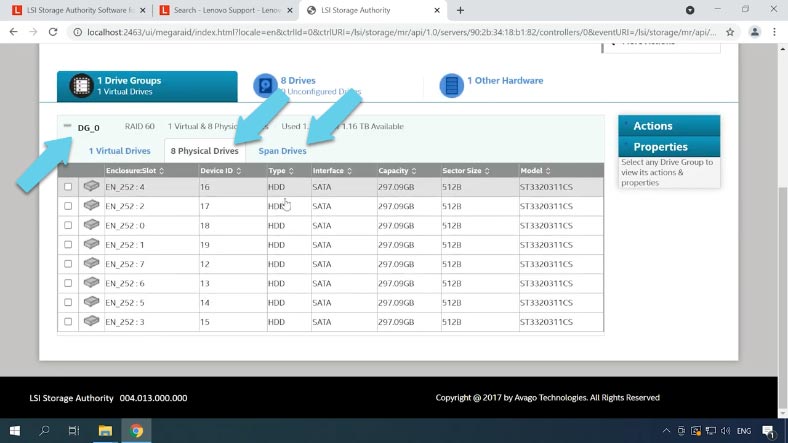
In the tabs, you can see its information, disk status and so on.
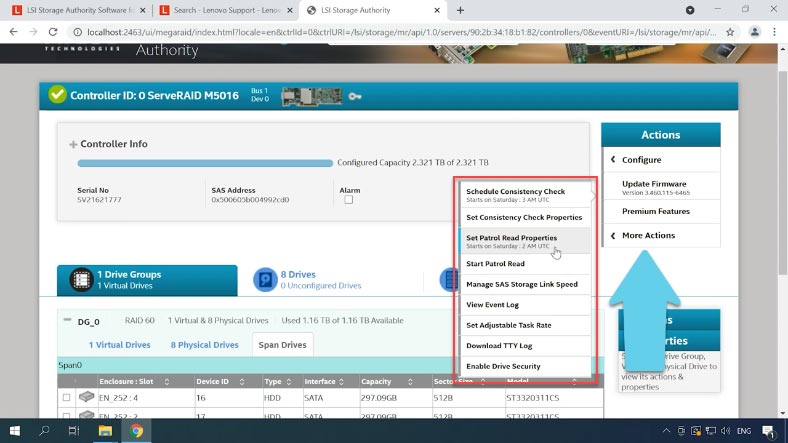
When you click “More Actions,” you’ll be able to schedule a consistency check, configure notifications, add hot swap disks and do many other things.
How to create RAID 6 with the help of storCLI utility
Another way to create a disk array on this type of controller is by using the console-based utility StorCLI.
StorCLI is a command prompt tool that lets you change any settings for LSI/Avago RAID controllers – that is, you can use it for the same things as the LSA utility: Create, modify and manage RAID systems.
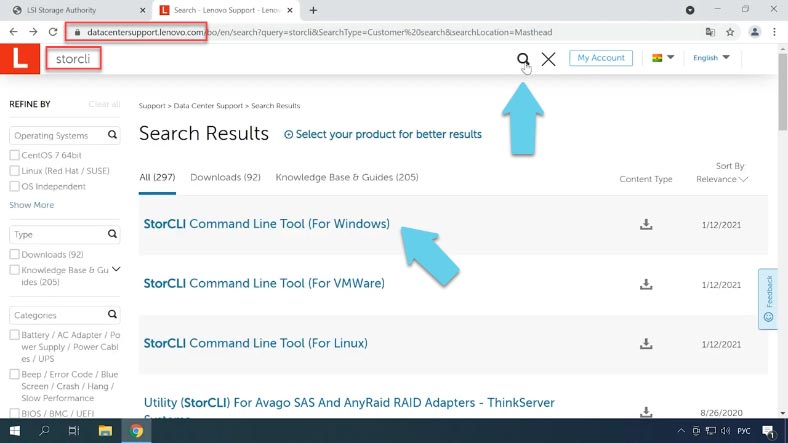
The program can be downloaded from the official website – just type the name in the search field and download the version you need.
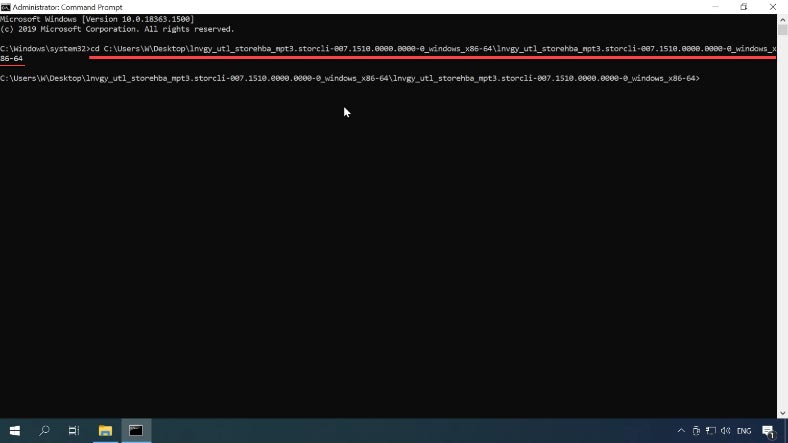
Extract the files from the archive. To start the program, open the Command Prompt as administrator and go to the folder containing the program: do it by typing “cd” and copying the path to the directory that contains the necessary version of this utility.
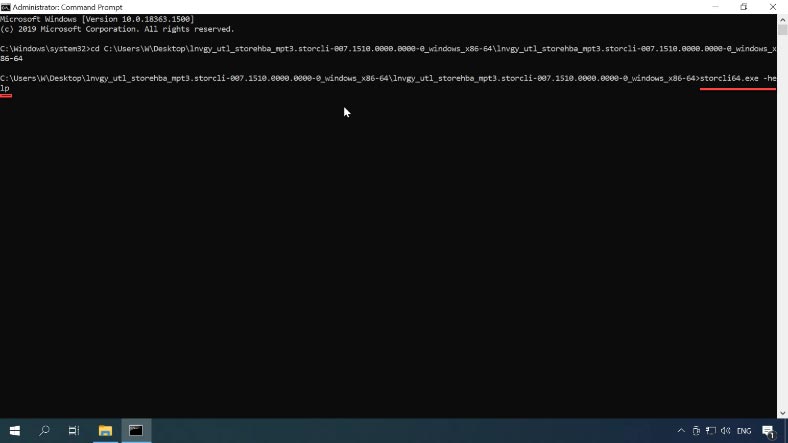
Run the help command to check how the program works:
storcli64.exe –help
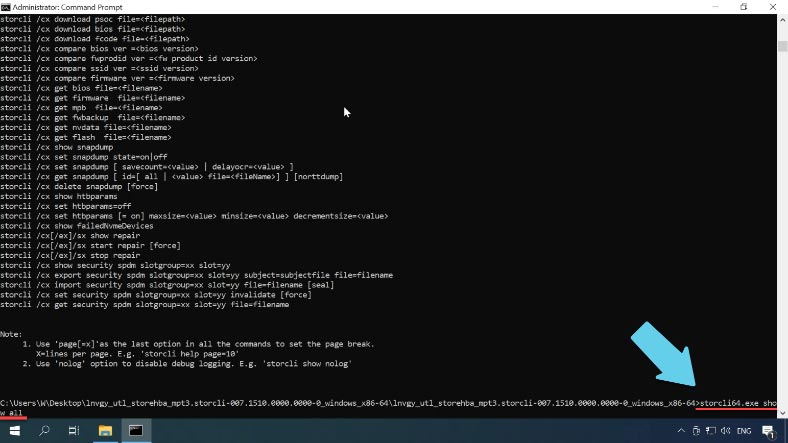
Now we need to make sure that the program can recognize the controller; to display the controller information type the following command:
storcli64.exe show all
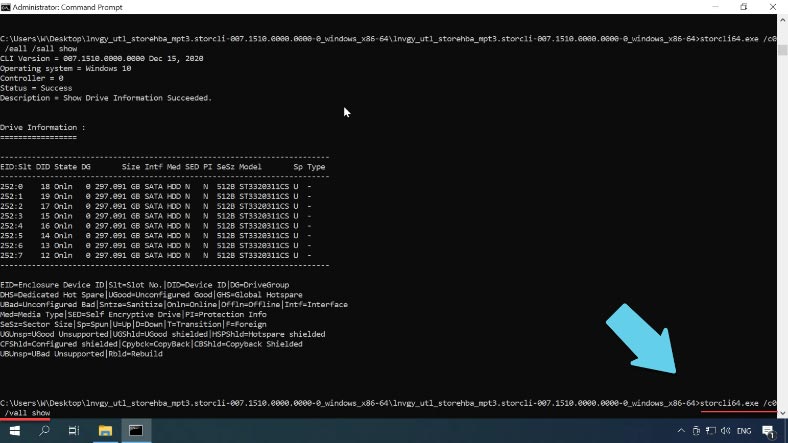
Now, we can view the list of disks connected to this controller, and all you need is one command:
storcli64.exe /c0 /eall /sall show
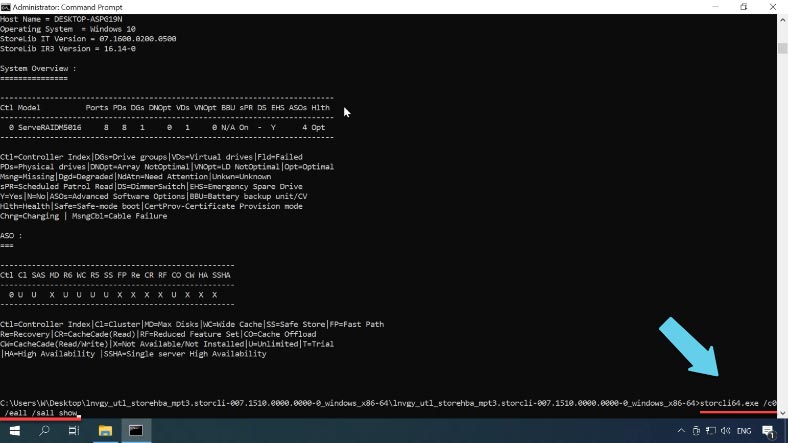
Wich displays their status here.
To make sure they aren’t united into a RAID system, run one more command:
storcli64.exe /c0 /vall show
It displays the information about virtual disks.
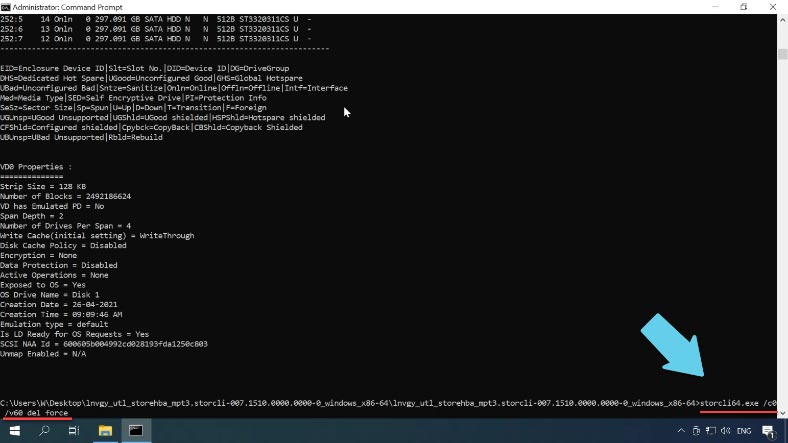
If you add the element “all” at the end of the command, you will see more detailed information, such as the composition of the virtual drive, cache settings, strip size etc.
storcli64.exe /c0 /vall show all
To remove a virtual disk, type this command:
storcli64.exe /c0 /v60 del force
where v60 is the name of the virtual disk.
To make sure that the RAID system has been removed, run the command to display virtual disks one more time:
storcli64.exe /c0 /vall show
Now that the array which we don’t need is removed, let’s start building a RAID60 system.
To set the ball rolling, type this command:
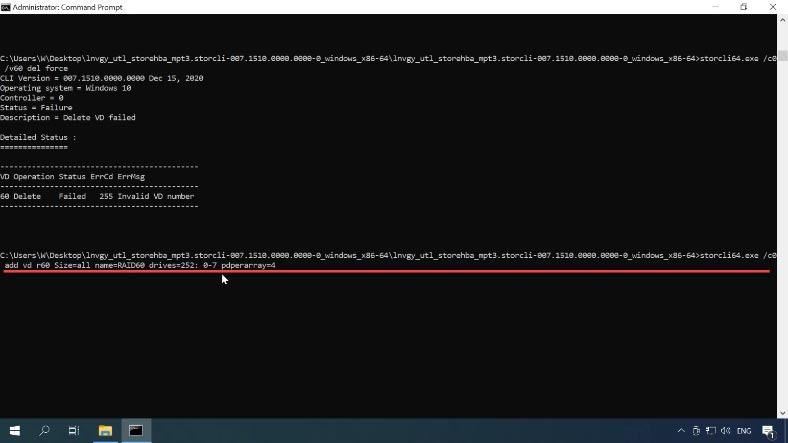
storcli64.exe /c0 add vd r60 Size=all name=RAID60 drives=252: 0-7pdperarray=4 pdcache=on direct wt nora strip=128
or
storcli64.exe /c0 add vd r60 Size=all name=RAID60 drives=252: 0-7 pdperarray=4
where:
vd is the virtual disk to be created
r sets the array level
size sets the space to be used, and I selected all the free space.
name is used to assign a name to this array
drives indicates the drives to be used in building this RAID system, and in my case, it is from 0 to 7, a total of 8 drives.
pdperarray determines the number of physical disks per one array; in my case with RAID60, I set two groups of 4 disks each.
This information is sufficient to create the array. You can add some advanced settings if necessary:
Enable write caching for the disks – pdcache (and specify on/off).
WT read and write policy, NRA, strip size and so on, otherwise these advanced settings will have default options.
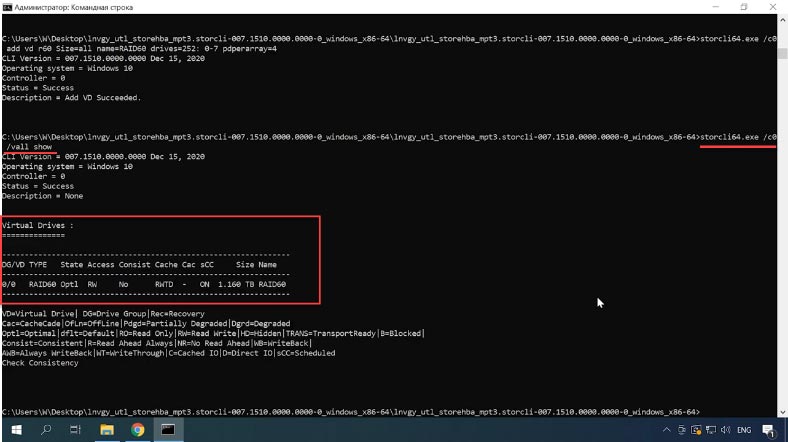
Now check the information on the virtual disk: as you can see, the array has been created successfully, and you can use the previously described utility to manage it.
How to create RAID60 with the controller’s webBIOS
One more way to build a RAID system on an LSI controller involves using the controller’s webBIOS. To access it, press the corresponding key shortcut while the computer is booting: in my case, this is Ctrl+H. If this operation doesn’t boot webBIOS, but the operating system is booting instead, then try again, but before that, disable the boot disk in the BIOS of your motherboard.

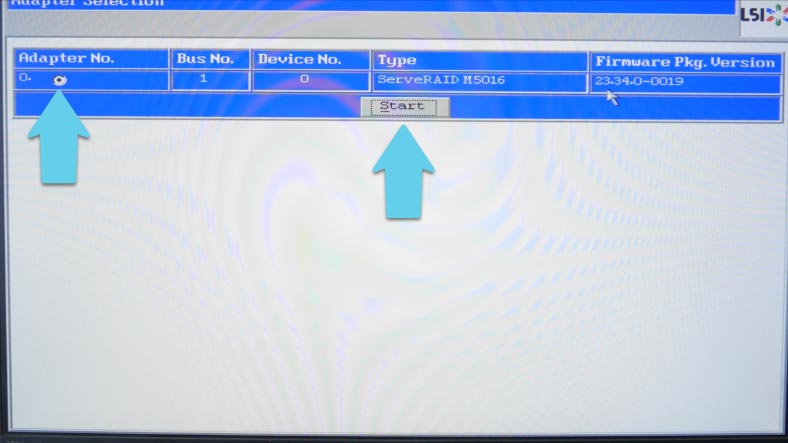
The first screen will show you the list of detected controllers (if you have more than one), select the controller you want to use and click "Start".
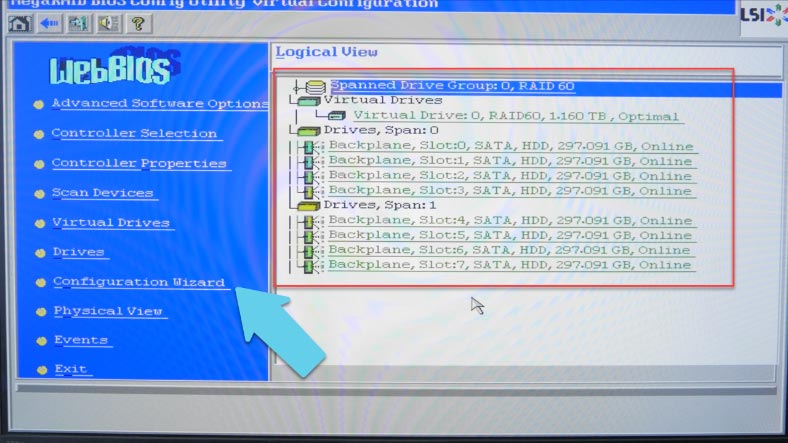
In the next window, you’ll see all drives connected to the controller. To build a RAID system, open the line Configuration Wizard.
If you used to have an array made of these drives, the system will warn you that it is going to be lost
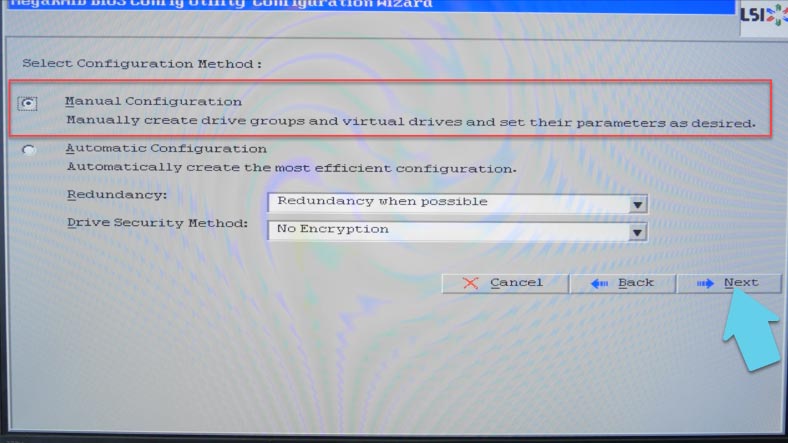
Click “Yes” to confirm. Now choose “Manual configuration” and click “Next”.
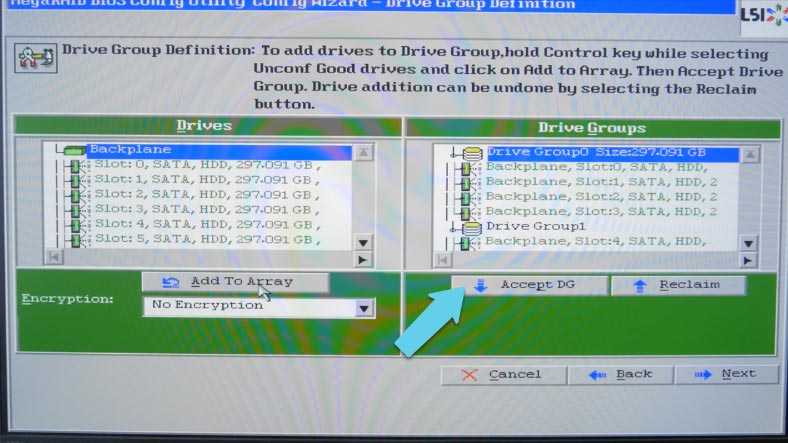
At the next stage, select the drives for the future array, and click “Add to Array”.
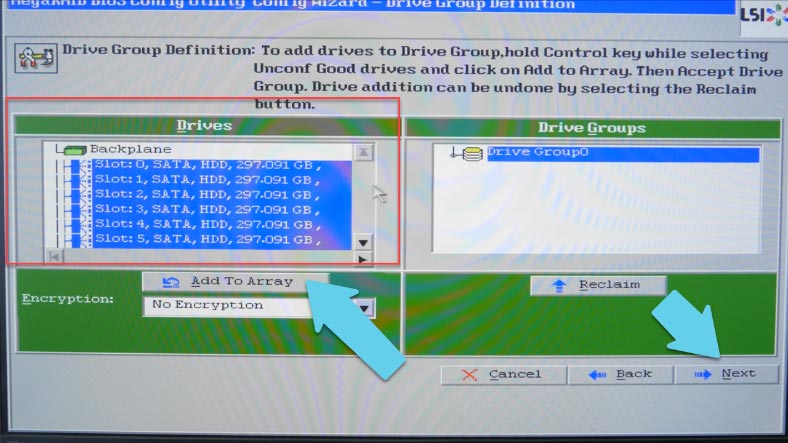
If you select all drives and add them into a group, you’ll be able to create RAID 6, 5, 1 or 0. In order to have RAID 10, 50 or 60 you have to create several groups of drives, as such array types are based on using groups of drives rather than individual drives. In my case, the plan is to create a RAID 60 system consisting of 8 drives, so I select the first 4 drives, and then click Add and Accept DG (DG stands for Drive Group). After that, I select the remaining 4 drives, click Add and Accept DG, then click “Next.”
In the next window, click “Add to SPAN,” add the drive groups we have just created, and click “Next” to continue.
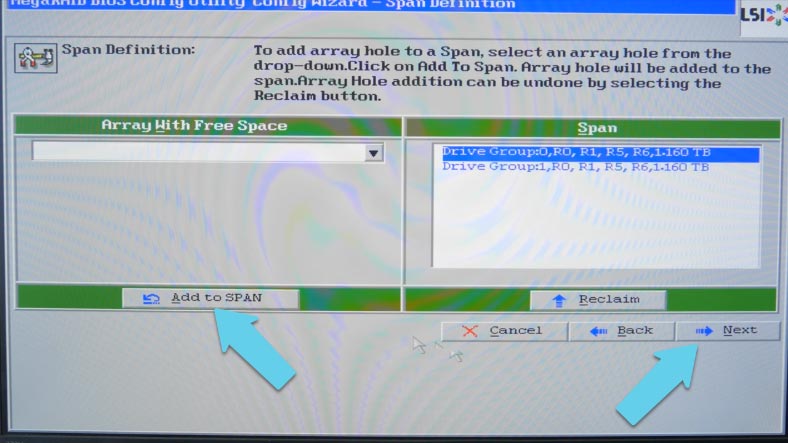
Now you can see what RAID levels are available: 60, 50, 10 and 00, so select the necessary one from this list.
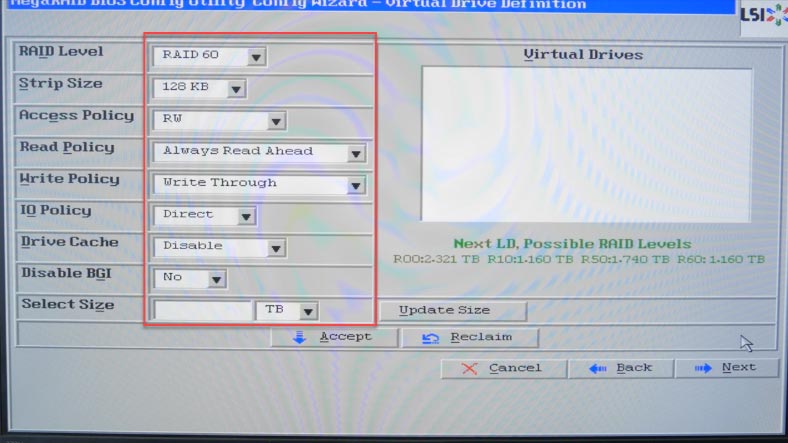
If necessary, you can modify other settings, such as strip size, read and write policy, and so on. In the end, set the size of the future array - I select all available capacity. Then click “Accept” to confirm your decision, and then “Yes”. Click “Next”, then “Accept” again, and then “Yes” to save the configuration.
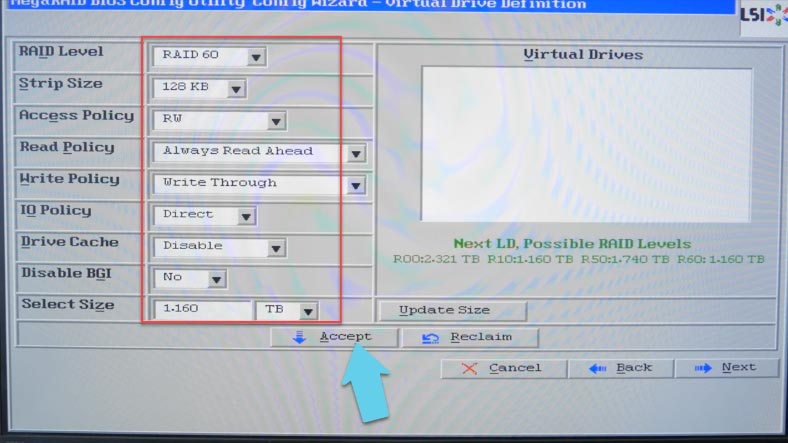
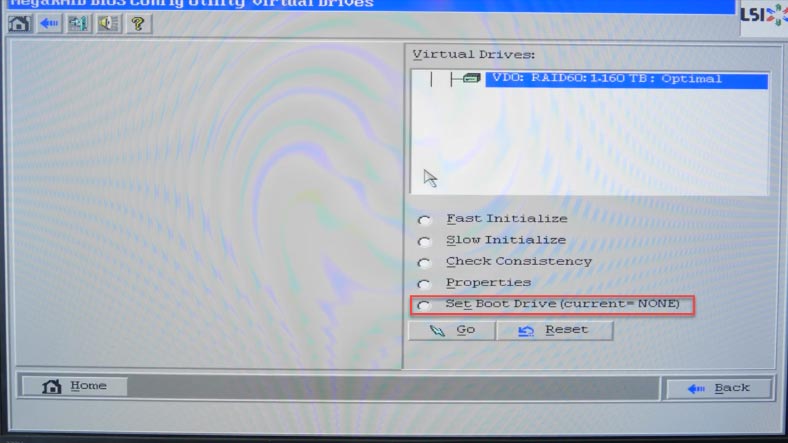
The program will warn you that all data will be lost, and ask you to confirm the start of initialization. Click “Yes” to agree. Go back to the main menu and restart the computer. If you want to boot from this device, don’t forget to check the box next to “Set Boot Drive”.
If the whole system is supposed to boot from another disk which was disabled before starting the controller’s web BIOS, open the BIOS of your motherboard and enable that disk again.
After the operating system boots, you should format the array in the Disk Management, so that it will appear in Windows Explorer. Create a new volume and wait until the format operation is complete. Now it is displayed in the Explorer window properly.
Read the full article with all additional video tutorials. Also visit our Youtube channel, there are over 400 video tutorials.


The World Redundant Array of Independent Disks (RAID Market Research Report 2024 (covering USA, Europe, China, Japan, India, South East Asia and etc), is an informative market report offered by DecisionDatabases.com.
Redundant Array of Independent Disks (RAID) market research report provides the newest industry data and industry future trends, allowing you to identify the products and end users driving Revenue growth and profitability.The industry report lists the leading competitors and provides the insights strategic industry Analysis of the key factors influencing the market.The report includes the forecasts, Analysis and discussion of important industry trends, market size, market share estimates and profiles of the leading industry Players.Final Report will cover the impact of COVID-19 on this industry.Access Full Report with Table of Contents @ https://www.decisiondatabases.com/ip/45250-world-redundant-array-of-independent-disks-raid-market-reportThe Players mentioned in our reportBroadcom(Avago Technologies)IntelFujitsuHPIBMLenovoMicrosemiSupermicroAreca Technology CorporationDellGlobal Redundant Array of Independent Disks (RAID) Market: Product Segment AnalysisHardware RAID CardSoftware RAID CardGlobal Redundant Array of Independent Disks (RAID) Market: Application Segment AnalysisInternet IndustryService IndustryManufacturing IndustryFinancialGovernmentGlobal Redundant Array of Independent Disks (RAID) Market: Regional Segment AnalysisUSAEuropeJapanChinaIndiaSouth East AsiaDownload Free Sample Report of World Redundant Array of Independent Disks (RAID Market @ https://www.decisiondatabases.com/contact/download-sample-45250There are 10 Chapters to deeply display the World Redundant Array of Independent Disks (RAID) market.Chapter 1 About the Redundant Array of Independent Disks (RAID) IndustryChapter 2 World Market Competition LandscapeChapter 3 World Redundant Array of Independent Disks (RAID) Market shareChapter 4 Supply Chain AnalysisChapter 5 Company ProfilesChapter 6 Globalisation & TradeChapter 7 Distributors and CustomersChapter 8 Import, Export, Consumption and Consumption Value by Major CountriesChapter 9 World Redundant Array of Independent Disks (RAID) Market Forecast through 2024Chapter 10 Key success factors and Market OverviewPurchase full World Redundant Array of Independent Disks (RAID Market Research Report @ https://www.decisiondatabases.com/contact/buy-now-45250Other Reports by DecisionDatabases.com:World Advanced Driver Assist Systems (ADAS) Market Research Report 2025 (Covering USA, EU, China, South East Asia, India, Japan and etc)World Industrial Panel PC Market Research Report 2022 (covering USA, Europe, China, Japan, India, South East Asia and etc)About Us:DecisionDatabases.com is a global business research report provider, enriching decision makers and strategists with qualitative statistics.
DecisionDatabases.com is proficient in providing syndicated research Reports, customized research reports, company profiles and industry databases across multiple domains.Our expert research analysts have been trained to map client’s research requirements to the correct research resource leading to a distinctive edge over its competitors.
We provide intellectual, precise and meaningful data at a lightning speed.For More Details:DecisionDatabases.comE-Mail: [email protected]: +91 9028057900Web: https://www.decisiondatabases.com

The latest trending report Global Redundant Array of Independent Disks (RAID) Market 2020 by Manufacturers, Regions, Type and Application, Forecast to 2025 offered by DecisionDatabases.com is an informative study covering the market with detailed analysis.
The report will assist reader with better understanding and decision making.The global Redundant Array of Independent Disks (RAID) market size is expected to gain market growth in the forecast period of 2020 to 2025, with a CAGR of 4.6% in the forecast period of 2020 to 2025 and will expected to reach USD 5929.7 million by 2025, from USD 4954.7 million in 2019.The Redundant Array of Independent Disks (RAID) market report provides a detailed analysis of global market size, regional and country-level market size, segmentation market growth, market share, competitive Landscape, sales analysis, impact of domestic and global market players, value chain optimization, trade regulations, recent developments, opportunities analysis, strategic market growth analysis, product launches, area marketplace expanding, and technological innovations.Final Report will cover the impact of COVID-19 on this industry.Browse the complete report and table of contents @ https://www.decisiondatabases.com/ip/14126-redundant-array-of-independent-disks-raid-market-analysis-reportThe major players covered in Redundant Array of Independent Disks (RAID) are:Broadcom(Avago Technologies)Microchip TechnologyFujitsuIntelLenovoDellAreca Technology CorporationIBMHPSupermicroBy Type, Redundant Array of Independent Disks (RAID) market has been segmented intoHardware RAID CardSoftware RAID CardBy Application, Redundant Array of Independent Disks (RAID) has been segmented intoInternet IndustryService IndustryManufacturing IndustryFinancial, GovernmentOthersThe report offers in-depth assessment of the growth and other aspects of the Redundant Array of Independent Disks (RAID) market in important countries (regions), including:North America (United States, Canada and Mexico)Europe (Germany, France, UK, Russia and Italy)Asia-Pacific (China, Japan, Korea, India, Southeast Asia and Australia)South America (Brazil, Argentina, Colombia)Middle East and Africa (Saudi Arabia, UAE, Egypt, Nigeria and South Africa)Download Free Sample Report of Global Redundant Array of Independent Disks (RAID) Market @ https://www.decisiondatabases.com/contact/download-sample-14126The content of the study subjects, includes a total of 15 chapters:Chapter 1, to describe Redundant Array of Independent Disks (RAID) product scope, market overview, market opportunities, market driving force and market risks.Chapter 2, to profile the top manufacturers of Redundant Array of Independent Disks (RAID), with price, sales, revenue and global market share of Redundant Array of Independent Disks (RAID) in 2018 and 2019.Chapter 3, the Redundant Array of Independent Disks (RAID) competitive situation, sales, revenue and global market share of top manufacturers are analyzed emphatically by landscape contrast.Chapter 4, the Redundant Array of Independent Disks (RAID) breakdown data are shown at the regional level, to show the sales, revenue and growth by regions, from 2015 to 2020.Chapter 5, 6, 7, 8 and 9, to break the sales data at the country level, with sales, revenue and market share for key countries in the world, from 2015 to 2020.Chapter 10 and 11, to segment the sales by type and application, with sales market share and growth rate by type, application, from 2015 to 2020.Chapter 12, Redundant Array of Independent Disks (RAID) market forecast, by regions, type and application, with sales and revenue, from 2020 to 2025.Chapter 13, 14 and 15, to describe Redundant Array of Independent Disks (RAID) sales channel, distributors, customers, research findings and conclusion, appendix and data source.Purchase the complete Global Redundant Array of Independent Disks (RAID) Market Research Report @ https://www.decisiondatabases.com/contact/buy-now-14126Other Reports by DecisionDatabases.com:Global Rotating U Disk Market 2020 by Manufacturers, Regions, Type and Application, Forecast to 2025Global External Hard Disk Market 2020 by Manufacturers, Regions, Type and Application, Forecast to 2025Global U Disk Market 2020 by Manufacturers, Regions, Type and Application, Forecast to 2025About-Us:DecisionDatabases.com is a global business research reports provider, enriching decision makers and strategists with qualitative statistics.
DecisionDatabases.com is proficient in providing syndicated research report, customized research reports, company profiles and industry databases across multiple domains.Our expert research analysts have been trained to map client’s research requirements to the correct research resource leading to a distinctive edge over its competitors.
We provide intellectual, precise and meaningful data at a lightning speed.For more details:DecisionDatabases.comE-Mail: [email protected]: +91 9028057900Web: https://www.decisiondatabases.com/


