


Eighteen years of laughter, tears, birthday parties, prom nights, and dates. It will be a big day for every high school student to bid farewell to their high school and start a new chapter of their journey. Being the senior craft teacher of the school, the principal has given me the duty of making invitations for each of them. I feel lucky that she trusted me, and I would give her the best Cricut graduation cards for this event.
Creating attractive and simple invitations is undoubtedly a difficult task, thanks to my Cricut machine, as it will help me finish the craft on time. I can make several easy-to-make projects from Cricut products for this occasion, but my favorite is customized slider cards. In this tutorial, I've shared step-by-step instructions for making this project.
Step 1: First, Open the Cricut App and Create a Design
Start by opening the Cricut app and pressing the New Project button. Next, tick the Upload option and press the Upload Image box. Now, press the Browse icon, select the image from your system library, and save it. Afterward, go to Recent Upload Images, choose your image, and hit the Insert Image button. Following this, separate the layers by pressing Ungroup under the Layers panel.

Then, find the card base in the Layers section and change the fold line to score lines by selecting Score from the Operation section. At the same time, attach the scoreline and card base by selecting the Attach option in the lower right-hand corner. After that, repeat the same steps for the slider piece and four rosette pieces.

Select the Text tool and enter the text into your Cricut graduation cards. After finishing the text, select the whole text and apply a new font, color, size, and style. Now, you must change the line by returning to the Operation section and pressing the PEN option. Besides you can also change the color of your pen depending on your choice.

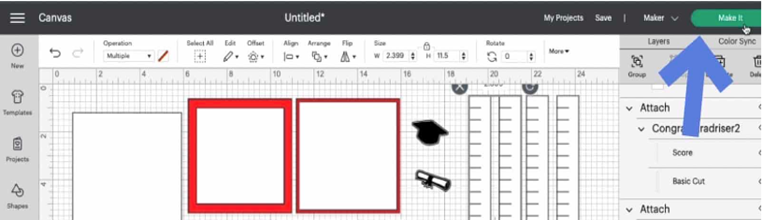
Next, cross-check that the design has been made correctly; if there are any mistakes, then instantly change it. Following this, tap the Make It, which appears blank on the top right-hand side of your canvas.
Step 2: Now, Choose the Material for Your Craft
You will see the mat on the mat preview page and press the Continue option. Also, select your material from the list of your choice and load the tools into the respective Clamps. Use a brayer or scraper tool to stick the material on the cutting mat properly. Then, you must prepare for the final writing and cutting process.

Step 3: Next, Insert the Mat Into Your Cricut Machine
Equally important, tap the Double Arrows button to ensure your cutting mat is in the correct position. When your craft machine starts flashing the C button, it indicates that it's time to cut the material. Please press the button and let it make the Cricut graduation cards without any disturbances. You must repeat the same steps until all the layers have been cut.

Step 4: Lastly, Assemble All the Layers
Following this, weed out all the materials from the Cricut mat with your weeding tool or tweezer. Ensure that you are accurately using the tool without causing any damage to the mat or design. It's time to assemble all the layers and give it the shape of a proper invitation.

Start assembling the card by sticking the diploma and Cricut graduation cards with strong adhesive glue. Keep both pieces aside for a few minutes, and let the glue dry completely. Afterward, fold the rosette pieces from the score lines back and forth or as you wish. Now, add a tiny bit of glue to one of the rosettes and stick the second piece of the same color. Then, add glue to the other end and attach both, making a continuous piece.Just take your time and start folding the rosette flat while gathering all the pleats. Ensure that all the pleats are folded correctly, and it will instantly begin to take its shape. Next, put a small portion of glue in the center and put a diploma or graduation cap on it. Also, set aside the mat and messaging panel. After that, place the yellow mat on the blue base and the sentiment layer on the yellow mat.

Following this, fold the slider piece with the pull tab cutout at first, start with valley fold, mountain fold, and then again valley fold. After doing that, flip the slider and add glue at the bottom of the tab. Flip the pull tab and stick it correctly with the slider, ensuring the edges line up.
Now, you need to add glue on all sides of the slider and attach it to the top of the sentiment layer. Simultaneously, pull up the pull tab and add the rosettes to the raised portion. Once it is done, fold the card base and add the messaging panel on the base. Lastly, complete your Cricut graduation cards by adding the slide to the front of the card base.

That's it! Making this customized project from your cut-die machine will take a few minutes. Moreover, you can also create different crafts for this event, such as dorm moving bags, window signs, cake toppers, car decals, and many more.
Source Url:- cricut graduation cards
Visit here for more Information:- Cricut Design Space,


