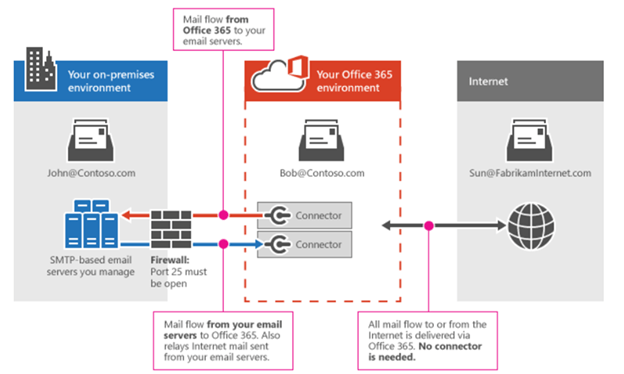
Due to increasing cyberattacks on on-premises Exchange servers, many organizations have either migrated to cloud-based Office 365 or are in the process of doing so. This shift has been witnessed recently due to ransomware attacks on-premises Exchange server by a threat group named HAFNIUM. Although Microsoft releases security updates to counter such attacks, on premises Exchange servers are still vulnerable to various malicious attacks, physical damage, hardware or software failure, etc.
On the other hand, Office 365 or Exchange Online offers better security features. It also provides greater scalability and is more cost-effective in a longer run. In this guide, we help you migrate mailboxes from Exchange on-premises version to Office 365 with step-by-step process.
How to Migrate Exchange from On-Premises to Office 365?
To migrate Exchange on-premises to Office 365, you have five different methods:
- Cutover Migration
- Staged Migration
- Hybrid Deployment
- PST Upload
- EDB to Office 365 Migration Software
The first three methods are specific and do not work with all Exchange versions. In this guide, we will discuss the PST upload method to migrate mailboxes from Exchange 2010, 2013, 2016, or 2019 to Office 365.
To begin with the PST upload method, you need to first export the mailboxes from Exchange on-premises server database (EDB) to PST format. For this, you can use either Exchange Management Shell (EMS) or Exchange Admin Center (EAC).
After exporting the mailboxes from Exchange, you can upload the PST to the mailbox on Office 365. However, this involves multiple steps and may take longer. Also, it requires some level of expertise with Exchange Management Shell and Exchange Admin Center to perform the migration.
To overcome these limitations and migrate Exchange to Office 365 quickly and easily, you can use an Exchange on-premises to Office 365 migration tool, such as Stellar Converter for EDB. The EDB to PST software allows you to extract mailboxes from offline Exchange database file (.edb) and exports them to Office 365 mailboxes directly. It also auto-maps the source and destination mailboxes, which makes your Exchange to Office 365 migration job much easier. It uses parallel processing technique and thus, migrates up to 4 mailboxes simultaneously. This can help you minimize the downtime and quickly restore mailbox connectivity.
Steps to migrate Exchange on-premises to Office 365 via PST method are as follows:
Step 1: Assign Mailbox Import Export Role
To export mailboxes from Exchange on-premises server database to PST, Mailbox Import Export role should be assigned to the user account, which will be used to export the mailboxes via Exchange Admin Center (EAC) or Exchange Management Shell (EMS). The Mailbox Import Export Role is not assigned to any user by default, including Administrator.
The command to assign the Mailbox Import Export role using Exchange Management Shell is as follows:
New-ManagementRoleAssignment –Role "Mailbox Import Export" –User AdminUserName
You can change the AdminUserName with any user name to assign this role.
Step 2: Create Mailbox Export Request to Export Exchange Mailboxes to PST
You may use EAC or EMS to create mailbox export request and export the mailboxes from Exchange database to PST.
The EAC provides a graphical user interface, which makes it easier to export mailboxes to PST at a defined UNC path. However, it offers limited export options and you can’t export multiple mailboxes at once.
With EMS, you can use the New-MailboxExportRequest PowerShell cmdlet with parameters to create batch mailbox export request, add filters, and have more control over mailbox export requests.
To export Exchange mailbox to PST, launch EMS and enter the following command:
New-MailboxExportRequest -Mailbox Nancy.J -FilePath \EXCHSRV\File1.pst
This will create a single mailbox export request.
To create batch export request, enter the following command in the EMS:
$Export = get-mailbox; $Export|%{$_|New-MailboxExportRequest -FilePath \\EXCHSRV\PST\$($_.alias).pst}
To check the status of export request, you can use the Get-MailboxExportRequest cmdlet.
Get-MailboxExportRequest -Name MailboxExport | fl
To know more, consult our article on New-MailboxExportRequest PowerShell cmdlet. This will help you understand various parameters you can use to export mailboxes, including Archive Mailboxes, from Exchange on-premises to PST.
Step 3: Upload Exported PSTs to Office 365
To upload the Exchange mailbox PST file to Office 365, you need to assign the Mailbox Import Export role to the user account that you will use for uploading the PST file(s) to Office 365. The process is same, open the EMS and enter the following command:
New-ManagementRoleAssignment –Role "Mailbox Import Export" –User AdminUserName
Change AdminUserName with the user name to whom you want to assign the role.
Then follow the below steps to upload the Exchange Mailbox PST file to Office 365.
- Open Office 365 and login to Admin Center.
- Navigate to Compliance > Information governance > Import.
- Click Import PST Files > New Import Job and then provide a name. Click ‘’
- Click Upload Your Data > Next and then click Show Network Upload SAS URL. Copy this SAS URL anywhere, such as Notepad.
- Now download, install, and launch the Azure Storage Explorer tool on your system.
- Right-click on Storage Accounts and choose Connect Azure storage…
- Choose the Use a shared access signature (SAS) URI and click ‘Next.’
- Now paste that SAS URI from Notepad to the URI section and click Next > Connect
- Click ‘Upload > Upload Files…’
- Click the … icon and choose the Exchange Mailbox PST file that you’ve exported via EAC or EMS.
- Choose a Destination directory on your Office 365 storage and click ‘’ This will save the PST file from your local system to Office 365 directory.
- Now create a CSV file using MS Excel (refer to the screenshot below). This CSV file is used to map the uploaded PST file to the desired Office 365 mailbox account. Thus, ensure all details are correct.
- Now go back to the Import data screen, enable or check both options and click Next.
- Then click Select Mapping file to upload the CSV file. To verify, click Validate and then click Save.
- Once done, click ‘Close’ and then ‘Refresh.’
- Right-click or use double-click to open the job details and then click the ‘Import to Office 365’ button.
- Choose ‘No, I want to import everything’ and then click ‘Next.’
- Click ‘Import data’ to complete the PST import process.
This completes the mailbox migration from Exchange on-premises version to Office 365. Repeat the steps to import more mailboxes or upload all PST files at once and create a CSV file with all mailbox details to migrate PST mailboxes in bulk.
For more help or queries, reach us via comments down below.


The home office trend is the current driver because cloud-based collaboration applications such as Microsoft Teams are used extensively.Engage Executives to Convey the Goals & Business Benefits of MigrationIn the case of a planned migration from SharePoint On-Premises to Office 365, a thorough assessment of the initial situation with subsequent planning usually takes place at the start.
By providing users with comprehensive information about the project at an early stage, acceptance is achieved right from the start and potential resistance is taken out of the sails.
Finally, with a governance plan for SharePoint, goals can be clearly defined and their implementation stipulated and fulfilled on a permanent basis.Specialized Migration Tools Can Do More Than Microsoft AppsCode Creators Inc. is the leading provider of professional SharePoint migration solutions.
The company specializes in modern workplace solutions such as Office 365 and is certified as an Azure Architect, Azure Administrator, and Team Administrator.The most important question of migration is how to transfer the data easily and without errors from the on-premises infrastructure to Office 365.
The range of functions varies greatly depending on the manufacturer.It should be noted that in such projects there is usually more than just sites and documents to move.
For this reason, migration tools that support the full range of SharePoint workloads are recommended.SaaS Solutions Make Extra Infrastructure UnnecessaryWith SharePoint migrations, more than just sites and documents have to be moved, often mailboxes and workflows as well.Another decision criterion is the delivery platform.


We provide office 365 migration services to migrate your contact data from your existing messaging environment to Office 365.
Call 1.888.820.8548 to know more.

Whenever a new version of SharePoint is released upgrading from a previous version is not as simple as running a quick background software update.
There are lots of advantages for SharePoint online compared to Sharepoint on premises, but the best reason is probably the fact that this will be the last SharePoint migration that you will need to do since Microsoft will take care of the updates in the future.
Once the users are migrated you will still have to purchase office 365 licensing for them and assign to the users.